Vocal Tune Studio User Interface Pitch and Time Mode (Phone)
Due to the phone's smaller screen, Vocal Tune Studio's interface on a phone contains all of the same elements as the tablet interface but not all parameters can be displayed onscreen at the same time. As such, the full options are contained across three alternate views. Most controls remain onscreen in all three views but there are some controls unique to each view. It is also especially important to remember when using a phone screen that you can zoom in and out of the notes on the piano roll using pinch/pull with two fingers. This will allow you to be as precise with your edits as required despite the smaller screen. This section will guide you through the full interface as displayed on a phone.
The important thing to be aware of straight away is how to access each of the three views*. The first view is the default view Vocal Tune Studio will open with. The second and third views contain the parameters for how the retuning is applied within Vocal Tune Studio and are made available by selecting a note or notes. This can be done by tapping once on an individual note, long pressing, holding and moving right or left to select multiple notes or by pressing the Select all button ![]() . Selected notes will turn from yellow to orange on the piano roll grid. Selecting a note, or notes, will open the second view. To move back and forth between the second view and the third view*, simply use the Interface toggle button
. Selected notes will turn from yellow to orange on the piano roll grid. Selecting a note, or notes, will open the second view. To move back and forth between the second view and the third view*, simply use the Interface toggle button ![]() which is available in both views. To move back to the first view, deselect all notes by tapping once in any empty area of the piano roll.
which is available in both views. To move back to the first view, deselect all notes by tapping once in any empty area of the piano roll.
To jump to the Second and Third view definitions please use the links provided.
* There are actually four views in Start without pitch correction mode as the additional Pitch Quantization parameter becomes available on view two, meaning the Volume parameter is on its own on a third view and the artificial vibrato parameters are on a fourth view.
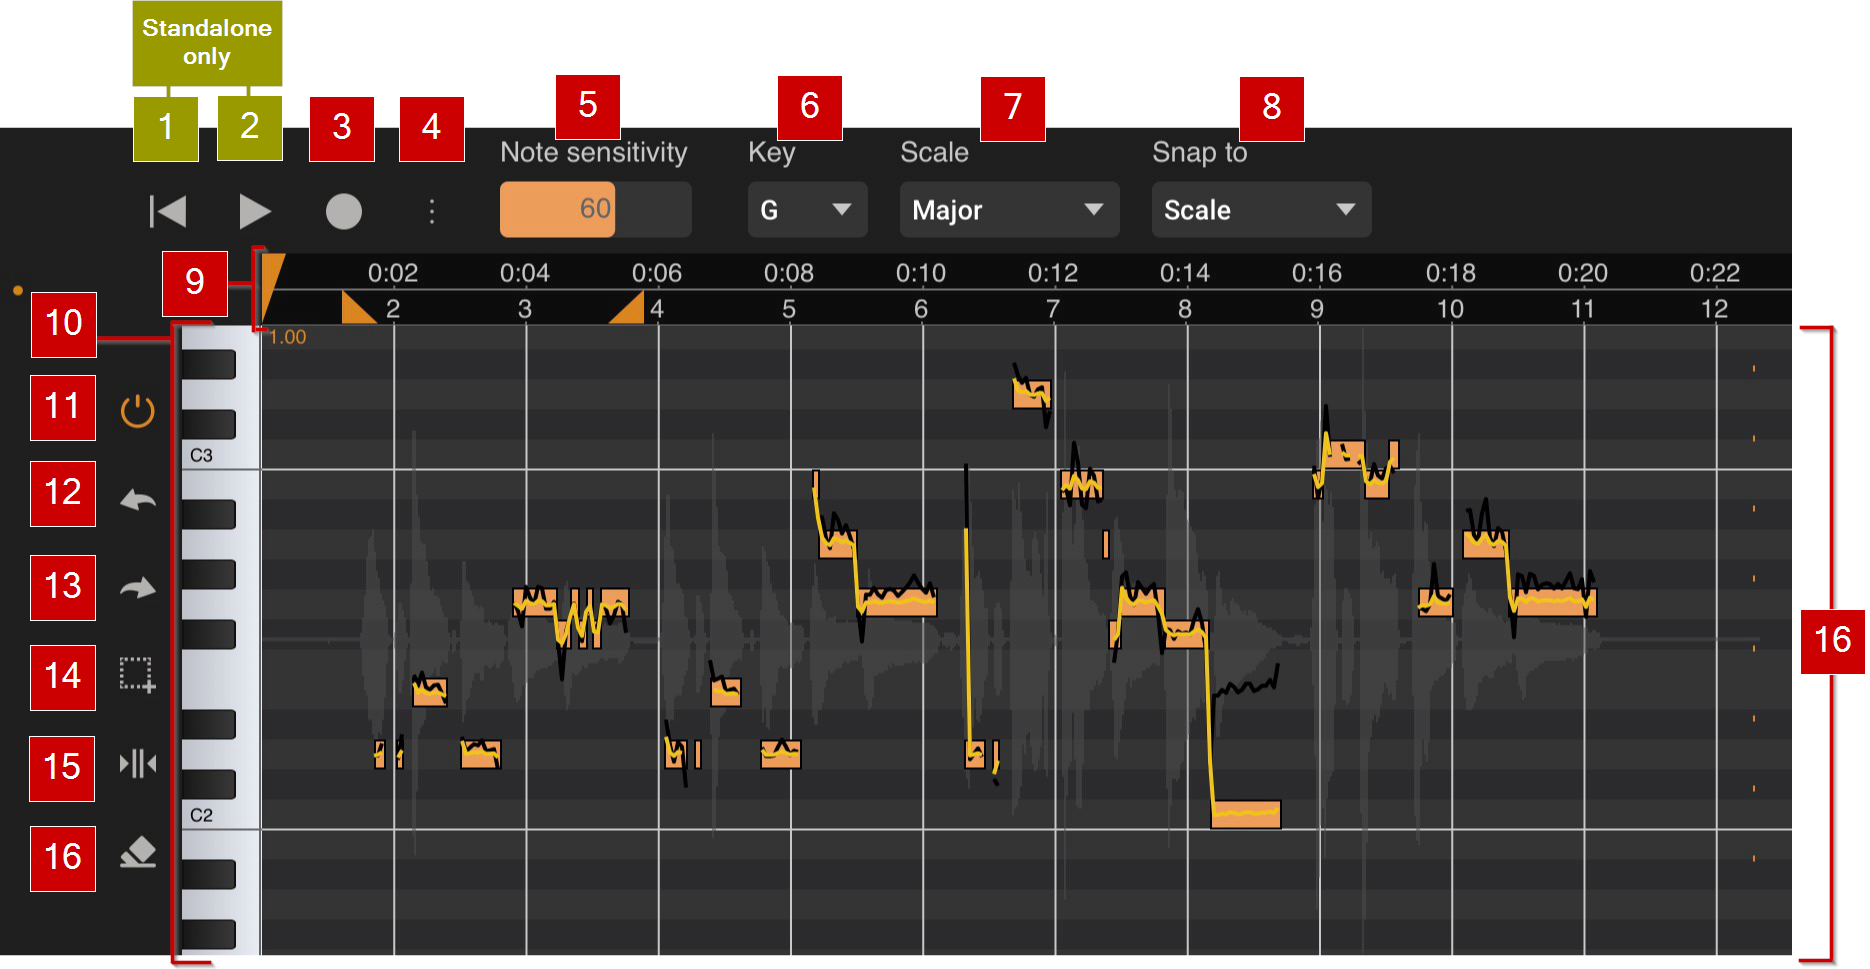
This is the default view, the one which Vocal Tune Studio will open to after analyzing your audio. Most of the controls you see in this view remain onscreen in all views, with only the parameters along the top being different in views two and three, becoming available once one or more notes have been selected.
1 Return Time Marker to beginning button ![]() (standalone version only). You can manually place the Time Marker (the orange marker
(standalone version only). You can manually place the Time Marker (the orange marker ![]() in the Timeline) at any place you would like to start playback from when you press Play in the standalone version. Pressing this button will return the Time Marker to the very beginning.
in the Timeline) at any place you would like to start playback from when you press Play in the standalone version. Pressing this button will return the Time Marker to the very beginning.
2 Play button ![]() (standalone version only). Pressing this will start playback from the position of the Time Marker in the standalone version. The Play button becomes a Stop button once playback has started. Stopping playback and pressing the Play button again will once more start playback from the position of the Time Marker.
(standalone version only). Pressing this will start playback from the position of the Time Marker in the standalone version. The Play button becomes a Stop button once playback has started. Stopping playback and pressing the Play button again will once more start playback from the position of the Time Marker.
NOTE. Buttons 1 and 2 are not present in the AUv3 plugin user interface as their functions are handled by the host application.
3 Record button ![]() .
.
Standalone mode. In standalone mode, pressing this button will start recording audio into Vocal Tune Studio from your device microphone (or connected USB microphone or audio interface). Please note that you can also import your previously recorded vocal performance into Vocal Tune Studio standalone via the Three Dot Button options. Please be aware that Vocal Tune Studio standalone version can only contain one audio file/recording at a time so pressing the Record ![]() button again once audio is present will open a pop-up dialog asking you to confirm that you want to continue given that the current audio would be lost. Further details about using the Vocal Tune Studio standalone version can be found here.
button again once audio is present will open a pop-up dialog asking you to confirm that you want to continue given that the current audio would be lost. Further details about using the Vocal Tune Studio standalone version can be found here.
AUv3 Plug-in. Vocal Tune Studio needs direct access to the audio in order to be able to carry out the processing it does. This is not possible within the usual framework for AUv3 effects, which cannot directly access the audio on a host's track. As such, the Vocal Tune Studio AUv3 plug-in requires you to first record the audio present on its host track into the plug-in so that it can have direct access to the audio. In the Vocal Tune Studio AUv3 plugin in, pressing this Record button arms Vocal Tune Studio's record function. It will start recording when you press Play (not Record) in your host application. Audio present on the track upon which Vocal Tune Studio is loaded as an AUv3 effect will be recorded into Vocal Tune Studio as long as the host playback continues. Stop recording by either stopping playback in the host or by pressing this Record button in the Vocal Tune Studio interface again. Once your audio is recorded into Vocal Tune Studio, it is analyzed and you can then fully utilize all of Vocal Tune Studio's many features. Further details about using the Vocal Tune Studio AUv3 version can be found here and specific details regarding its use within popular AUv3 host apps can be found here.
4 Three Dot Button/Options ![]() . Pressing the Three Dot Button opens a drop-down list of options as follows.
. Pressing the Three Dot Button opens a drop-down list of options as follows.
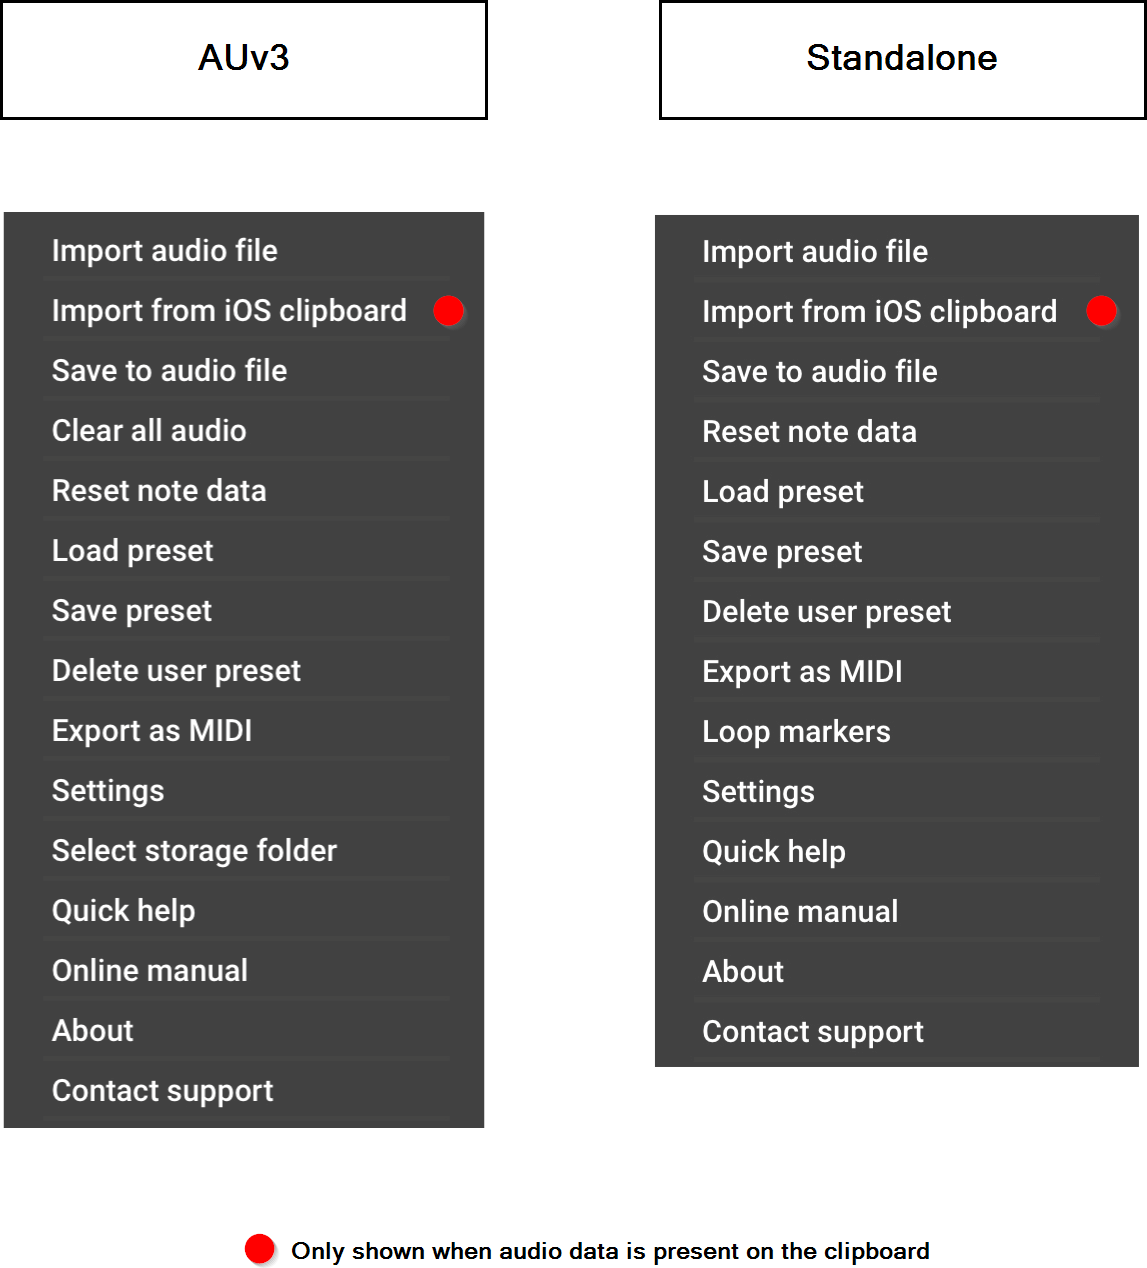
- Import audio file Selecting this option will allow you to import the audio recording of a previously recorded vocal performance you'd like to correct into Vocal Tune Studio. Though this is possible in both the standalone and AUv3 plug-in versions it is strongly recommended that you do not use this option within the AUv3 plug-in but rather record/capture audio present on the host track into Vocal Tune Studio as this ensures there is a proper relationship between the host and Vocal Tune Studio AUv3 (for more details on this, please see here). Please be aware of the best practice advice given here when making a recording for use in Vocal Tune Studio. Pressing this will open the Files app, allowing you to locate the file you'd like to import on your device. Once located, tap on the file to import it into Vocal Tune Studio. Please be aware that Vocal Tune Studio standalone version can only contain one audio file or recording at a time so pressing this option once a file is loaded, or pressing the Record
 button, will open a pop-up dialog asking you to confirm that you want to continue given that the current audio would be lost.
- Import from iOS clipboard Pressing this will import any audio file which is currently copied to the internal iOS clipboard into Vocal Tune Studio. Please be aware that, as stated above and here, though possible, this is not the recommended way to use the AUv3 Vocal Tune Studio plug-in. Please note that if no audio file is currently present on the clipboard, this option will not be shown in this list.
- Save to audio file Selecting this will render the audio within Vocal Tune Studio, including any corrections you've made to either pitch or time, to a FLAC audio file. Pressing this will open the system browser, allowing you to choose the location you'd like the resulting file to be saved to on your device. This option is available within the AUv3 plug-in as well as in the standalone version but obviously when using the AUv3 plug-in, you can also use the host application to export/mixdown the audio from the track upon which Vocal Tune Studio is loaded as an effect.
- Clear all audio (AUv3 plug-in only) This option will remove all audio currently held within the Vocal Tune Studio AUv3 plug-in. You will be shown a confirmation dialog before this action is carried out as it cannot be undone.
- Reset note data Selecting this option will remove all edits and changes you have made within Vocal Tune Studio (including any timing changes) and return everything back to the state it was in after Vocal Tune Studio had carried out its initial analysis of the audio signal. This action cannot be undone so please use with caution. You will be shown a confirmation dialog before this is carried out.
- Load preset... Select this to load a preset into Vocal Tune Studio. There are four factory presets which you can load if desired:
Default Vocal Tune Studio's default parameter settings.
No correction This preset gives you just the original audio without any retuning applied. Notes are still identified on the piano roll but, as you will see, the yellow retuned waveform has not actually been returned to pull the audio within those identified notes, but instead follows the exact same line as the original audio pitch represented by the black waveform (which, in this case is obscured by the yellow waveform on top of it.
Smooth This preset gives a longer Retune Time and a lower Retune Amount than the default settings.
Robotic This preset has a zero millisecond Retune Time and a 100% Retune Amount resulting in unnatural immediate retuning which is exact and retains none of the pitch fluctuations present in the original (the yellow retuned pitch waveform, as you'll see, is a perfect straight line in the middle of each note).
Any user presets you create and save will also appear in this list, ready for you to load.
- Save preset... Select this to save your own Vocal Tune Studio preset. Vocal Tune Studio presets store the parameter settings for how it applies retuning to the detected notes within audio - parameters 19 to 27. As such, you need to have at least one note selected on the piano roll before saving its settings for those parameters as a preset. Please be sure to select a note which uses the parameters you want to save as a preset if you have many different variations of settings for individual notes within your current audio. You will be given the option to select 'New user preset...' or one of your existing presets which will prompt an 'Overwrite existing preset?' confirmation dialog.
- Delete user preset... Select this to choose any user presets you'd like to delete. You will be shown a confirmation dialog before anything is actually deleted.
- Remove pitch correction Selecting this will completely remove every and any effect Vocal Tune Studio has had on your audio clip, close its interface and return you to the Audio Evolution Mobile Arranger Screen. This action cannot be undone so please use with caution. You will be shown a confirmation dialog before this is carried out.
- Export as MIDI The pitches in your audio are represented by 'MIDI notes' on the grid but they are not actually MIDI notes, it is just sensible for them to be shown in this way. It is, though, possible to export those notes as actual MIDI data using this option. Selecting Export as MIDI will export the 'MIDI notes' in Vocal Tune Studio to your device storage. Pressing this will open the Files app, allowing you to name and choose the location for the MIDI file to be saved to. This feature can be really useful for a speedy workflow if, for example, you want to have a virtual instrument play the same melodic line as the vocals being sung. Alternatively, it could even be used to transcribe from audio to MIDI if you've recorded yourself singing a musical idea you've had.
- Loop markers (Standalone version only) Selecting this will show/hide the Loop Markers
 and activate/deactivate looping mode in the standalone version. The loop markers can be freely positioned as required.
NOTE. Loop markers are not available in the AUv3 version of Vocal Tune Studio as this functionality is controlled by the host application.
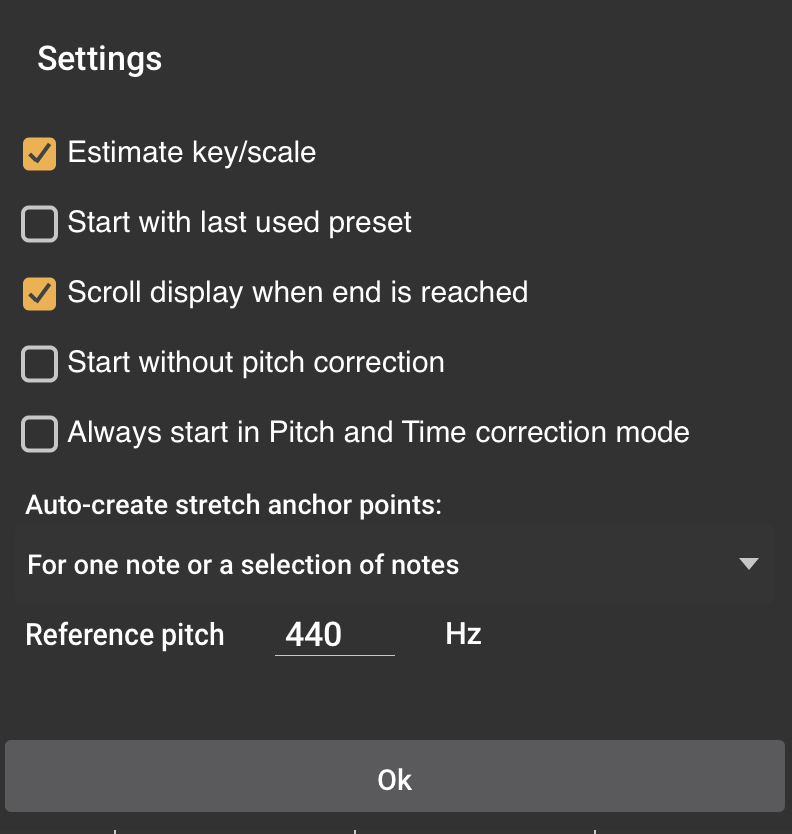
Estimate key/scale Vocal Tune Studio works best when you know the key and scale your vocal has been sung in and it is advisable to try to know this whenever possible. Vocal Tune Studio will, by default, analyze the audio, identify pitches present and, from that, estimate the key and scale which has been used. Vocal Tune Studio needs a good number of notes to be sung for it to be able to analyze the pitches present and estimate the key and scale so if this estimation is inaccurate, you can always select the correct key/scale yourself. If Vocal Tune Studio cannot identify a key and scale at all it will open in Chromatic (all notes present within the chromatic set of pitches) mode, placing all identified notes at the closest pitch within the chromatic set to which it conforms rather than shifting any of them so they are within a particular scale.
It is possible, though, that you prefer this workflow of having Vocal Tune Studio open your audio in chromatic mode as it means, for example, that any accidental notes (notes which are deliberately used but are not within the given key and scale) will be placed in their correct position rather than initially being snapped to the closest note within the estimated scale, requiring you to change the Snap to setting and reposition the accidental notes yourself. Or maybe you'd rather just work in chromatic mode rather than bothering yourself with keys and scales?
If you would prefer Vocal Tune Studio to open and place notes on the grid in chromatic mode rather than estimating the key and scale, deselect this option in the settings.
Start with last used preset Selecting this option will automatically launch Vocal Tune Studio using your last used preset when you next use it after selecting this option.
Scroll display when end is reached This option is enable by default. If you would rather the display did not automatically scroll during playback, deselect this option.
Start without pitch correction Selecting this option opens Vocal Tune Studio's Pitch and Time mode in its alternative mode. In this mode no pitch correction is initially applied and an extra retuning parameter becomes available on the interface - Pitch Quantization ![]() - between Retune Amount and Volume. This parameter allows you to set the target pitch for the retuning of a selected note or notes for occasions where you don't want the target to be fully quantized to the exact frequency of the nearest note within the key and scale. More details about this mode can be found in the definition for 20* and in the section here.
- between Retune Amount and Volume. This parameter allows you to set the target pitch for the retuning of a selected note or notes for occasions where you don't want the target to be fully quantized to the exact frequency of the nearest note within the key and scale. More details about this mode can be found in the definition for 20* and in the section here.
Always start in Pitch and Time correction mode Selection this option will automatically start Vocal Tune Studio in Pitch and Time mode rather than asking you which mode you'd like it to load in. As such, when this option is selected, the initial dialog you are usually shown when Vocal Tune Studio launches will not be shown.
Auto-create stretch anchor points This option allows you to select the way Vocal Tune Studio will auto-create anchor/stretch points for time stretching within its Pitch and Time mode. The drop-down list gives you three options: None, For one note or a selection of notes (default) and For a group or selection of notes. Full details on these modes and time stretching in Pitch and Time mode can be found in the section here.
Reference pitch By default, Vocal Tune Studio uses the western 'Concert pitch' standard of 440Hz for its pitch identification/quantization. This means that the note A above middle C on a piano keyboard will have a frequency of 440Hz and all other notes will be tuned accordingly from that precise value. This setting option allows you to alter the defined frequency for the A above middle C, therefore allowing Vocal Tune Studio to work with non standard tuning models.
- Select storage folder (AUv3 version only) As noted in the First Use Setup section here, the AUv3 version of Vocal Tune Studio needs you to specify where you would like it to store the files it creates when you record into it. This enables it to directly access and process the audio in a way not typically available to AUv3 effect apps. This option allows you to change the location on your device where such files are stored. You can create your own folder specifically for Vocal Tune Studio AUv3 (recommended) or navigate to an existing folder using the device Files app which will open when this option is selected. If you want, you can choose the 'Vocal Tune Studio' folder automatically created by the standalone app when it is first launched however it is really important to be aware that, just as with all iOS applications, folders created automatically by an app will be deleted, including all user data when the app is uninstalled. As such, the Vocal Tune Studio folder created by the standalone app will be deleted if you uninstall the app. This will mean that, if you chose it as the storage location for the AUv3 plug-in, instances of Vocal Tune Studio AUv3 saved within host projects will not be able to access their saved data should you reinstall and launch those projects. Therefore, if you choose the Vocal Tune Studio folder created by the standalone app, please be sure to backup the Vocal Tune Studio folder BEFORE you uninstall the app so that you can copy files back into the newly created Vocal Tune Studio folder when the app is reinstalled. If you create your own folder specifically for the AUv3 plugin though (using the create new folder button in the Files app
 ), it will not be deleted if the app is uninstalled as it was created by you and not automatically generated by the app itself. As such, this is the recommended option. Remember to navigate to and select that folder again when you reinstall the app.
NOTE. Please do ensure that you do not create a new folder within an existing folder created automatically by any app as then you would run into the same deletion problem should that app be uninstalled. Create a new folder in the On My iPAD/iPhone ![]() location.
location.
- Quick help Selecting Quick help will show a brief quick start guide onscreen to introduce Vocal Tune Studio Pitch and Time mode and its functions.
- Online manual Selecting this option will open a link to this manual in both its online and downloadable PDF versions (internet connection required).
- About This option gives information and links to other eXtreme Software Development apps - Audio Evolution Mobile Studio and Vocal Tune Pro - in the AppStore.
- Contact support Pressing this will hopefully give you as convenient way as possible to contact us for help. The Mail app will automatically be opened with our email address in the To field and the subject already filled, meaning all you need to do is type your inquiry and press the send button.
5 Note Sensitivity ![]() . The Note sensitivity parameter allows you to adjust how sensitive Vocal Tune Studio is to identifying and placing notes on the piano roll. Lower sensitivity will result in fewer notes being identified on the piano roll while higher sensitivity will place more and more note events corresponding to every tonal variation detected. As such, this parameter can be adjusted to find the sweet spot where all of the 'pitch events' in your vocal recording are represented on the piano roll in Vocal Tune Studio and are therefore available for you to edit as required. The default setting for Note sensitivity is 60 which generally gives very good results on a clear, clean vocal recording. Double tap on the slider to either Reset to the default value or enter a value using the onscreen keyboard.
. The Note sensitivity parameter allows you to adjust how sensitive Vocal Tune Studio is to identifying and placing notes on the piano roll. Lower sensitivity will result in fewer notes being identified on the piano roll while higher sensitivity will place more and more note events corresponding to every tonal variation detected. As such, this parameter can be adjusted to find the sweet spot where all of the 'pitch events' in your vocal recording are represented on the piano roll in Vocal Tune Studio and are therefore available for you to edit as required. The default setting for Note sensitivity is 60 which generally gives very good results on a clear, clean vocal recording. Double tap on the slider to either Reset to the default value or enter a value using the onscreen keyboard.
6 Key ![]() . There are twelve notes within the chromatic set of pitches. The Key setting allows you to set the root note for the scale you are working in from these twelve notes.
. There are twelve notes within the chromatic set of pitches. The Key setting allows you to set the root note for the scale you are working in from these twelve notes.
7 Scale ![]() . A scale is the set of notes which have been used to create a piece of music. If you have chosen the option in the Settings (via the Three Dot Button
. A scale is the set of notes which have been used to create a piece of music. If you have chosen the option in the Settings (via the Three Dot Button ![]() where it is,by default, selected) Vocal Tune Studio will try to estimate the scale (and key) of the audio it analyzes. The more notes present which are identifiable, the greater the chance of this estimate being accurate. If, however, Vocal Tune Studio is unable to identify a key and scale (in which case, it will open in chromatic mode) or if it's estimation of the key and scale is incorrect, the Key and Scale settings allow you to manually select the correct options. As stated elsewhere, Vocal Tune Studio will give the best results when the correct key and scale are used. Once the correct Key and Scale has been estimated or selected, Vocal Tune Studio will place the notes it has detected and retuned onto the closest notes within that Key and Scale on the piano roll grid. This is why you will see the notes change position if you change the Key and Scale; they are being quantized to that scale instead. If your piece of audio contains any accidental notes (which are notes deliberately not within the given scale) please be aware of the Snap to settings (see below) which will allow you to correct the position of these notes.
where it is,by default, selected) Vocal Tune Studio will try to estimate the scale (and key) of the audio it analyzes. The more notes present which are identifiable, the greater the chance of this estimate being accurate. If, however, Vocal Tune Studio is unable to identify a key and scale (in which case, it will open in chromatic mode) or if it's estimation of the key and scale is incorrect, the Key and Scale settings allow you to manually select the correct options. As stated elsewhere, Vocal Tune Studio will give the best results when the correct key and scale are used. Once the correct Key and Scale has been estimated or selected, Vocal Tune Studio will place the notes it has detected and retuned onto the closest notes within that Key and Scale on the piano roll grid. This is why you will see the notes change position if you change the Key and Scale; they are being quantized to that scale instead. If your piece of audio contains any accidental notes (which are notes deliberately not within the given scale) please be aware of the Snap to settings (see below) which will allow you to correct the position of these notes.
8 Snap to ![]() . The Snap to setting defines whether notes on the piano roll will be snapped to certain grid/note positions or not. By default, the notes snap to the given Key and Scale, they can only be moved to a pitch which is within that key and scale. If all of the notes in your sung melody are within the given key and scale, this is the setting you'll want to use.
. The Snap to setting defines whether notes on the piano roll will be snapped to certain grid/note positions or not. By default, the notes snap to the given Key and Scale, they can only be moved to a pitch which is within that key and scale. If all of the notes in your sung melody are within the given key and scale, this is the setting you'll want to use.
Vocal Tune Studio offers two other Snap to settings to accommodate all situations though. Chromatic will snap any note detected and corrected to the closest note within the twelve chromatic notes and, as such, you can move the note anywhere vertically, but it will always snap exactly to the chosen note. If your sung melody contains accidental notes, notes the composer has used deliberately which are note within the given key and scale, these will be incorrectly snapped to be within the scale using Vocal Tune Studio's default settings. In this situation, you'll want to switch the Snap to setting to Chromatic mode which will allow yo to manually shift these accidental notes to the pitch they should be. Please note that having the Scale set to chromatic and Snap to set to scale will also allow you to move notes to any note on the piano roll.
The final Snap to setting is Free. This allows you freely reposition notes vertically on the piano roll without them snapping to any particular grid position. Thus, if you want to make tonal adjustments which are not within the chromatic set of notes, this can be done using the Free mode.
NOTE. If you would prefer Vocal Tune Studio not to estimate the key and scale of your audio so that it will always open in chromatic mode, this can be done via the Settings.
9 Timeline ![]() showing the Time Marker
showing the Time Marker ![]() and Loop Markers
and Loop Markers ![]() (both of which are shown/available in the standalone version only) at the beginning of the clip. Tap on the timeline to reposition the Time Marker to move it to the place you'd like playback to start from. Double tap on the Timeline or select Loop markers via theThree Dot Button
(both of which are shown/available in the standalone version only) at the beginning of the clip. Tap on the timeline to reposition the Time Marker to move it to the place you'd like playback to start from. Double tap on the Timeline or select Loop markers via theThree Dot Button ![]() options to show/hide the Loop Markers
options to show/hide the Loop Markers ![]() and activate looped playback. The loop markers can be freely positioned to select the section of audio to be looped.
and activate looped playback. The loop markers can be freely positioned to select the section of audio to be looped.
NOTE. There are no Time Marker or Loop Markers available in the timeline of Vocal Tune Studio AUv3 plug-in version as this functionality is controlled within the host app.
10 Keyboard Pitch Indicator ![]() . This indicates the pitch of the waveforms and notes on the Vocal Tune Studio Display.
. This indicates the pitch of the waveforms and notes on the Vocal Tune Studio Display.
11 On/Off or Active/Bypass button ![]() .
.
12 Undo button ![]() . Pressing this button undoes the last edit made within Vocal Tune Studio should you make a mistake. The undo stack is unlimited, so you can undo all the way back to when you started editing. Reset note data, selectable from within Vocal Tune Studio's options available via the Three Dot Button
. Pressing this button undoes the last edit made within Vocal Tune Studio should you make a mistake. The undo stack is unlimited, so you can undo all the way back to when you started editing. Reset note data, selectable from within Vocal Tune Studio's options available via the Three Dot Button ![]() , cannot be undone and will clear the Undo stack.
, cannot be undone and will clear the Undo stack.
13 Redo button ![]() . Pressing this button re-applies the last edit undone using the Undo button as long as no further edits have taken place since using the Undo function.
. Pressing this button re-applies the last edit undone using the Undo button as long as no further edits have taken place since using the Undo function.
14 Select All button ![]() . Individual notes on the piano roll can be selected by tapping on them, which then allows you to move the note on the piano roll and refine the parameters (numbers 19 to 27) for that individual note event. Multiple contiguous notes can be selected by long pressing on the piano roll and sliding left or right until the highlighted area covers all of the notes you require at which point you can release and the parameters can be changed for those selected notes and those notes can be shifted in pitch on the piano roll while keeping their original tonal relationship to each other. If, however, you want to transpose or set those parameters for all of the notes you can quickly do so by pressing the Select All button. As such, it can be useful to initially select all and set up your preferred general setting for the tuning parameters for all of the notes. Once that is done to your satisfaction, you can then select a smaller subset of notes, or individual notes, to fine tune those parameters as required to get the perfect performance results.
. Individual notes on the piano roll can be selected by tapping on them, which then allows you to move the note on the piano roll and refine the parameters (numbers 19 to 27) for that individual note event. Multiple contiguous notes can be selected by long pressing on the piano roll and sliding left or right until the highlighted area covers all of the notes you require at which point you can release and the parameters can be changed for those selected notes and those notes can be shifted in pitch on the piano roll while keeping their original tonal relationship to each other. If, however, you want to transpose or set those parameters for all of the notes you can quickly do so by pressing the Select All button. As such, it can be useful to initially select all and set up your preferred general setting for the tuning parameters for all of the notes. Once that is done to your satisfaction, you can then select a smaller subset of notes, or individual notes, to fine tune those parameters as required to get the perfect performance results.
15 Split Note button ![]() . Pressing this button activates the Split Note mode. Once activated, a note event on the piano roll can be split into two events by tapping on the note event at the desired split point. The two notes created can then be treated separately within Vocal Tune Studio. As the note is split at the point at which you touch it, it is advisable to zoom in for greater accuracy. To avoid unwanted note splits being created, the Split Note mode is automatically deactivated after a split has been placed and requires reactivating before every note split you wish to make. If you make a mistake, use the Undo button to remove the split. Alternatively, if you'd like to return to the Vocal Tune Studio's initial state after analyzing the audio, removing all note splits you have made, you can select Reset note data via the Three Dot Button options. Please be aware though that using the Reset note data option will also reset any other changes you may have made to all of the notes and their associated parameters so use this option with caution..
. Pressing this button activates the Split Note mode. Once activated, a note event on the piano roll can be split into two events by tapping on the note event at the desired split point. The two notes created can then be treated separately within Vocal Tune Studio. As the note is split at the point at which you touch it, it is advisable to zoom in for greater accuracy. To avoid unwanted note splits being created, the Split Note mode is automatically deactivated after a split has been placed and requires reactivating before every note split you wish to make. If you make a mistake, use the Undo button to remove the split. Alternatively, if you'd like to return to the Vocal Tune Studio's initial state after analyzing the audio, removing all note splits you have made, you can select Reset note data via the Three Dot Button options. Please be aware though that using the Reset note data option will also reset any other changes you may have made to all of the notes and their associated parameters so use this option with caution..
16 Erase Note mode ![]() . Pressing this button activates the Erase Note mode. Once active, any note event you tap on the piano roll will be erased and with it, any retuning of the audio signal meaning the original pitch will be played at that point. Erase note mode remains active until you press the Erase Note button again, allowing you to erase as many notes as you want in one go. If you make a mistake, you can always use the Undo button. Alternatively, if you'd like to return to the Vocal Tune Studio's initial state after analyzing the audio, restoring all erased notes, you can select Reset note data via the Three Dot Button options. Please be aware though that using the Reset note data option will also reset any other changes you may have made to all of the notes and their associated parameters so use this option with caution.
. Pressing this button activates the Erase Note mode. Once active, any note event you tap on the piano roll will be erased and with it, any retuning of the audio signal meaning the original pitch will be played at that point. Erase note mode remains active until you press the Erase Note button again, allowing you to erase as many notes as you want in one go. If you make a mistake, you can always use the Undo button. Alternatively, if you'd like to return to the Vocal Tune Studio's initial state after analyzing the audio, restoring all erased notes, you can select Reset note data via the Three Dot Button options. Please be aware though that using the Reset note data option will also reset any other changes you may have made to all of the notes and their associated parameters so use this option with caution.
NOTE. To remove/erase existing anchor/stretch points, simply double tap on them.
17 Timeline Area/Piano Roll Grid/Waveform display area. Scroll horizontally and vertically with one finger. Pinch/pull with two fingers to visually re-scale items within this area as required.
Second View (available by selecting a note or notes)
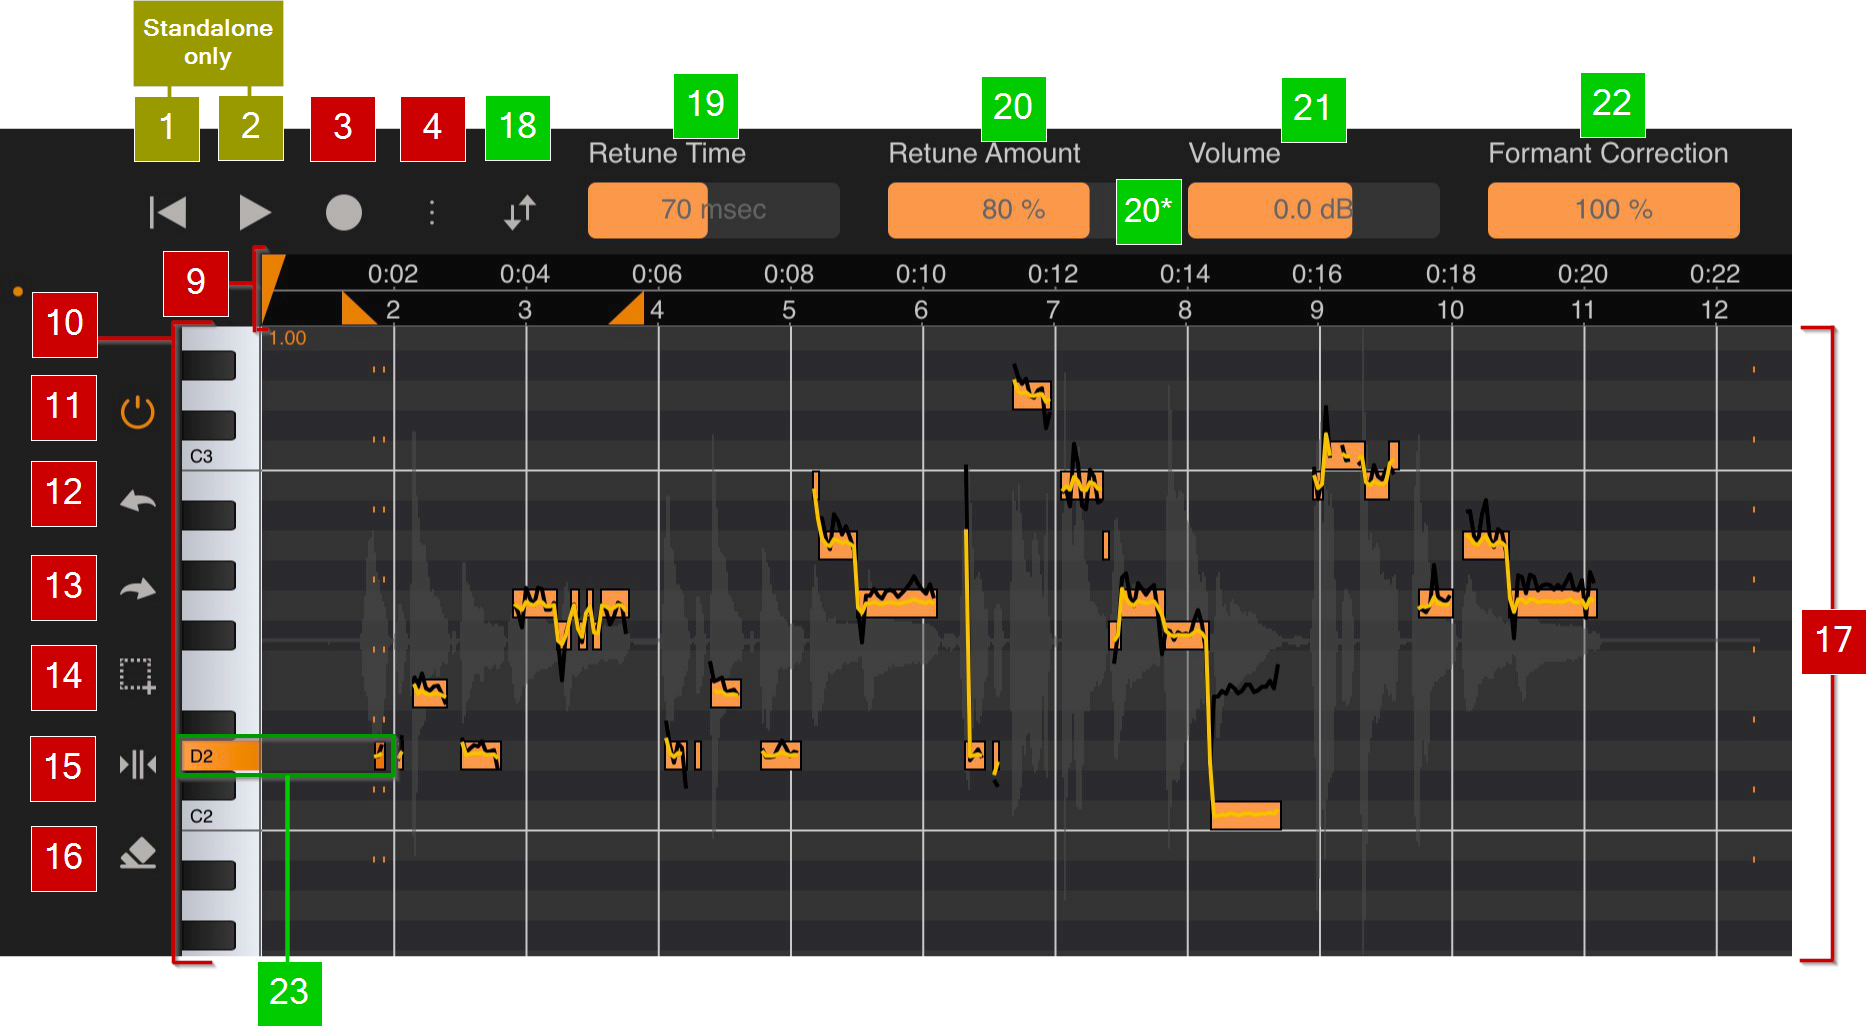
Selecting a note or notes on the first view will change the edit options along the top of the interface. These parameters, and those available on the third view via the Interface Toggle ![]() button, allow you to control how Vocal Tune Studio applies tuning to the selected note or notes. To return to the first view, deselect all notes by tapping once in any empty area of the piano roll grid.
button, allow you to control how Vocal Tune Studio applies tuning to the selected note or notes. To return to the first view, deselect all notes by tapping once in any empty area of the piano roll grid.
User interface elements from view one still present in view two are indicated by numbers in red boxes. New elements available in view two are indicated by numbers in green boxes.
NOTE. Functions 19 to 27 control how the retuning within Vocal Tune Studio is applied. These controls can be used to tailor the final result, allowing you to create completely transparent retuning all the way to very deliberate and audible retuning taking place if that's what you require. These parameters can be set on a global basis by first selecting all of the note events on the piano roll using the Select All ![]() button. Alternatively, multiple contiguous notes can be selected by long pressing on the piano roll and sliding left or right until the highlighted area covers all of the notes you require at which point you can release and the parameters can be changed for those selected notes. Finally, they can be fine tuned on a per note basis by selecting individual notes. If you want to reset all of these parameters for all notes, simply choose Default from the Load preset... options via the Three Dot Button
button. Alternatively, multiple contiguous notes can be selected by long pressing on the piano roll and sliding left or right until the highlighted area covers all of the notes you require at which point you can release and the parameters can be changed for those selected notes. Finally, they can be fine tuned on a per note basis by selecting individual notes. If you want to reset all of these parameters for all notes, simply choose Default from the Load preset... options via the Three Dot Button ![]() . Also, don't forget the Split note
. Also, don't forget the Split note ![]() function which allows you to split any note into multiple events which can then be individually selected and have these parameters adjusted.
function which allows you to split any note into multiple events which can then be individually selected and have these parameters adjusted.
Please also see the previous section here, which explains how most of these parameters are represented visually in the notes on the grid in the timeline area.
18 Interface Toggle ![]() button. The Interface Toggle button allows you to move back and forth between views two and three. To move back to view one, deselect all notes by tapping once on any empty area of the piano roll grid in either view two or three.
button. The Interface Toggle button allows you to move back and forth between views two and three. To move back to view one, deselect all notes by tapping once on any empty area of the piano roll grid in either view two or three.
19 Retune Time ![]() . This setting allows you to decide how quickly Vocal Tune Studio will apply retuning to the selected note or notes between 0 and 500 milliseconds. A longer Retune Time will mean the pitch starts the same as the originally detected pitch (the black waveform line displayed) and is gradually pulled from that pitch to the more accurate corrected pitch. A very short Retune Time will more immediately snap the pitch to the corrected value and may sound unnatural and obvious, though, of course, this may be the effect you are after. By default, the Retune Time is set to 70 milliseconds. Double tap on the slider to either Reset to the default value or enter a value using the onscreen keyboard.
. This setting allows you to decide how quickly Vocal Tune Studio will apply retuning to the selected note or notes between 0 and 500 milliseconds. A longer Retune Time will mean the pitch starts the same as the originally detected pitch (the black waveform line displayed) and is gradually pulled from that pitch to the more accurate corrected pitch. A very short Retune Time will more immediately snap the pitch to the corrected value and may sound unnatural and obvious, though, of course, this may be the effect you are after. By default, the Retune Time is set to 70 milliseconds. Double tap on the slider to either Reset to the default value or enter a value using the onscreen keyboard.
20 Retune Amount ![]() . The Retune Amount defines how much retuning is applied to the selected note or notes. The lower the value, the closer the retuned pitch will be to the original pitch and the more of its fluctuations will be retained even as it is retuned. At 100%, none of those original fluctuations will be present and the pitch will be completely retuned to the correct pitch. This can sound unnatural but, again, this might be the effect you are after and we encourage experimentation. We feel the default value of 80% gives a good balance between correcting the pitch and retaining the authenticity of the original performance. Double tap on the slider to either Reset to the default value or enter a value using the onscreen keyboard.
. The Retune Amount defines how much retuning is applied to the selected note or notes. The lower the value, the closer the retuned pitch will be to the original pitch and the more of its fluctuations will be retained even as it is retuned. At 100%, none of those original fluctuations will be present and the pitch will be completely retuned to the correct pitch. This can sound unnatural but, again, this might be the effect you are after and we encourage experimentation. We feel the default value of 80% gives a good balance between correcting the pitch and retaining the authenticity of the original performance. Double tap on the slider to either Reset to the default value or enter a value using the onscreen keyboard.
20* The number 20* on the screenshot above refers to an extra parameter - Pitch Quantization ![]() - which will be displayed between Retune Amount and Formant Correction when Start without pitch correction is selected in the options available via the Three Dot Button
- which will be displayed between Retune Amount and Formant Correction when Start without pitch correction is selected in the options available via the Three Dot Button ![]() . This mode starts with no pitch correction so the yellow retuning line sits on top of the black line represented the original detected pitch and likewise, the notes on the grid are not snapped to exact pitches but remain 'off-pitch' as sung. In this mode, Retune Amount and Pitch Quantization are both by default set to zero. The Pitch Quantization parameter allows you to gradually quantize the target pitch for retuning towards the exact, fully quantized frequency of the nearest note within the key and scale for any selected note or notes. Once the target pitch has been set, you can use Retune Amount to decide how much of the pitch fluctuation from the original signal will be smoothed away at that target pitch. For more details about this mode, please see the section here. Please note that in this mode, the Volume parameter will be moved to a third view and the artificial vibrato parameters will be available on a fourth view, all available via the Interface Toggle button
. This mode starts with no pitch correction so the yellow retuning line sits on top of the black line represented the original detected pitch and likewise, the notes on the grid are not snapped to exact pitches but remain 'off-pitch' as sung. In this mode, Retune Amount and Pitch Quantization are both by default set to zero. The Pitch Quantization parameter allows you to gradually quantize the target pitch for retuning towards the exact, fully quantized frequency of the nearest note within the key and scale for any selected note or notes. Once the target pitch has been set, you can use Retune Amount to decide how much of the pitch fluctuation from the original signal will be smoothed away at that target pitch. For more details about this mode, please see the section here. Please note that in this mode, the Volume parameter will be moved to a third view and the artificial vibrato parameters will be available on a fourth view, all available via the Interface Toggle button ![]() .
.
21 Volume ![]() . This allows you to control the volume of any selected note or notes between -40 and +12 dB from its original volume. As such, you are able to alter the dynamics of your performance if necessary. Default value is 0.0dB meaning no change has been applied. Double tap on the slider to either Reset to the default value or enter a value using the onscreen keyboard. When Start without pitch correction is selected in the options available via the Three Dot Button
. This allows you to control the volume of any selected note or notes between -40 and +12 dB from its original volume. As such, you are able to alter the dynamics of your performance if necessary. Default value is 0.0dB meaning no change has been applied. Double tap on the slider to either Reset to the default value or enter a value using the onscreen keyboard. When Start without pitch correction is selected in the options available via the Three Dot Button ![]() and the Pitch Quantization parameter is displayed, the Volume parameter is displayed on its own separate page accessible via the Interface Toggle button
and the Pitch Quantization parameter is displayed, the Volume parameter is displayed on its own separate page accessible via the Interface Toggle button ![]() .
.
22 Formant Correction ![]() . When referring to the human voice, formants are concentrations of acoustic energy at certain frequencies resulting from acoustic resonance of the vocal tract. There are several formants each at different frequencies and these give us the characteristic sounds we associate with the human voice. The length of the vocal tract will determine the exact formants of any individuals voice. This can cause a problem when pitch-shifting vocals and is the reason why Formant Correction is necessary. Without Formant Correction, the formants would be shifted with the pitch. This would mean that, for example, if you shifted the pitch upwards, the formants, the characteristics, would also be shifted upwards resulting in it sounding like the sound was made by a much smaller vocal tract, hence why pitch shifted vocals can sound 'chipmunk' like. Formant Correction avoids this which is why, by default, it is set at 100%. As always though, experimentation is always encouraged and maybe the 'chipmunk' effect is what you require? Double tap on the slider to either Reset to the default value or enter a value using the onscreen keyboard.
. When referring to the human voice, formants are concentrations of acoustic energy at certain frequencies resulting from acoustic resonance of the vocal tract. There are several formants each at different frequencies and these give us the characteristic sounds we associate with the human voice. The length of the vocal tract will determine the exact formants of any individuals voice. This can cause a problem when pitch-shifting vocals and is the reason why Formant Correction is necessary. Without Formant Correction, the formants would be shifted with the pitch. This would mean that, for example, if you shifted the pitch upwards, the formants, the characteristics, would also be shifted upwards resulting in it sounding like the sound was made by a much smaller vocal tract, hence why pitch shifted vocals can sound 'chipmunk' like. Formant Correction avoids this which is why, by default, it is set at 100%. As always though, experimentation is always encouraged and maybe the 'chipmunk' effect is what you require? Double tap on the slider to either Reset to the default value or enter a value using the onscreen keyboard.
23 Selected Note ![]() . At the beginning of the example shown in the screenshot above, a note has been selected on the piano roll by tapping on it once. Selecting a note turns it from yellow to orange, brings up two dotted lines indicating its beginning and end on the Timeline and highlights its corresponding note on the Keyboard Pitch Indicator which also displays the note's name. Selecting a note (or contiguous notes by long pressing and swiping left or right, or all notes using the Select All
. At the beginning of the example shown in the screenshot above, a note has been selected on the piano roll by tapping on it once. Selecting a note turns it from yellow to orange, brings up two dotted lines indicating its beginning and end on the Timeline and highlights its corresponding note on the Keyboard Pitch Indicator which also displays the note's name. Selecting a note (or contiguous notes by long pressing and swiping left or right, or all notes using the Select All ![]() button) allows you reposition it on the piano roll grid (change its pitch) and makes parameters 19 to 27 available for that note or notes. Double tapping on a note will create a stretch point to allow you to manipulate the length of that note. For full details on Time Stretching within Vocal Tune Studio, please see here. For full details on the representation of pitch on notes, please see here.
button) allows you reposition it on the piano roll grid (change its pitch) and makes parameters 19 to 27 available for that note or notes. Double tapping on a note will create a stretch point to allow you to manipulate the length of that note. For full details on Time Stretching within Vocal Tune Studio, please see here. For full details on the representation of pitch on notes, please see here.
Third view (toggle between views two and three using the Interface Toggle button ![]() )
)
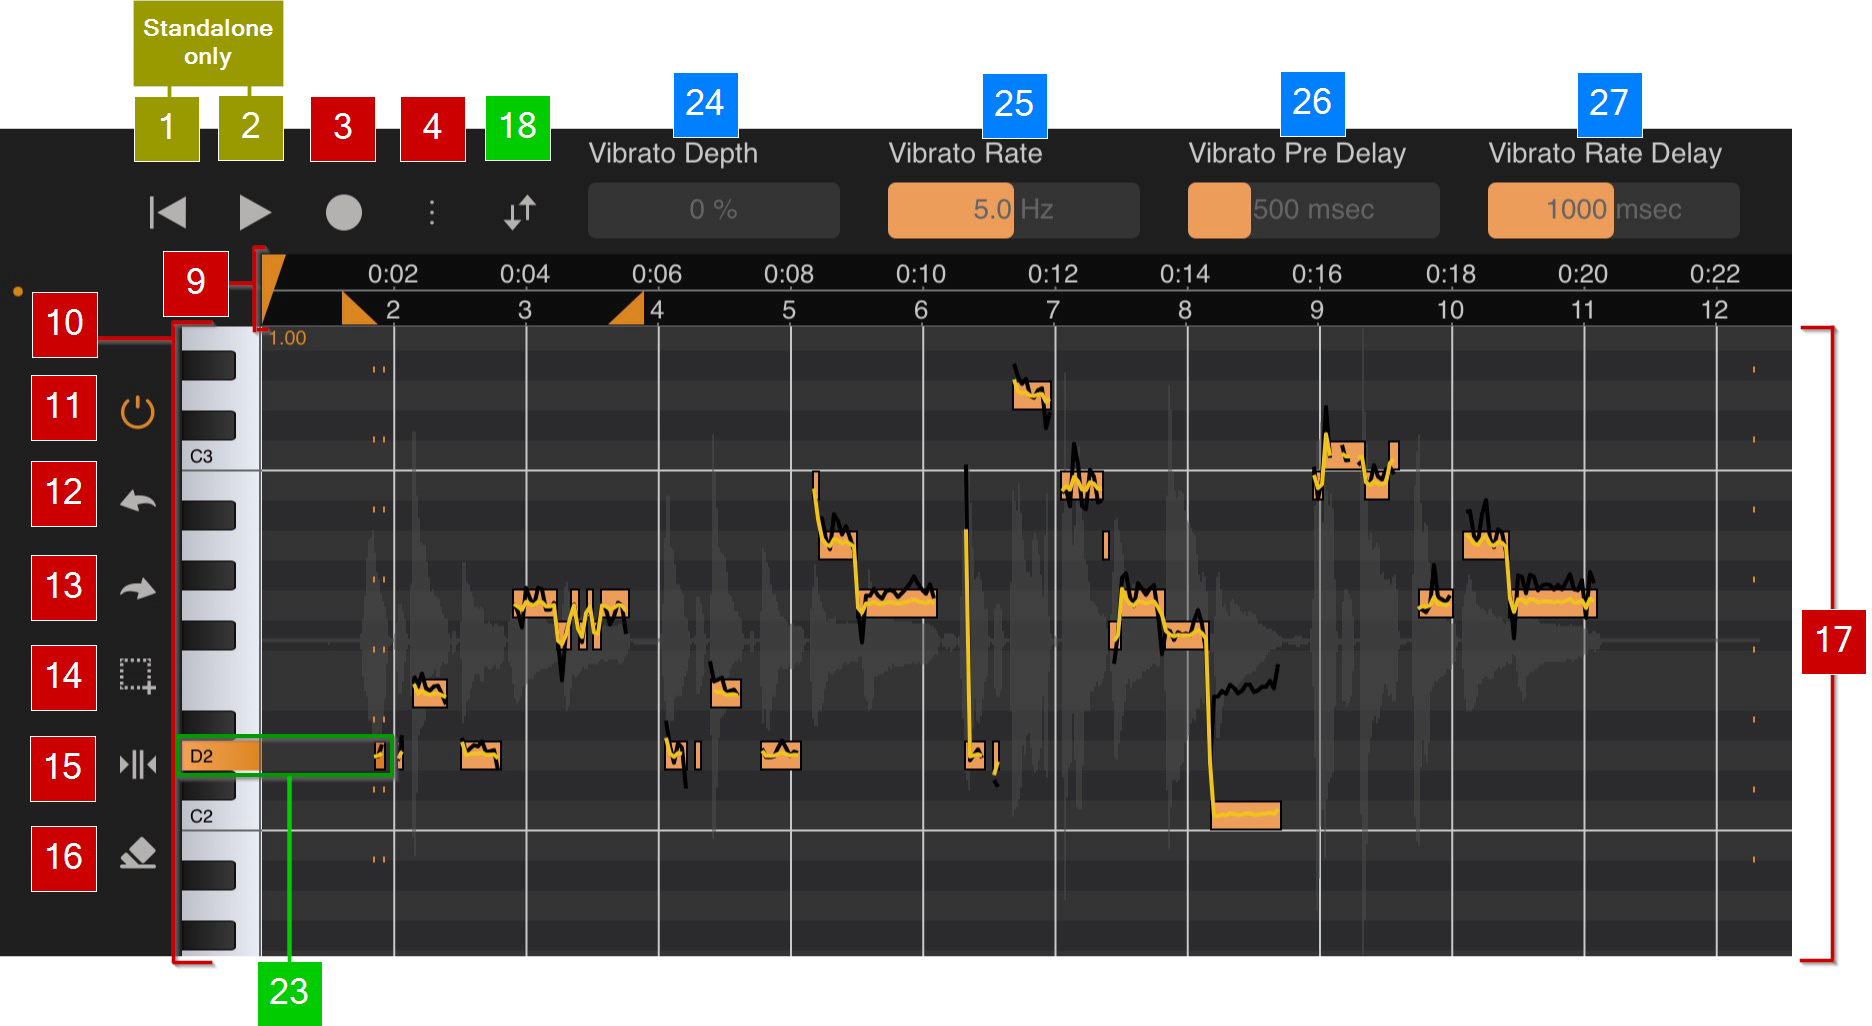
You can move back and forth between the second and third views using the Interface Toggle button ![]() whenever one or more notes are selected. The third view changes the parameters available along the top of the interface from those on views one and two. The controls revealed on the third view are those relating to adding artificial vibrato to your selected note or notes. To move back to view one from either view two or three, simply deselect all notes by tapping once in any empty area of the piano roll grid area.
whenever one or more notes are selected. The third view changes the parameters available along the top of the interface from those on views one and two. The controls revealed on the third view are those relating to adding artificial vibrato to your selected note or notes. To move back to view one from either view two or three, simply deselect all notes by tapping once in any empty area of the piano roll grid area.
In this screenshot, controls common to every view are indicated by numbers in red boxes. Controls common to views two and three are indicated by numbers in green boxes. Controls unique to view three are indicated by numbers in blue boxes.
24 Vibrato Depth ![]() . Vibrato is a rapid, regular slight variation in the pitch of a note. The listener automatically hears the average of the pitches sung which is thought to give warmth to vocals (though it can be distracting if used too much or in too excessive a way such that it becomes a vocal 'wobble'). Vocal Tune Studio allows you to add artificial vibrato to your retuned notes. Vocal Tune Studio gives you four parameters to allow you how vibrato is applied to any selected note or notes. Vibrato Depth allows you to set how much vibrato is applied to the selected note or notes; it defines how large the difference in pitch is on either side of the starting pitch during the vibrato. By default, this is turned off at 0%. Double tap on the slider to either Reset to the default value or enter a value using the onscreen keyboard.
. Vibrato is a rapid, regular slight variation in the pitch of a note. The listener automatically hears the average of the pitches sung which is thought to give warmth to vocals (though it can be distracting if used too much or in too excessive a way such that it becomes a vocal 'wobble'). Vocal Tune Studio allows you to add artificial vibrato to your retuned notes. Vocal Tune Studio gives you four parameters to allow you how vibrato is applied to any selected note or notes. Vibrato Depth allows you to set how much vibrato is applied to the selected note or notes; it defines how large the difference in pitch is on either side of the starting pitch during the vibrato. By default, this is turned off at 0%. Double tap on the slider to either Reset to the default value or enter a value using the onscreen keyboard.
25 Vibrato Rate ![]() . Vibrato Rate allows you to decide the speed of the vibrato, how quickly it pulsates between the two pitches on either side of the note. This can be set between 2.0 and 8.0 Hz. The default value is 5.0 Hz. Double tap on the slider to either Reset to the default value or enter a value using the onscreen keyboard.
. Vibrato Rate allows you to decide the speed of the vibrato, how quickly it pulsates between the two pitches on either side of the note. This can be set between 2.0 and 8.0 Hz. The default value is 5.0 Hz. Double tap on the slider to either Reset to the default value or enter a value using the onscreen keyboard.
26 Vibrato Pre Delay  . Vibrato Pre Delay defines the amount of time before any vibrato is applied to the retuned pitch of any selected note or notes meaning you can start the note without any vibrato and have it gradually appear further through the retuned note. This parameter can be set between 0 milliseconds (no delay, vibrato is immediately applied) all the way up to 2000 milliseconds (2 seconds) though obviously you need a note which is longer than 2 seconds for the effect of this to be heard. The default value is 500 milliseconds. Double tap on the slider to either Reset to the default value or enter a value using the onscreen keyboard.
27 Vibrato Rate Delay ![]() . Vibrato Rate Delay allows you to have the vibrato gradually reach the full Vibrato Rate rather than appear immediately at the chosen speed after the Vibrato Pre Delay. The Vibrato Rate Delay defines the amount of time its takes from any vibrato to be applied to the vibrato reaching its full rate/speed. As you can see then, you can use Vibrato Pre Delay and Vibrato Rate Delay together to apply a much more natural sounding vibrato to your retuned note or notes than would otherwise be possible. Vibrato Rate Delay can be set between 0 milliseconds (no delay, vibrato is heard at its full chosen rate immediately after the Vibrato Pre Delay) and 2000 milliseconds (2 seconds) though, again, you'll need a note of enough length for its effect to be heard. Double tap on the slider to either Reset to the default value or enter a value using the onscreen keyboard.
. Vibrato Rate Delay allows you to have the vibrato gradually reach the full Vibrato Rate rather than appear immediately at the chosen speed after the Vibrato Pre Delay. The Vibrato Rate Delay defines the amount of time its takes from any vibrato to be applied to the vibrato reaching its full rate/speed. As you can see then, you can use Vibrato Pre Delay and Vibrato Rate Delay together to apply a much more natural sounding vibrato to your retuned note or notes than would otherwise be possible. Vibrato Rate Delay can be set between 0 milliseconds (no delay, vibrato is heard at its full chosen rate immediately after the Vibrato Pre Delay) and 2000 milliseconds (2 seconds) though, again, you'll need a note of enough length for its effect to be heard. Double tap on the slider to either Reset to the default value or enter a value using the onscreen keyboard.