How to load and use Vocal Tune Studio AUv3 in popular AUv3 host apps
This section will hopefully give you a clear guide as to how to load and use Vocal Tune Studio in several popular AUv3 host apps. By explaining how to use Vocal Tune Studio AUv3 in these examples, it is hoped that you will then be able to easily work out how to approach setting up and using Vocal Tune Studio AUv3 in any host app. In all cases, please be aware of what Vocal Tune Studio is designed to do and of the best practice advice given here which will advise on how to make your vocal recordings in order to get the very best results from Vocal Tune Studio. In addition, always try to remember to set the correct time signature and tempo within your host app as it is these host settings which Vocal Tune Studio AUv3 will use for its placement of bar lines and having them in the correct position can be invaluable when it comes to accurate time correction. Once your pitch and time corrections have been made in Vocal Tune Studio, you can mixdown your song, or render the individual track, including those corrections (as long as Vocal Tune Studio remains as an active effect on the track) using the usual methods of export for your host app.
Please use these links to jump to your preferred AUv3 host.
NOTE. For clarity of instruction, the screenshots show the Vocal Tune Studio AUv3 plugin as it is positioned and sized by the host by default when it is opened. Each host will have its own way of repositioning and resizing the plugin interface for easier use as will be indicated.
As we will find later with AUM and Drambo, apeMatrix doesn't have audio tracks as such. This doesn't mean that Vocal Tune Studio cannot be used perfectly well with it though. The key is to first load your pre-recorded vocal performance into one of apeMatrix's included AU Sampler modules.
Tap on one of the ![]() buttons on the left hand side of apeMatrix's matrix to open the instrument and effect selection dialog. Select Audio Unit at the top of the dialog and scroll down the list of Audio Units installed on your device until you find Sampler (apeSoft). This Audio Unit comes free with apeMatrix. Tap on its name to load it on the chosen channel.
buttons on the left hand side of apeMatrix's matrix to open the instrument and effect selection dialog. Select Audio Unit at the top of the dialog and scroll down the list of Audio Units installed on your device until you find Sampler (apeSoft). This Audio Unit comes free with apeMatrix. Tap on its name to load it on the chosen channel.
In the dialog shown, select Connects and Show. This will connect the plug-in to the output, turn it on and open its interface.
Within the Sampler interface, tap on the folder ![]() icon towards the top left to open the Quick Samples audio file selection dialog. On the top right of that dialog is the Import
icon towards the top left to open the Quick Samples audio file selection dialog. On the top right of that dialog is the Import ![]() icon: tap on it to open the system file browser which you can use to navigate to your vocal performance audio file. Once found, tap on the audio file and this will import it into the SHARED section of the Quick Samples dialog. Once its there, simply tap on its name to load it into the Sampler plug-in. With your vocal performance loaded, you can close the Sampler interface using the
icon: tap on it to open the system file browser which you can use to navigate to your vocal performance audio file. Once found, tap on the audio file and this will import it into the SHARED section of the Quick Samples dialog. Once its there, simply tap on its name to load it into the Sampler plug-in. With your vocal performance loaded, you can close the Sampler interface using the ![]() button.
button.
Now we want to load Vocal Tune Studio AUv3. Press the next ![]() button on the left of the matrix and find Vocal Tune Studio in the list of installed Audio Units. Tap on its name to load it.
button on the left of the matrix and find Vocal Tune Studio in the list of installed Audio Units. Tap on its name to load it.
This time, just select Connects in the dialog shown. This will connect the plug-in to the output and turn it on but won't immediately open its interface.
So, now we have our two elements in place but we need to correctly route their inputs and outputs. Currently, both plug-ins are outputting their signals to the device speakers but we want the Sampler's signal to be routed to Vocal Tune Studio's input instead so that Vocal Tune Studio acts as an effect for the Sampler. This is easily done.
The plug-in's icons on the left of the matrix represent their outputs. The plug-in's icons along the top of the matrix represent their inputs. As such, you can see how it is possible to use the matrix grid to connect outputs to inputs. Disconnect the Sampler's output from the speakers by tapping on the red connection symbol on the matrix. Now, on the Sampler's output row, move along until you reach the input of Vocal Tune Studio along the top and tap at that point to connect the Sampler output to Vocal Tune Studio's Input as seen below.
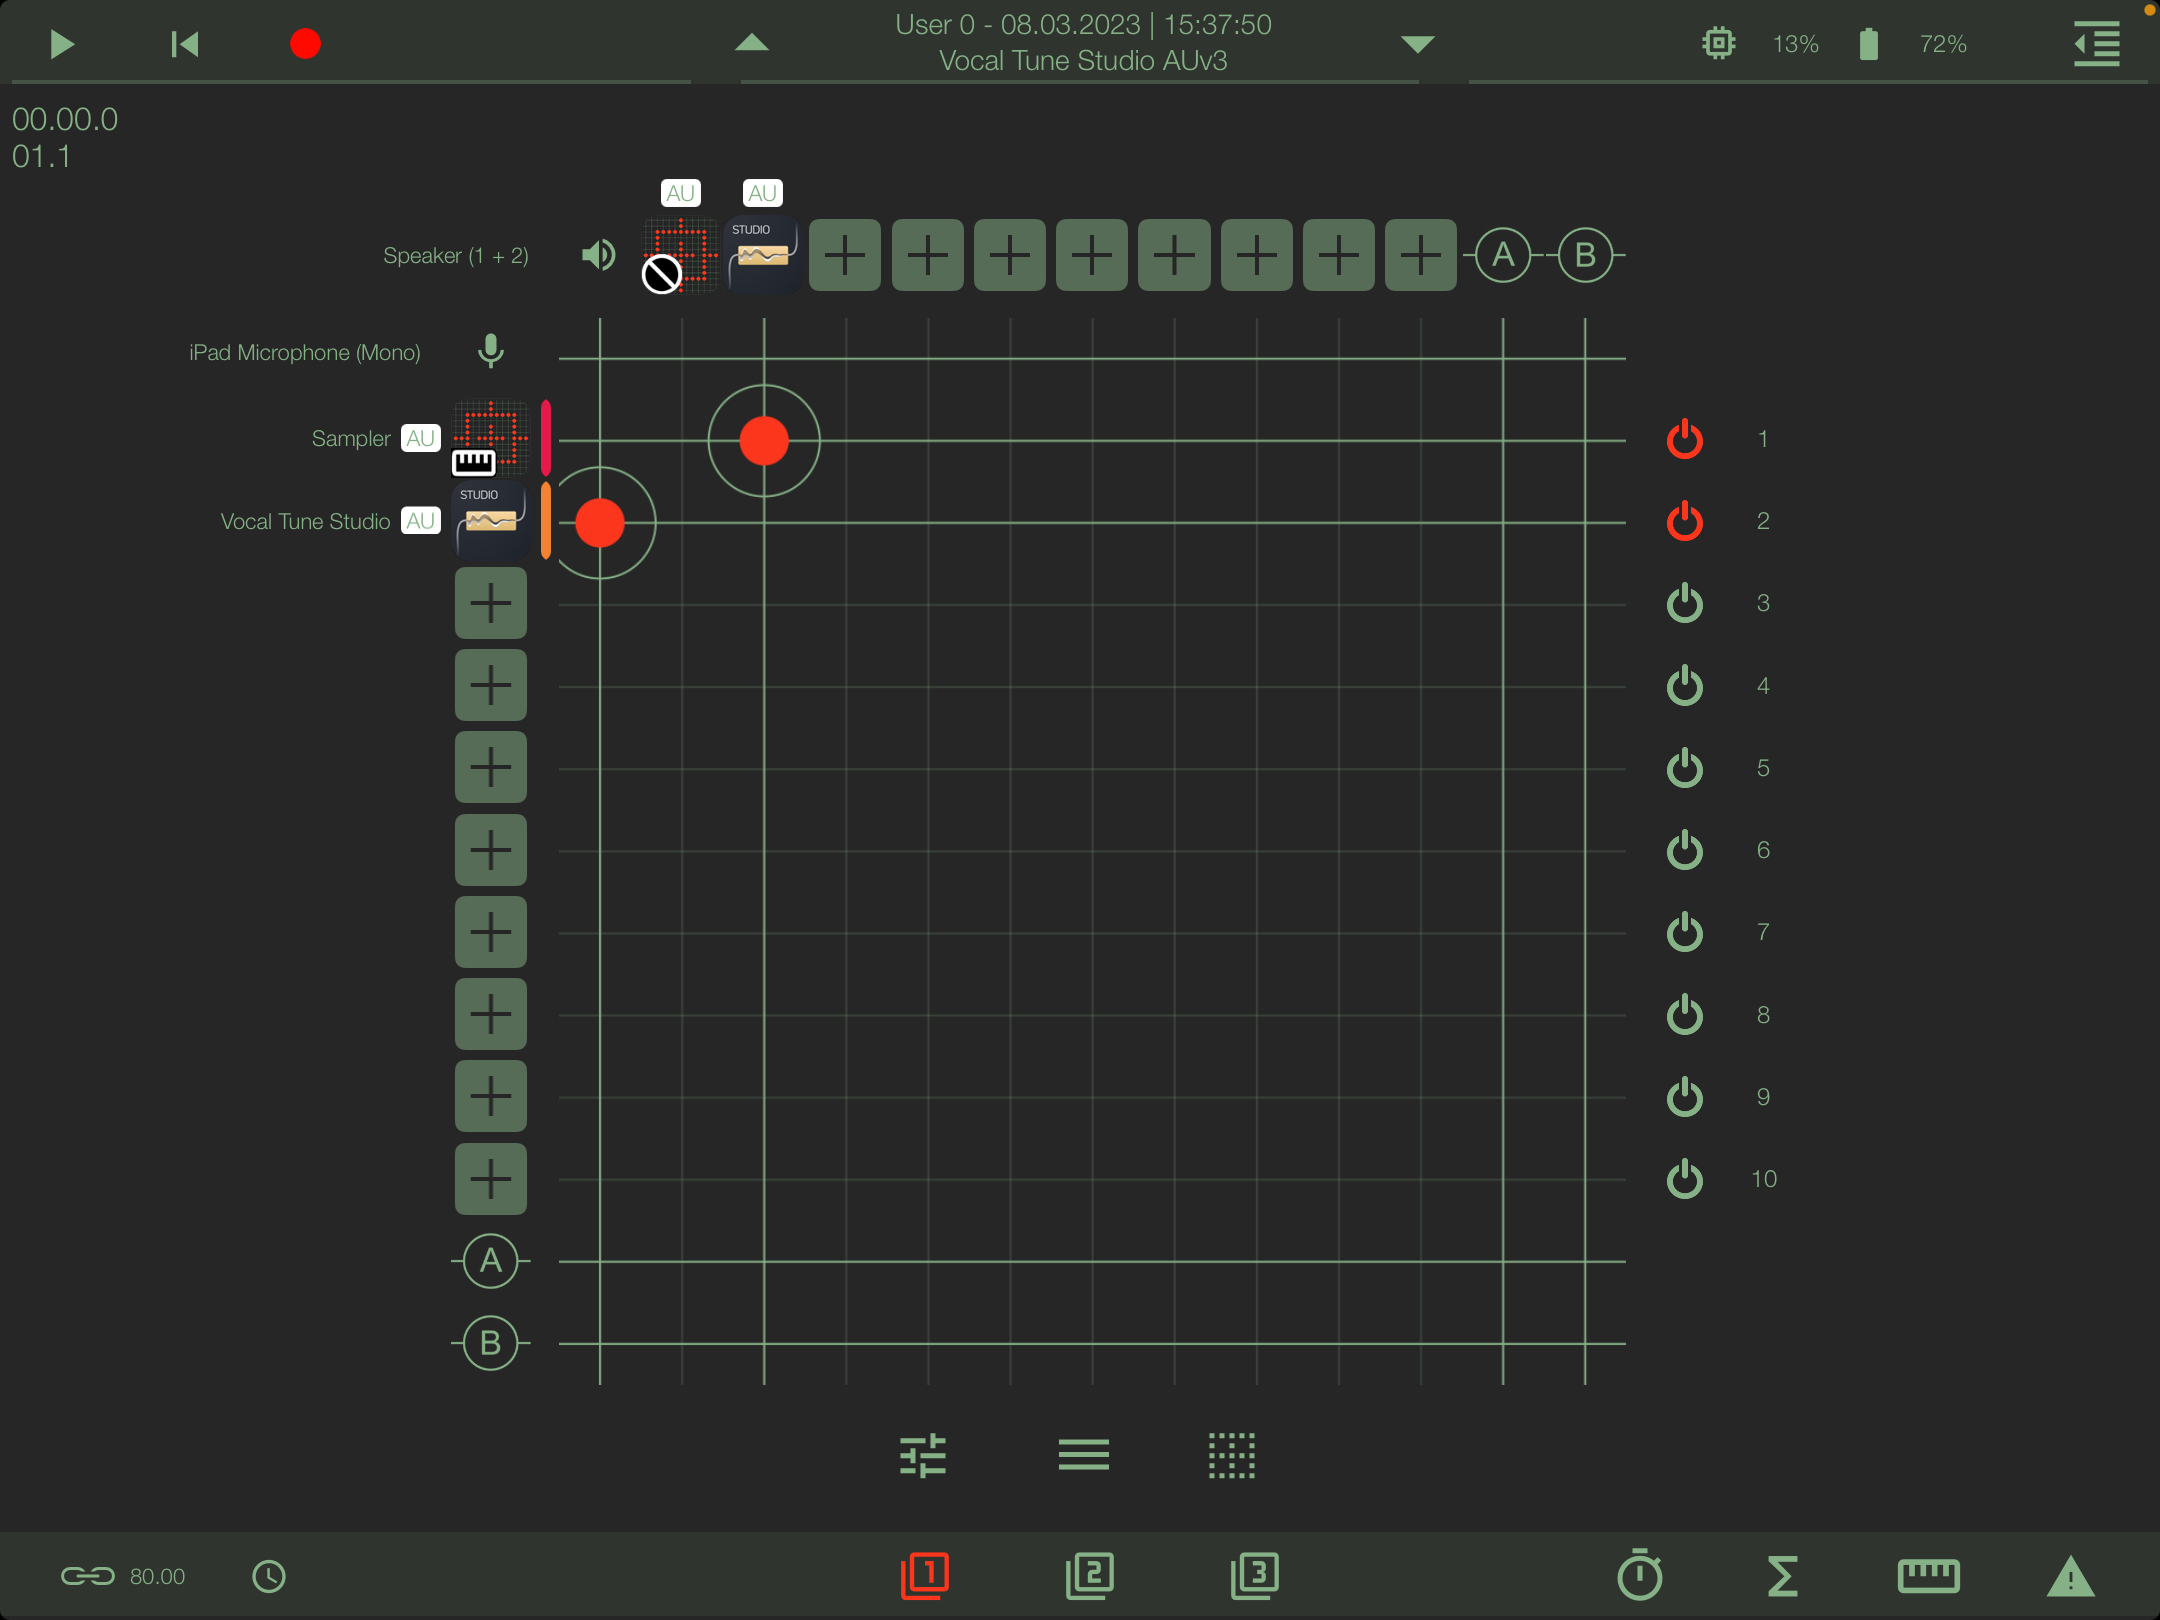
The output of Vocal Tune Studio want s to remain where it is so that the signal path is Sampler>Vocal Tune Studio>Speakers.
Now we want to open Vocal Tune Studio's plug-in interface by tapping on its icon.
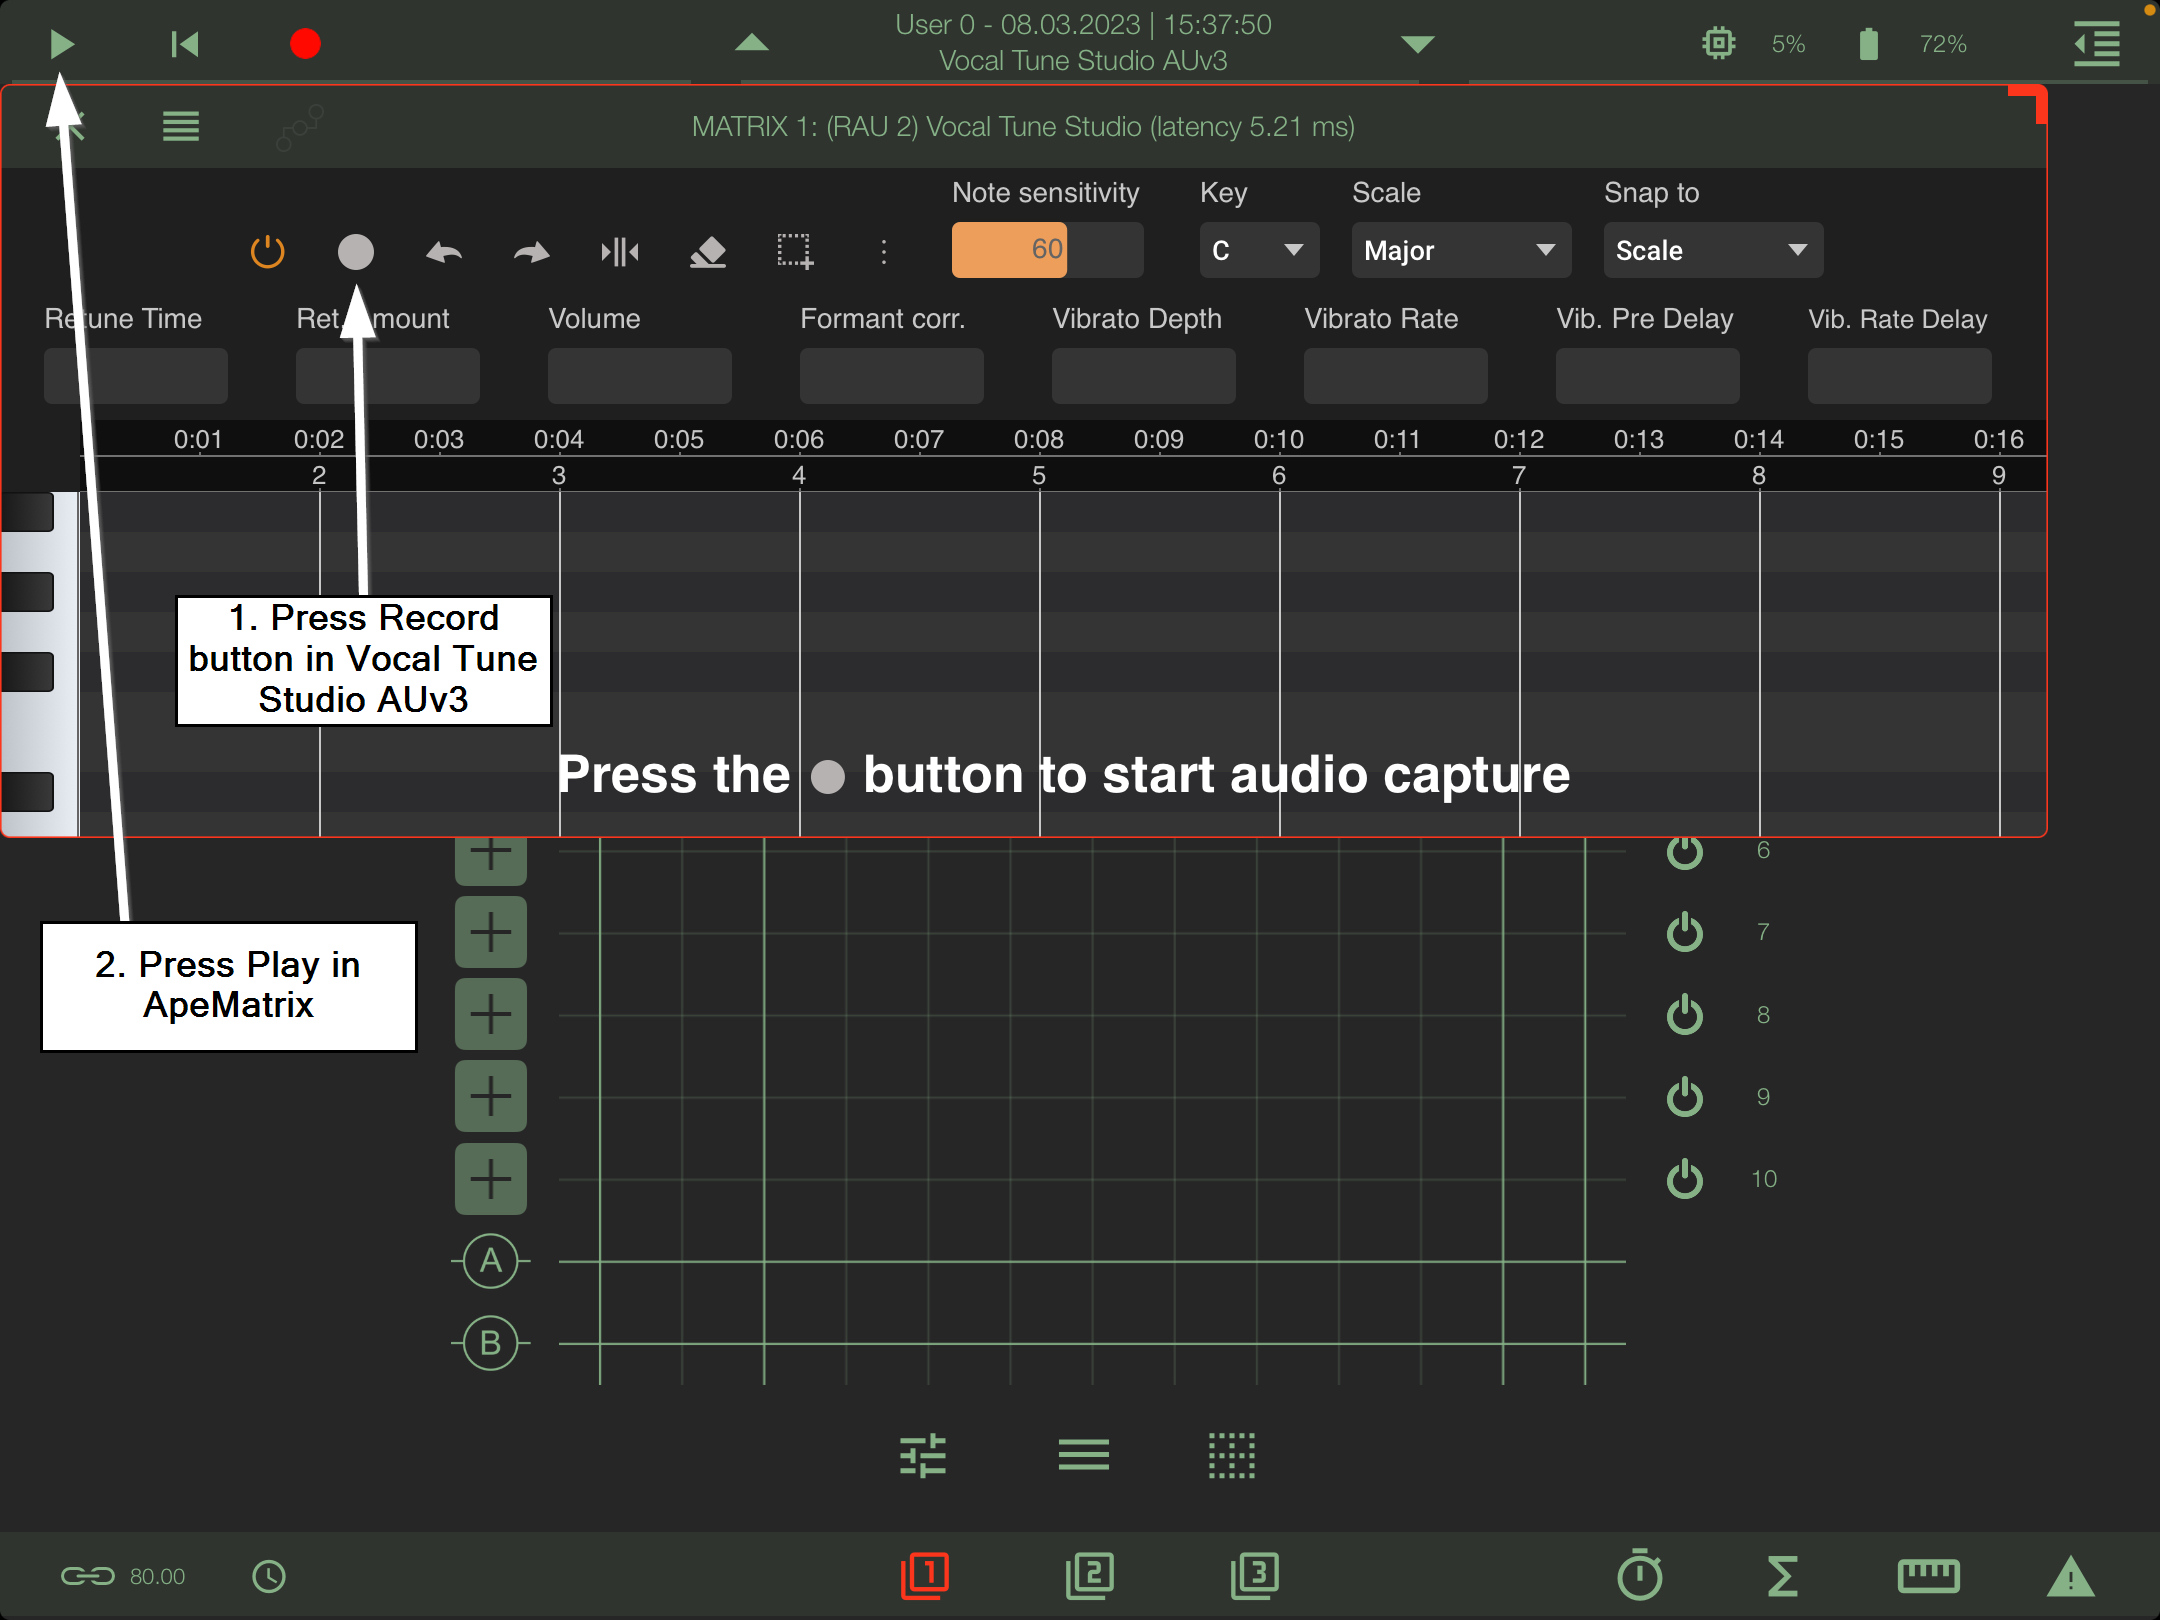
Once you have opened the Vocal Tune Studio interface and selected the mode in which you'd like it to run (Pitch and Time correction or Time correction only), you then need to record the audio from your track into the Vocal Tune Studio plug-in. As instructed in the previous section, to capture audio into Vocal Tune Studio, you need to press the Record ![]() button in Vocal Tune Studio AUv3 followed by Play/Pause
button in Vocal Tune Studio AUv3 followed by Play/Pause ![]() in apeMatrix which will start playback of the audio loaded into the Sampler and simultaneously start audio capture within Vocal Tune Studio. Press the Record button again in Vocal Tune Studio, or Play/Pause in apeMatrix, to stop the audio capture.
in apeMatrix which will start playback of the audio loaded into the Sampler and simultaneously start audio capture within Vocal Tune Studio. Press the Record button again in Vocal Tune Studio, or Play/Pause in apeMatrix, to stop the audio capture.
Vocal Tune Studio will analyze the captured audio after which point you can carry out any pitch and time corrections needed as explained in this manual.
You can reposition the Vocal Tune Studio AUv3 plug-in window by pressing, holding and sliding using the name strip along the top of its interface. The window can be resized using the handle ![]() at the top right right of its interface.
at the top right right of its interface.
Close the AUv3 window by pressing the ![]() button.
button.
Because apeMatrix doesn't have a timeline or patterns in the way of some other hosts here, please remember that exporting is done by internally recording the playback audio using the Record ![]() button so this is what you'll want to do once you have made your adjustments in Vocal Tune Studio. Don't forget to press Play
button so this is what you'll want to do once you have made your adjustments in Vocal Tune Studio. Don't forget to press Play ![]() after pressing Record to begin playback.
after pressing Record to begin playback.
Audio Evolution Mobile Studio by eXtream Software Development
Audio Evolution Mobile Studio has a fully integrated version of Vocal Tune Studio - our recommended version for the ultimate experience of Vocal Tune Studio - available as an in-app purchase which offers significant workflow benefits and convenience over the plug-in AUv3 version (though the core functionality is the same). It is possible, though, that you might decide that you'd rather purchase the Standalone/AUv3 version of Vocal Tune Studio and use it within Audio Evolution Mobile Studio instead of buying the integrated version. This can be easily done if so desired.
Once you have recorded your vocal performance (or imported a previously recorded performance via Project > File browser or Import using the Files app) onto an audio track, press the track's FX grid ![]() button in its channel strip. Depending on the size of the screen you're using, you may have to move through the track's channel strip Page Selector
button in its channel strip. Depending on the size of the screen you're using, you may have to move through the track's channel strip Page Selector ![]() by tapping on it to locate the page upon which the FX grid button is located.
by tapping on it to locate the page upon which the FX grid button is located.
Now, tap on an empty block in the effects grid at the bottom of the Effects screen which will have opened. This will open the effects selection dialog. On the left of this dialog, select Audio Units which will then list all of your installed AUv3 plug-ins to the right of the dialog. Scroll down the list until you find Vocal Tune Studio and tap on it to select and load it into the effects chain for the track, opening its user interface on the effects screen.
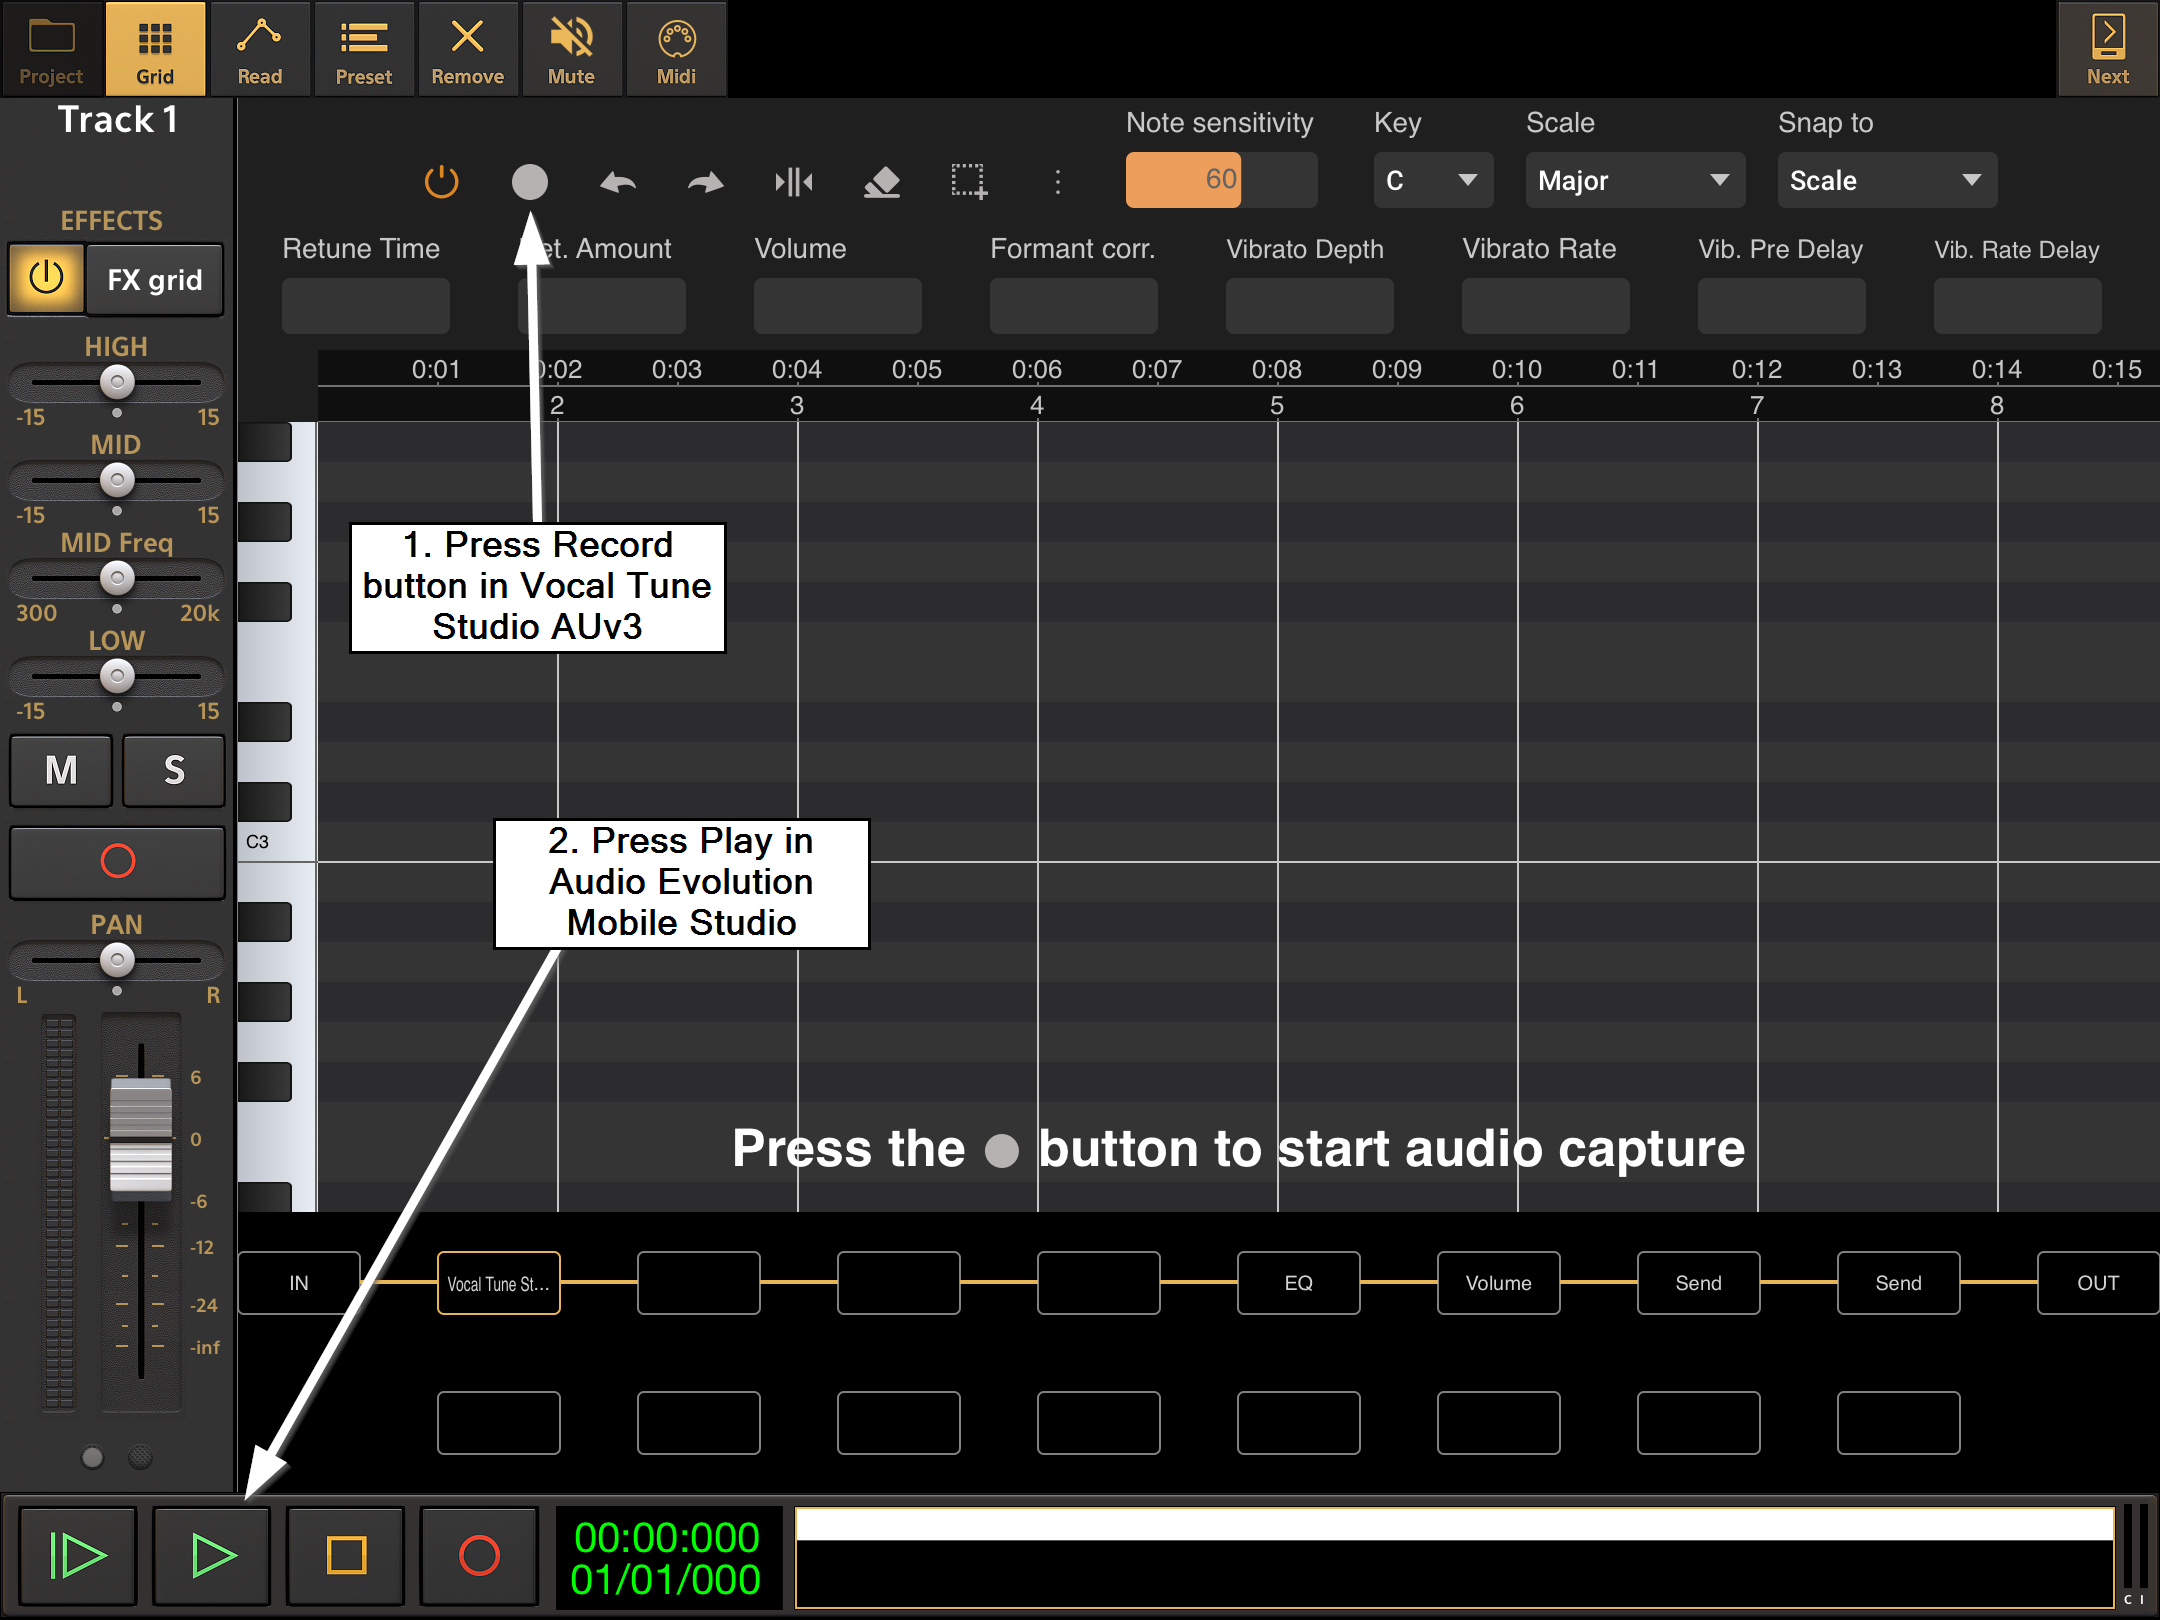
Once you have opened the Vocal Tune Studio interface and selected the mode in which you'd like it to run (Pitch and Time correction or Time correction only), you then need to record the audio from your track into the Vocal Tune Studio plug-in. As instructed in the previous section, to capture audio into Vocal Tune Studio, you need to press the Record ![]() button in Vocal Tune Studio AUv3 followed by Play
button in Vocal Tune Studio AUv3 followed by Play ![]() in Audio Evolution Mobile Studio which will start playback of the audio on the track and simultaneously start audio capture within Vocal Tune Studio. Press the Record button again in Vocal Tune Studio, or Stop
in Audio Evolution Mobile Studio which will start playback of the audio on the track and simultaneously start audio capture within Vocal Tune Studio. Press the Record button again in Vocal Tune Studio, or Stop ![]() in Audio Evolution Mobile Studio, to stop the audio capture.
in Audio Evolution Mobile Studio, to stop the audio capture.
Vocal Tune Studio will analyze the captured audio after which point you can carry out any pitch and time corrections needed as explained in this manual.
Audio Evolution Mobile Studio is used as the host in the Example Tutorial later in this manual if you would like to have this process explained in greater detail.
To maximize the size of the AUv3 plugin interface, press the Grid ![]() button at the top of the effects page which will hide the FX grid and resize the AUv3 plug-in interface accordingly. Press the Grid button again to display the FX grid.
button at the top of the effects page which will hide the FX grid and resize the AUv3 plug-in interface accordingly. Press the Grid button again to display the FX grid.
Press the Next ![]() button, top right, to return to the main Arranger Screen of Audio Evolution Mobile Studio or select a different effect loaded on the FX grid to have its interface displayed instead of Vocal Tune Studio AUv3.
button, top right, to return to the main Arranger Screen of Audio Evolution Mobile Studio or select a different effect loaded on the FX grid to have its interface displayed instead of Vocal Tune Studio AUv3.
AUM doesn't have audio tracks as such, so the easiest way to use Vocal Tune Studio AUv3 within it is to have an audio track/channel with a File Player (+>Sources>AUM>File Player) loaded on it, into which is loaded the audio file you want to correct in Vocal Tune Studio. Remember to set your host to the correct time signature and tempo for your audio so that bar lines are drawn in the correct place when you record into Vocal Tune Studio. Then load Vocal Tune Studio as an insert effect on that channel (+>Inserts & Effects>Plugins>Audio Unit Extension>Extream>Vocal Tune Studio) as seen here.
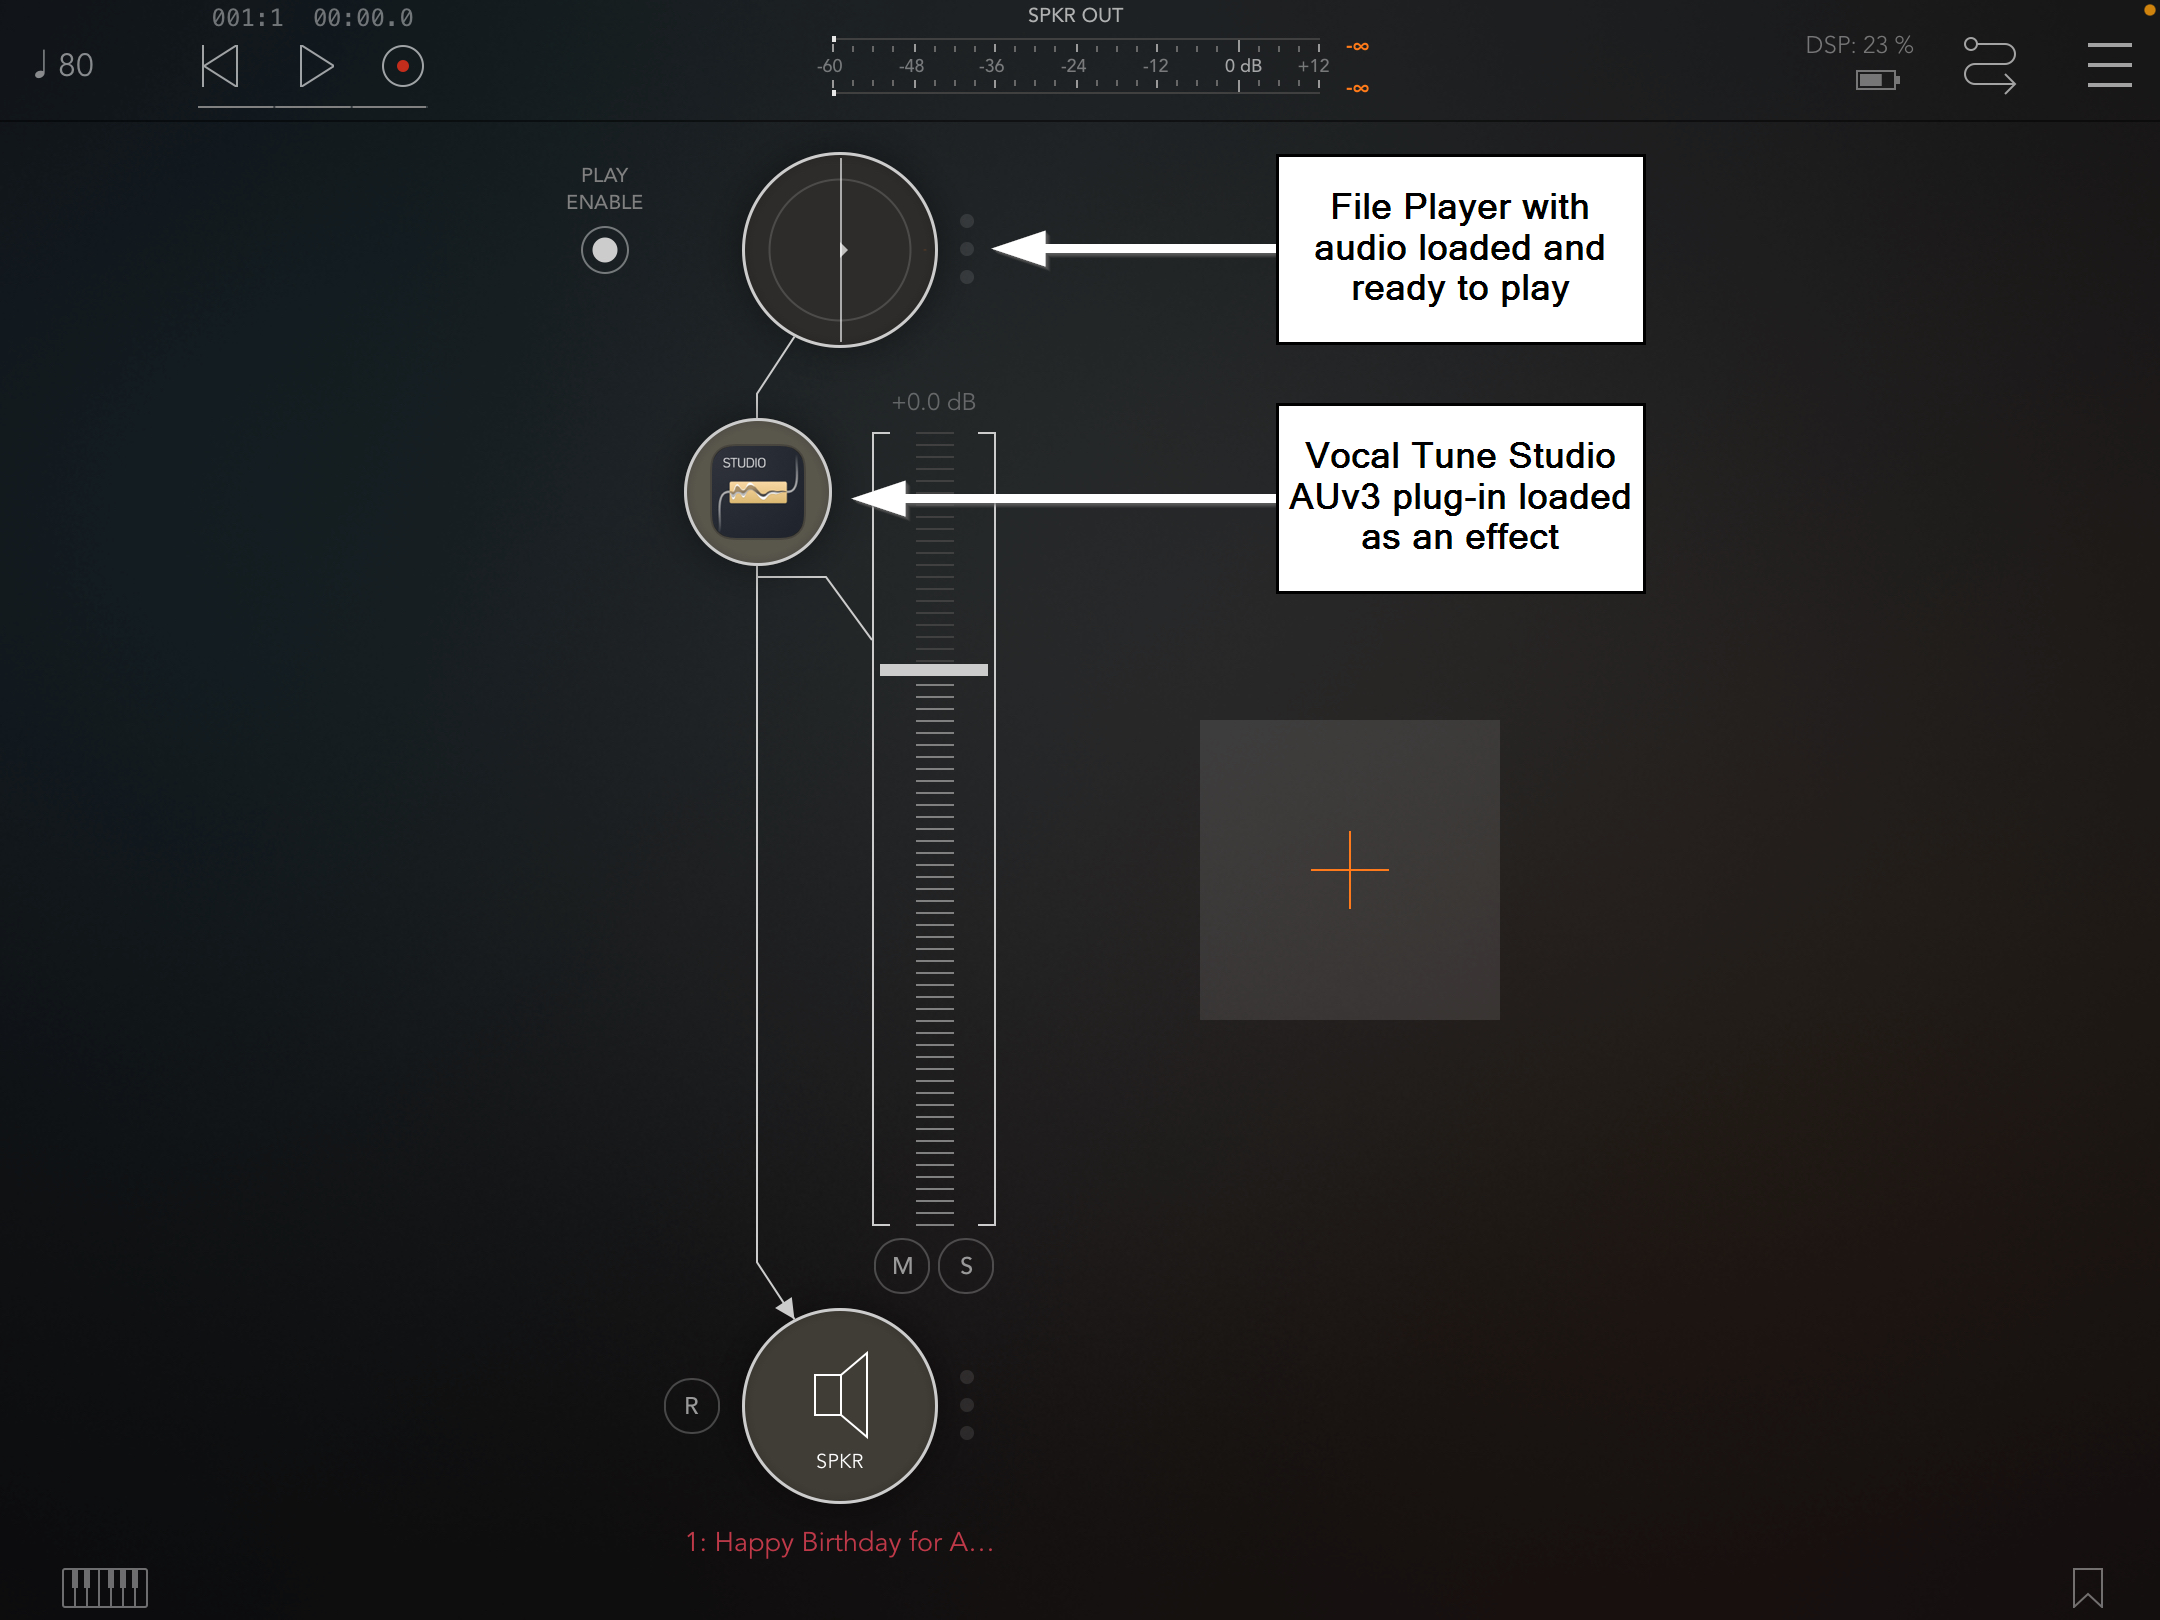
Tap on the Vocal Tune Studio icon on the channel in AUM to open the Vocal Tune Studio AUv3 plug-in as can be seen here.
Select the mode you want Vocal Tune Studio to open in. Then, as instructed in the previous section, to capture audio into Vocal Tune Studio, you need to press the Record ![]() button in Vocal Tune Studio AUv3 followed by Play/Pause
button in Vocal Tune Studio AUv3 followed by Play/Pause ![]() in AUM which will start playback of the audio file loaded into the File Player and simultaneously start audio capture within Vocal Tune Studio. Press the Record button again in Vocal Tune Studio, or Play/Pause again in AUM, to stop the audio capture.
in AUM which will start playback of the audio file loaded into the File Player and simultaneously start audio capture within Vocal Tune Studio. Press the Record button again in Vocal Tune Studio, or Play/Pause again in AUM, to stop the audio capture.

Vocal Tune Studio will analyze the captured audio after which point you can carry out any pitch and time corrections needed as explained in this manual.
You can reposition the Vocal Tune Studio AUv3 plug-in window by pressing, holding and sliding using the name strip along the top of its interface. The window can be resized using the handle ![]() at the bottom right of its interface.
at the bottom right of its interface.
Close the AUv3 window by pressing the ![]() button.
button.
Because AUM doesn't have a timeline or patterns in the way of some other hosts here, please remember that exporting is done by internally recording the playback audio using the Record ![]() button so this is what you'll want to do once you have made your adjustments in Vocal Tune Studio. Remember to Record enable your channel by pressing
button so this is what you'll want to do once you have made your adjustments in Vocal Tune Studio. Remember to Record enable your channel by pressing ![]() next to its Speaker icon before pressing Record.
next to its Speaker icon before pressing Record.
Cubasis 3 by Steinberg Media Technologies GmbH
You can choose to either record your vocals live onto an audio track within Cubasis 3 or import a previously recorded vocal performance. Live vocal performances can be recorded by creating and selecting an audio track before pressing Record. Remember to use headphones to ensure that only your vocals are heard in the recording and not any audio present on other tracks during recording.
To import previously recorded audio onto an audio track, create an audio track and tap on the MEDIA icon at the top left of the interface. From the options which will open at the bottom of the screen, select Audio on the left and then double tap on My Audio Files in the center. If you haven't already imported your vocal performance into Cubasis 3's media, tap on IMPORT at the bottom of the screen. This will allow you to import your audio file using either AudioShare, Apple Music or the Files app. Use one of these methods to locate your file and import it. After doing this you may need to reopen the MEDIA options. Now your vocal performance will be present in the My Audio Files section. To add your audio file to the timeline, long press on the file's name in the My Audio Files section and continue to hold as you slide it across and position it on the timeline of the audio track you created.
Once you have your audio present on a track, the process of loading and using Vocal Tune Studio is the same whether it was recorded or imported.
Make sure your audio track is selected by tapping on its timeline area. This will bring up its various track options to the left of the interface, topped by the name of the track.
From those options, tap on Insert Effects and then Tap to Add Effect. This will open an interface at the bottom of the screen.
To the left of that interface, tap on Audio Units. This will open a list of the AUv3 plug-ins installed on your device.
Scroll down the list until you find Vocal Tune Studio. Tap on its name to load it as an insert effect on your audio track. Its interface will load to the right.
Once you have selected the mode in which you'd like it to run (Pitch and Time correction or Time correction only), you then need to record the audio from your track into the Vocal Tune Studio plug-in. As instructed in the previous section, to capture audio into Vocal Tune Studio, you need to press the Record ![]() button in Vocal Tune Studio AUv3 followed by Play
button in Vocal Tune Studio AUv3 followed by Play ![]() in Cubasis 3 which will start playback of the audio on the track and simultaneously start audio capture within Vocal Tune Studio. Press the Record button again in Vocal Tune Studio, or Play again in Cubasis 3, to stop the audio capture.
in Cubasis 3 which will start playback of the audio on the track and simultaneously start audio capture within Vocal Tune Studio. Press the Record button again in Vocal Tune Studio, or Play again in Cubasis 3, to stop the audio capture.
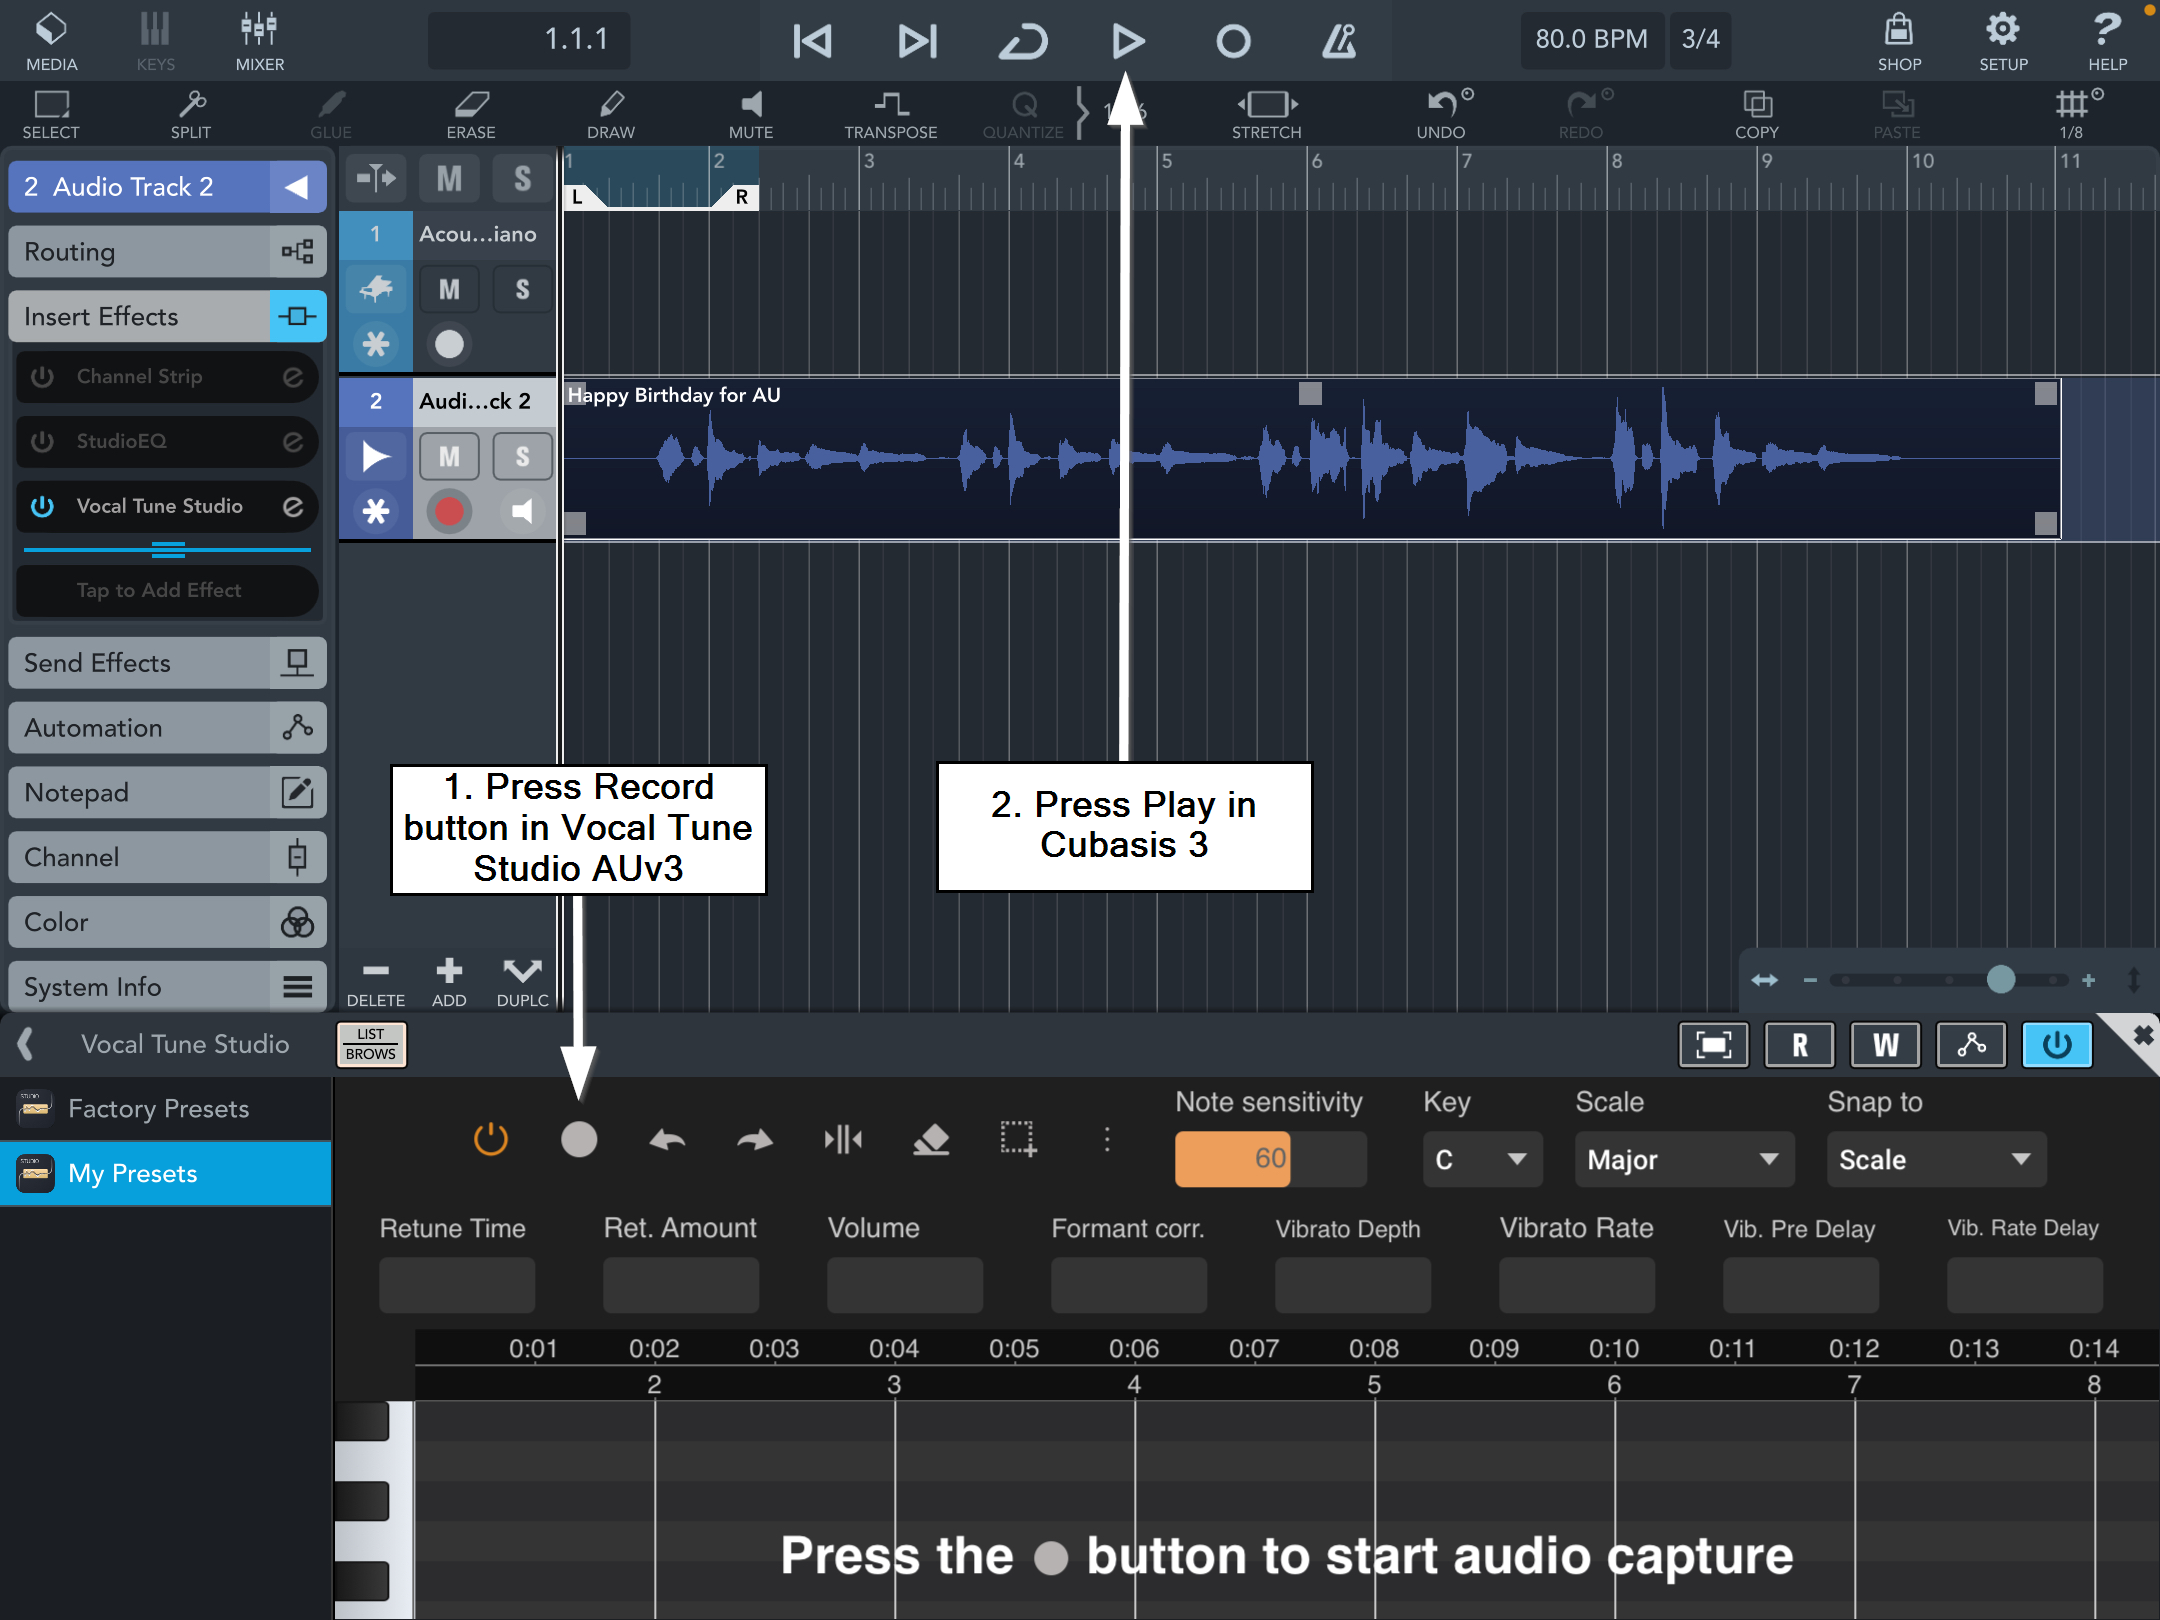
Vocal Tune Studio will analyze the captured audio after which point you can carry out any pitch and time corrections needed as explained in this manual.
You can resize the Vocal Tune Studio AUv3 plug-in window by pressing, holding and sliding using the name strip along the top of its interface. To immediately maximize the display of the AUv3 plug-in in GarageBand, press the Full-screen view ![]() button. Press the Full-screen view button again to minimize the view again when required.
button. Press the Full-screen view button again to minimize the view again when required.
Press ![]() to close the Vocal Tune Studio AUv3 interface.
to close the Vocal Tune Studio AUv3 interface.
Just like apeMatrix and AUM, Drambo doesn't have audio tracks per se. Not surprisingly then, the solution for using Vocal Tune Studio in Drambo is largely the same as for those two: use a sampler to load your pre-recorded vocal audio file into. Shown below is an example using the Flexi Sampler module.
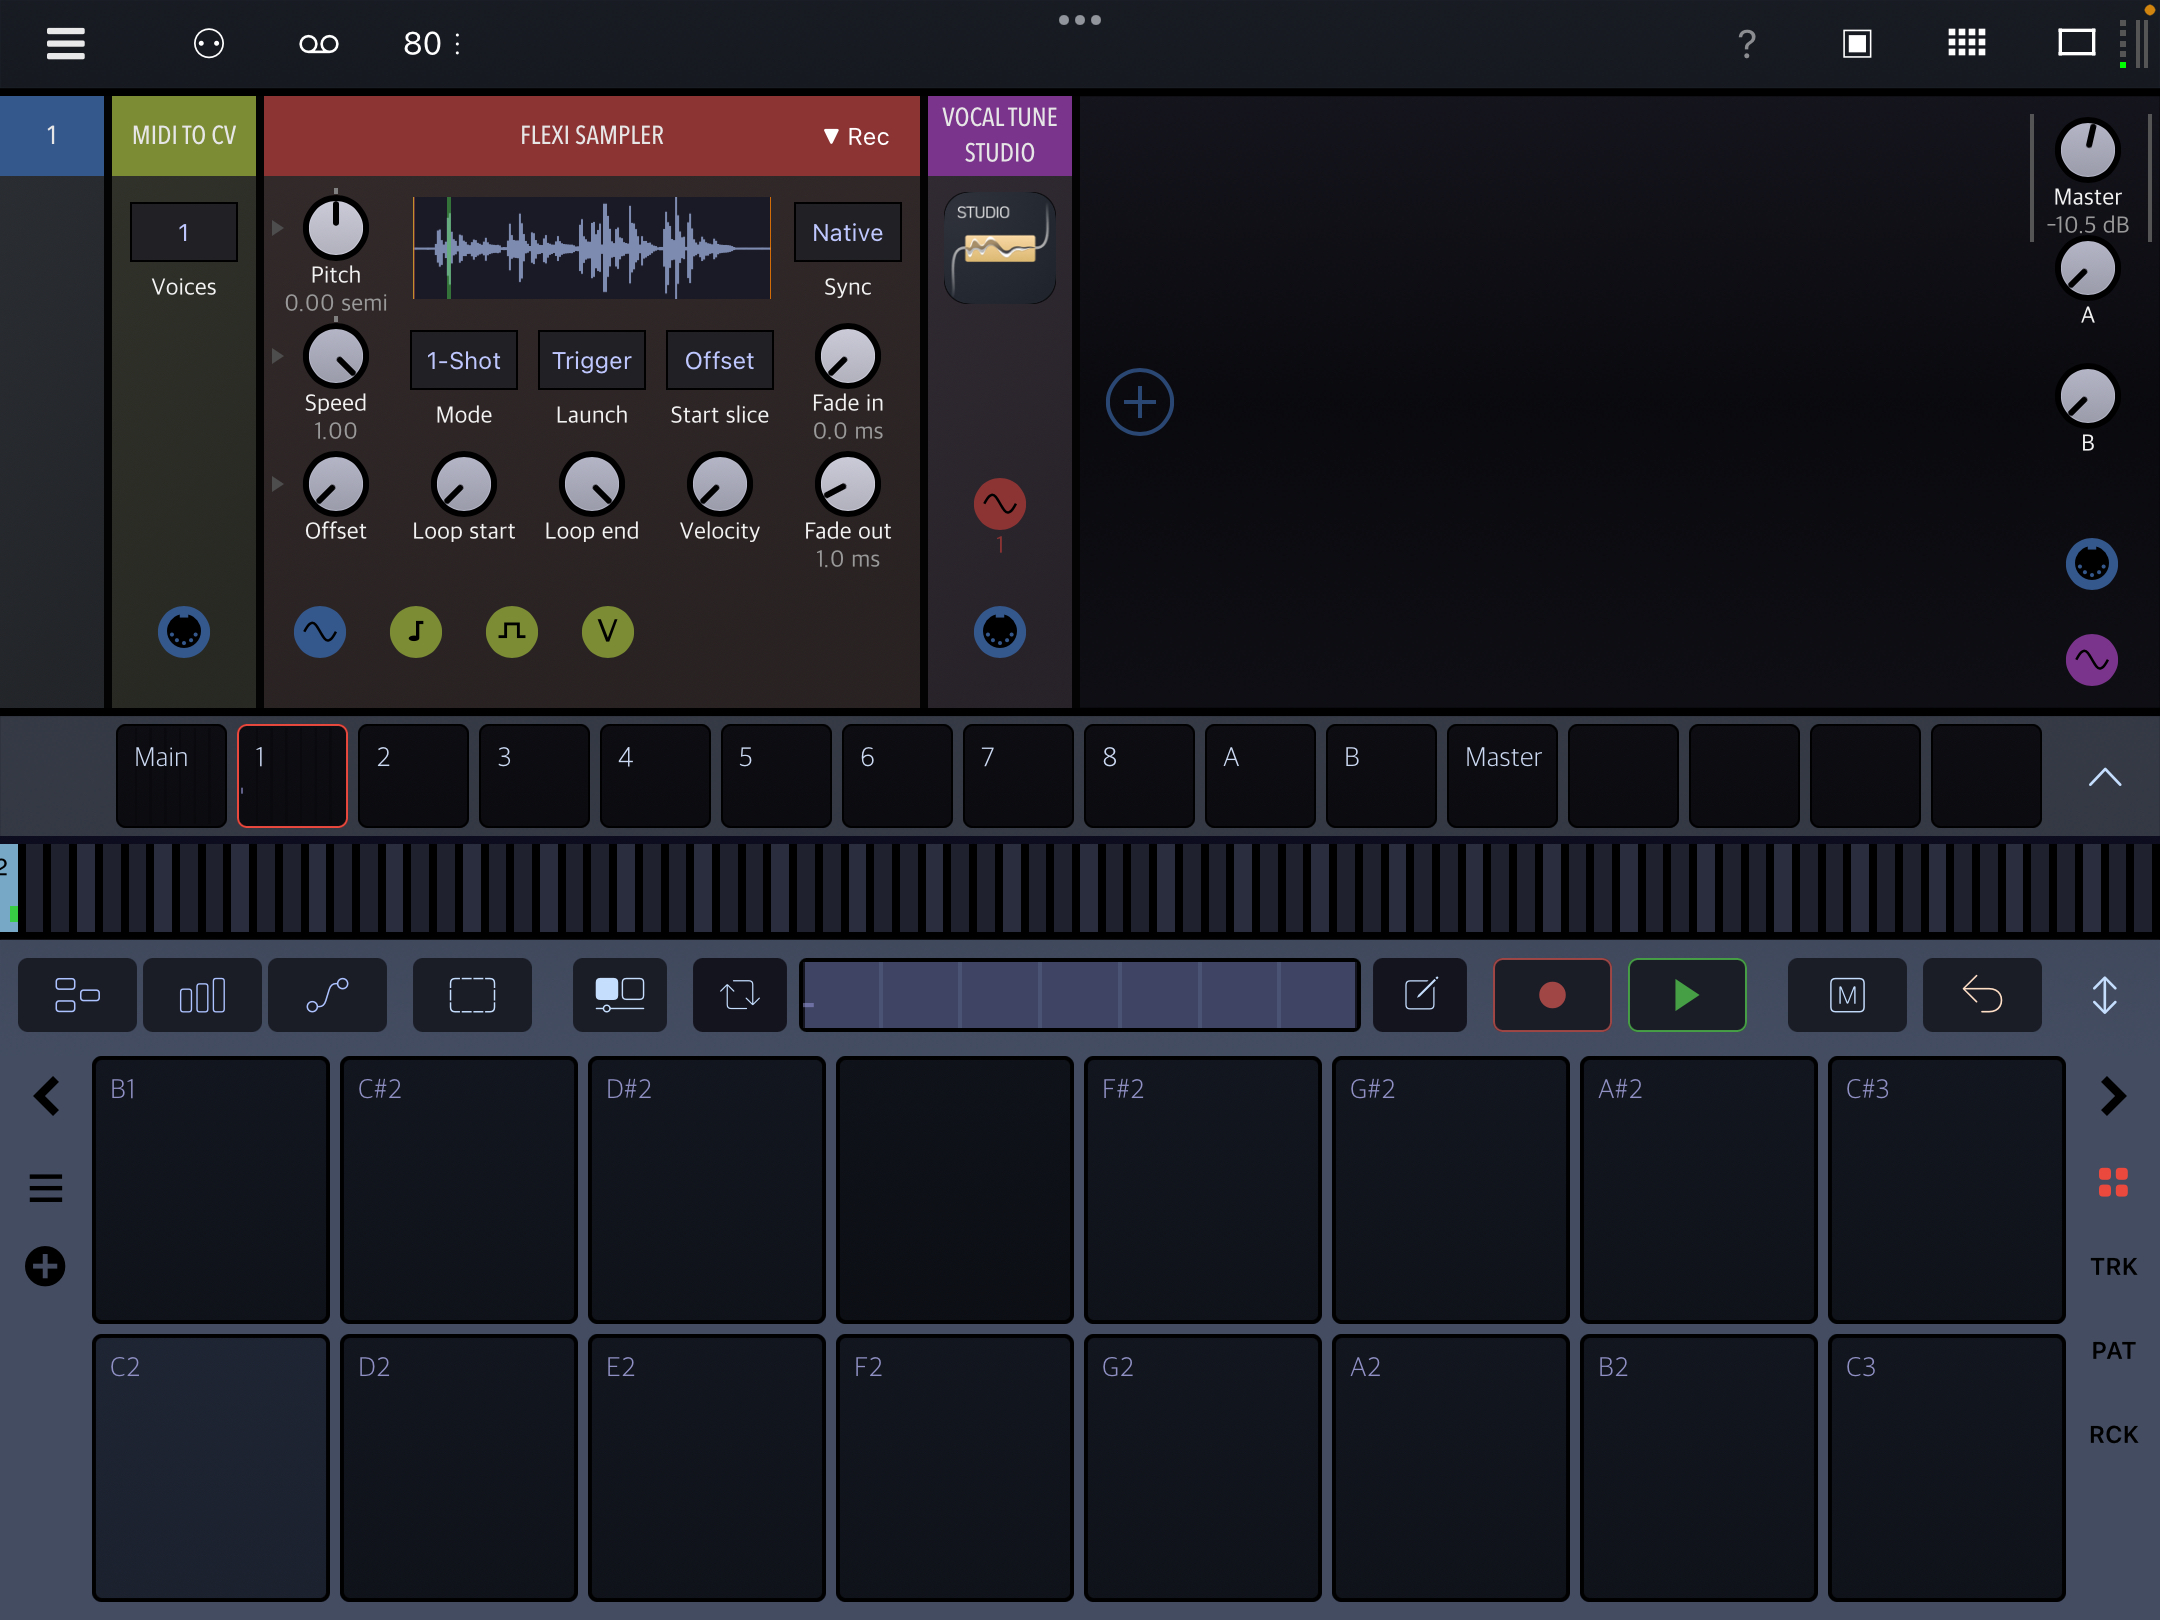
So, here a Flexi Sampler module has been loaded by pressing the Add module ![]() button to open the Library and navigating through the available modules - it can be found in the GENERATOR>SAMPLER section of the library or in the SAMPLER section of the tagged library.
button to open the Library and navigating through the available modules - it can be found in the GENERATOR>SAMPLER section of the library or in the SAMPLER section of the tagged library.
Once you have your sampler module in place, you then want to load your audio file into it. As the Help text indicates, you want to tap on the waveform display area of the sampler module to load an audio file. Doing this opens the Sample Library. If you have already imported your vocal performance you can select it from the list of available samples. Should you need to import it, press the Import ![]() button at the bottom of the interface. This will open the Files app, allowing you to navigate to your chosen audio file on your device. Once found, tap on its name and it will be imported and added to the list in the Sample Library in Drambo. Tap on its name to load it into the Flexi Sampler module.
button at the bottom of the interface. This will open the Files app, allowing you to navigate to your chosen audio file on your device. Once found, tap on its name and it will be imported and added to the list in the Sample Library in Drambo. Tap on its name to load it into the Flexi Sampler module.
The Flexi Sampler module's playback needs to be triggered by a MIDI note in the pattern in order to begin playback when Play is pressed in Drambo. Please be aware that you should select the C2 note in order for your audio file to be played back at its original speed and pitch. Press the C2 pad at the bottom (or on the keyboard view if you have that displayed) and then tap on the first note in the pattern grid to add it as the trigger, as has happened above. Please also be careful to make sure that there are enough bars present in the pattern to allow for the whole length of your audio file to be played back after it is triggered. In the example above, seven bars needed to be created to ensure this happened. You can add extra bars to your pattern via the ![]() button.
button.
Now that you have your sampler ready, your audio file of your vocal performance loaded and the MIDI note placed on the pattern to trigger playback, you want to add Vocal Tune Studio AUv3 after the Flexi Sampler module. To do this, press the Add module ![]() button to open the Library. It can be found via PROCESSOR>DEVICE>Audio Unit Processor in the library or AU>Audio Unit Processor in the tagged library. Once you've located Audio Unit Processor, press the
button to open the Library. It can be found via PROCESSOR>DEVICE>Audio Unit Processor in the library or AU>Audio Unit Processor in the tagged library. Once you've located Audio Unit Processor, press the ![]() symbol next to it to open the list of Audio Unit effects/processors installed on your device. Scroll down the list until you find Vocal Tune Studio and tap on its name to load it as can be seen in the screenshot above. If you tap on Audio Unit Processor instead of the symbol next to it, the module will be created without a specific Audio Unit loaded. In this situation, simply tap on the + symbol on the module (where the Vocal Tune Studio icon is above) to open the list of Audio Units and then load Vocal Tune Studio AUv3.
symbol next to it to open the list of Audio Unit effects/processors installed on your device. Scroll down the list until you find Vocal Tune Studio and tap on its name to load it as can be seen in the screenshot above. If you tap on Audio Unit Processor instead of the symbol next to it, the module will be created without a specific Audio Unit loaded. In this situation, simply tap on the + symbol on the module (where the Vocal Tune Studio icon is above) to open the list of Audio Units and then load Vocal Tune Studio AUv3.
With Vocal Tune Studio AUv3 loaded, tap on its icon to open its interface.
Once you have selected the mode in which you'd like it to run (Pitch and Time correction or Time correction only), you then need to record the audio from your track into the Vocal Tune Studio plug-in. As instructed in the previous section, to capture audio into Vocal Tune Studio, you need to press the Record ![]() button in Vocal Tune Studio AUv3 followed by Play
button in Vocal Tune Studio AUv3 followed by Play ![]() in Drambo which will start playback of the audio loaded into the Sampler and simultaneously start audio capture within Vocal Tune Studio. Press the Record button again in Vocal Tune Studio, or Play in Drambo, to stop the audio capture.
in Drambo which will start playback of the audio loaded into the Sampler and simultaneously start audio capture within Vocal Tune Studio. Press the Record button again in Vocal Tune Studio, or Play in Drambo, to stop the audio capture.
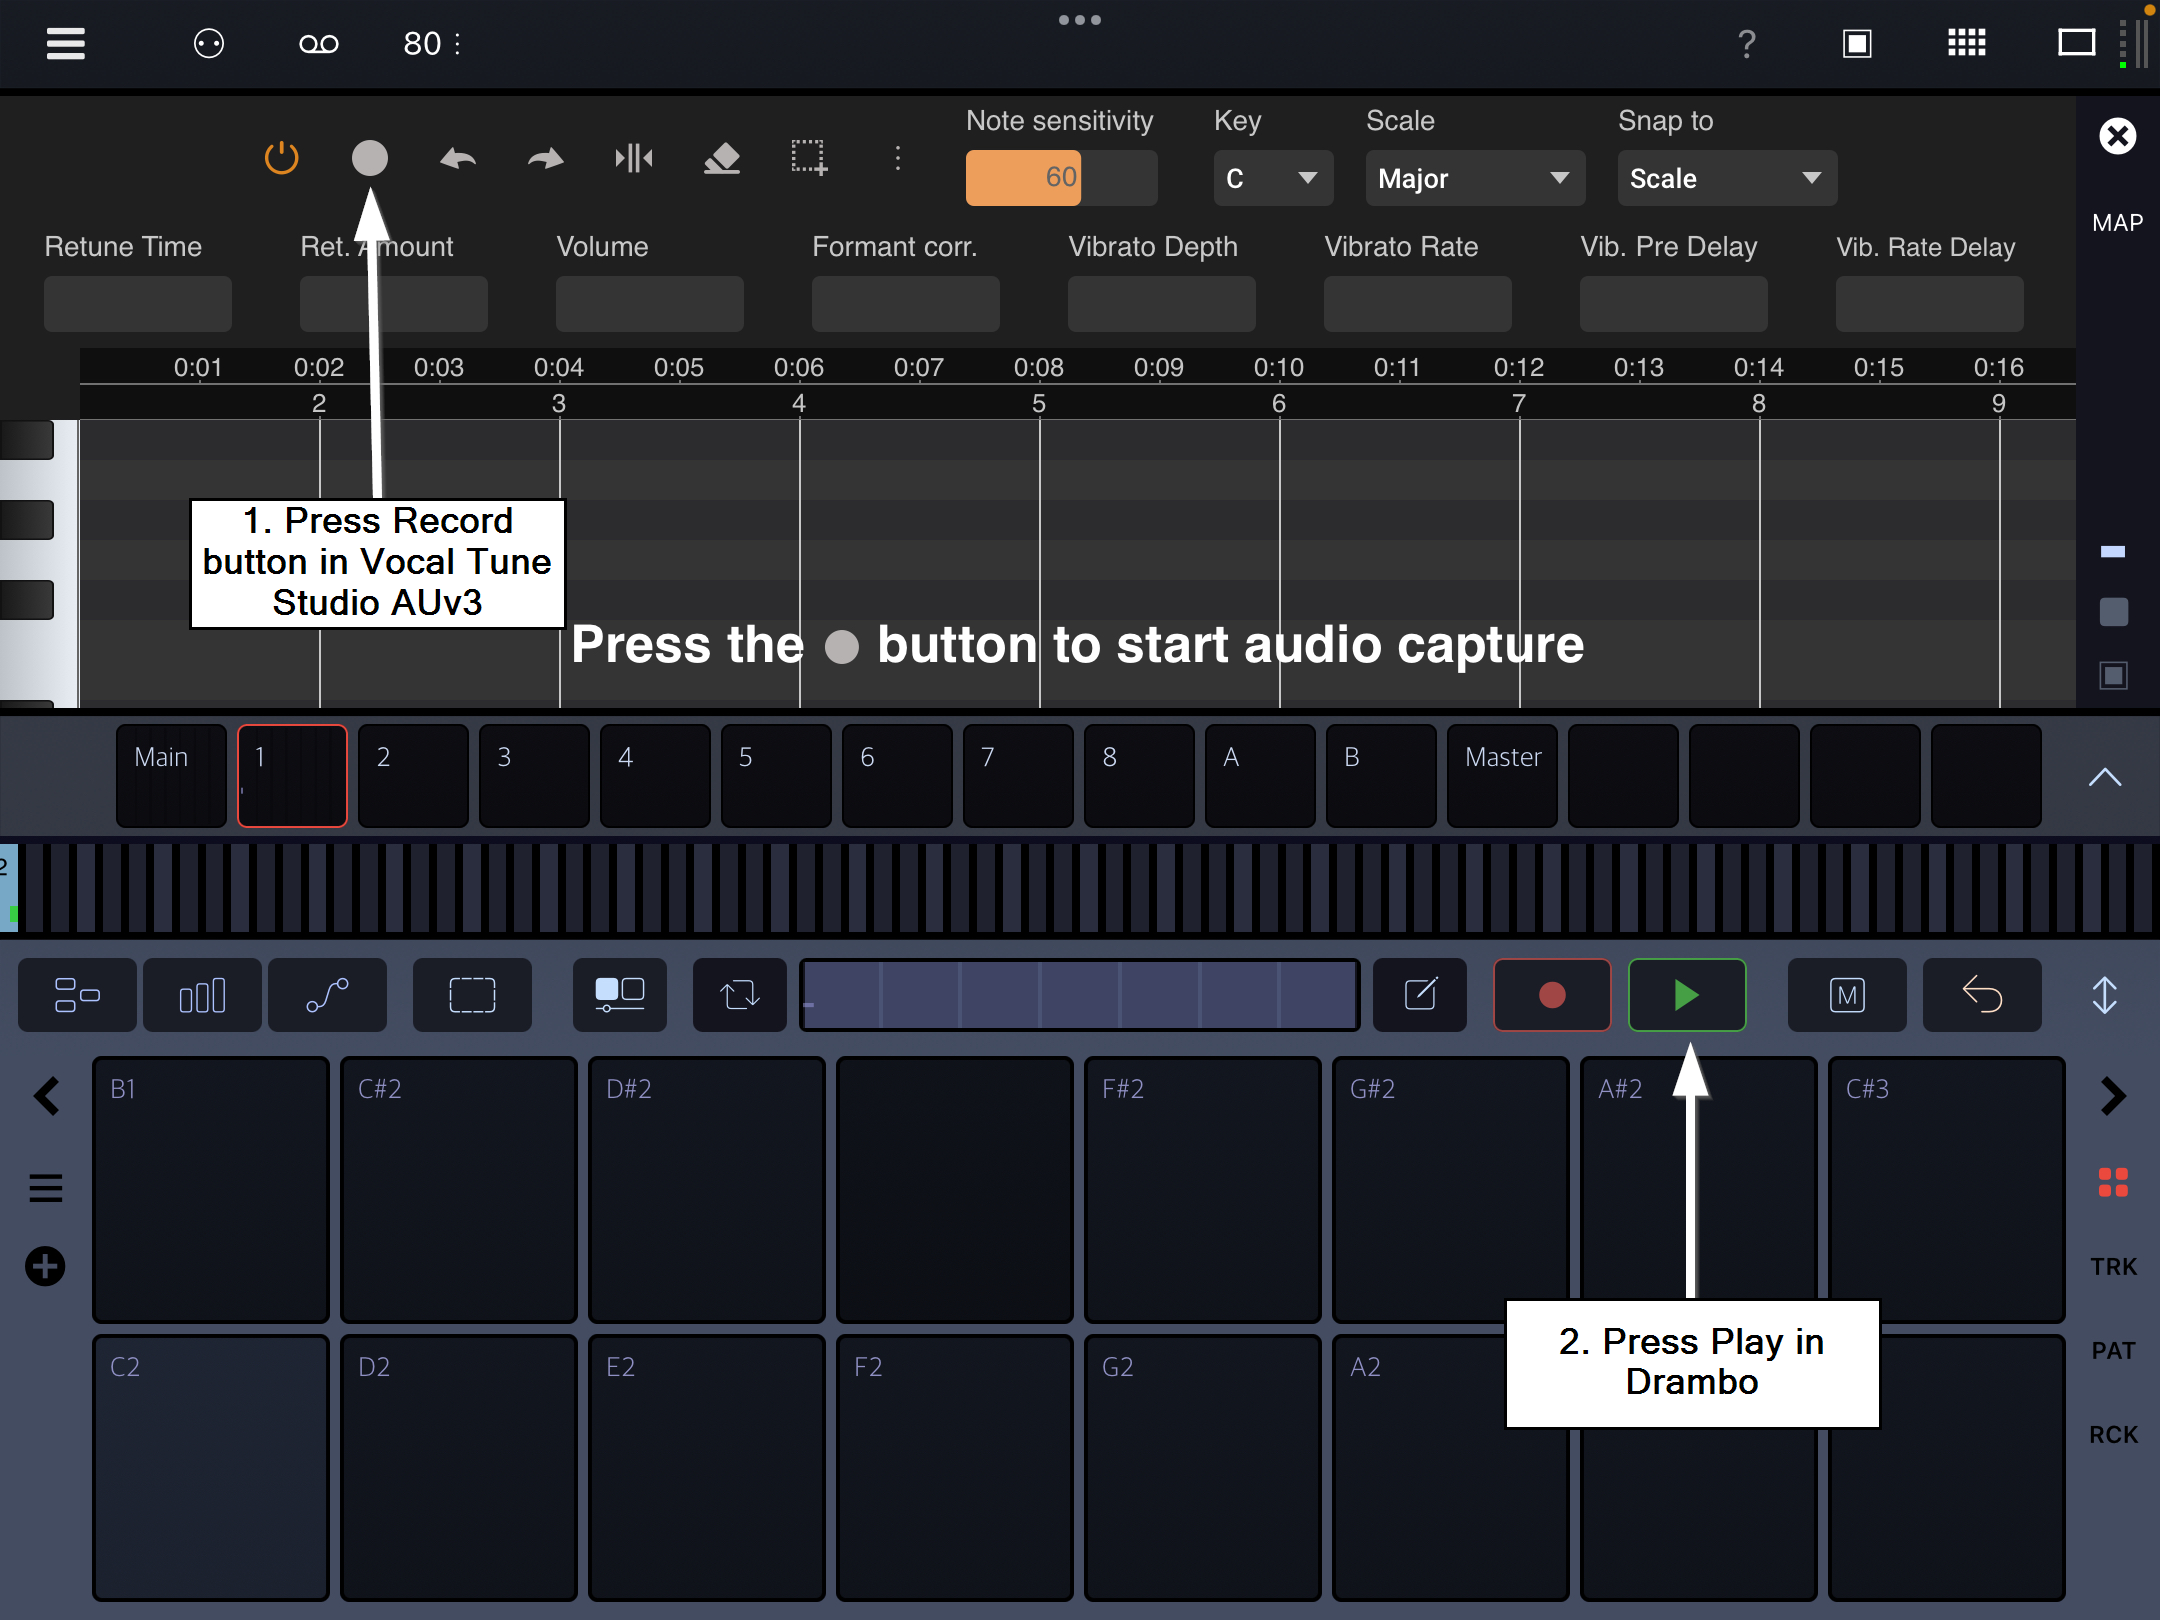
Vocal Tune Studio will analyze the captured audio after which point you can carry out any pitch and time corrections needed as explained in this manual.
The Vocal Tune Studio AUv3 plug-in interface can be resized in Drambo using the ![]() buttons. The top option gives the small view as seen in the screenshot above. The middle button opens a larger view which is automatically scaled according the slide-able size of the keyboard/pad section below it. The bottom button opens the AUv3 plug-in as a floating window which you can freely move, by pressing, holding and sliding using the name strip along the top of its interface; and resize using the
buttons. The top option gives the small view as seen in the screenshot above. The middle button opens a larger view which is automatically scaled according the slide-able size of the keyboard/pad section below it. The bottom button opens the AUv3 plug-in as a floating window which you can freely move, by pressing, holding and sliding using the name strip along the top of its interface; and resize using the ![]() handle at the bottom right of its interface
handle at the bottom right of its interface
Close the Vocal Tune Studio AUv3 interface using the ![]() button.
button.
GarageBand is made by Apple and is free to everyone who owns an iPad or iPhone. You can choose to either record your vocals live onto a track within GarageBand or import a previously recorded vocal performance. Live vocal performances can be recorded by selecting the Audio Recorder option. Remember to use headphones to ensure that only your vocals are heard in the recording and not any audio present on other tracks during recording.
To import a previously recorded vocal performance, go to the main track view and tap on the Loop Browser ![]() button towards the top right of the interface (iPad). Select Files and then Browse items from the Files app. This opens the Files app which allows you to navigate the your desired audio file. Tap on your chosen file to import it. Now it appears in the list of available loops. Long press on the file name and continue to hold and slide it onto the track timeline where you can position it, releasing your finger at the chosen location. Full details about this process can be found here.
button towards the top right of the interface (iPad). Select Files and then Browse items from the Files app. This opens the Files app which allows you to navigate the your desired audio file. Tap on your chosen file to import it. Now it appears in the list of available loops. Long press on the file name and continue to hold and slide it onto the track timeline where you can position it, releasing your finger at the chosen location. Full details about this process can be found here.
Once you have your audio present on a track, the process of loading and using Vocal Tune Studio is the same whether it was recorded or imported.
Select the track by tapping on its icon on the left.
Select the Track Settings/Options  button at the top of the interface.
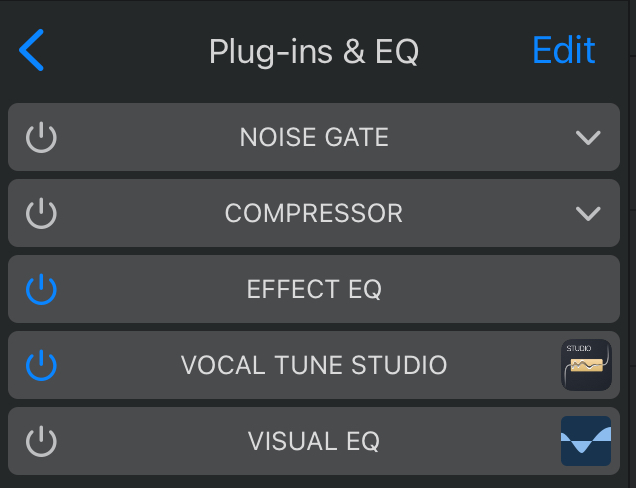
Press PLUG-INS & EQ >.
Press Edit.
Tap on one of the empty effect slots labeled as NONE.
The pop-up effect selection screen will, by default, be showing the effects included in GarageBand. At the top of this interface, instead of Effects, select Audio Unit Extensions. Scroll through the list of Audio Unit Extensions installed on your device until you find Vocal Tune Studio. Tap on its name and it will be loaded on the track as an insert effect, ready to use.
To open the Vocal Tune Studio interface in order to use it, tap on its name in the PLUG-INS & EQ list as seen here.
Once you have opened the Vocal Tune Studio interface and selected the mode in which you'd like it to run (Pitch and Time correction or Time correction only), you then need to record the audio from your track into the Vocal Tune Studio plug-in. As instructed in the previous section, to capture audio into Vocal Tune Studio, you need to press the Record ![]() button in Vocal Tune Studio AUv3 followed by Play
button in Vocal Tune Studio AUv3 followed by Play ![]() in GarageBand which will start playback of the audio on the track and simultaneously start audio capture within Vocal Tune Studio. Press the Record button again in Vocal Tune Studio, or Play again in GarageBand, to stop the audio capture.
in GarageBand which will start playback of the audio on the track and simultaneously start audio capture within Vocal Tune Studio. Press the Record button again in Vocal Tune Studio, or Play again in GarageBand, to stop the audio capture.
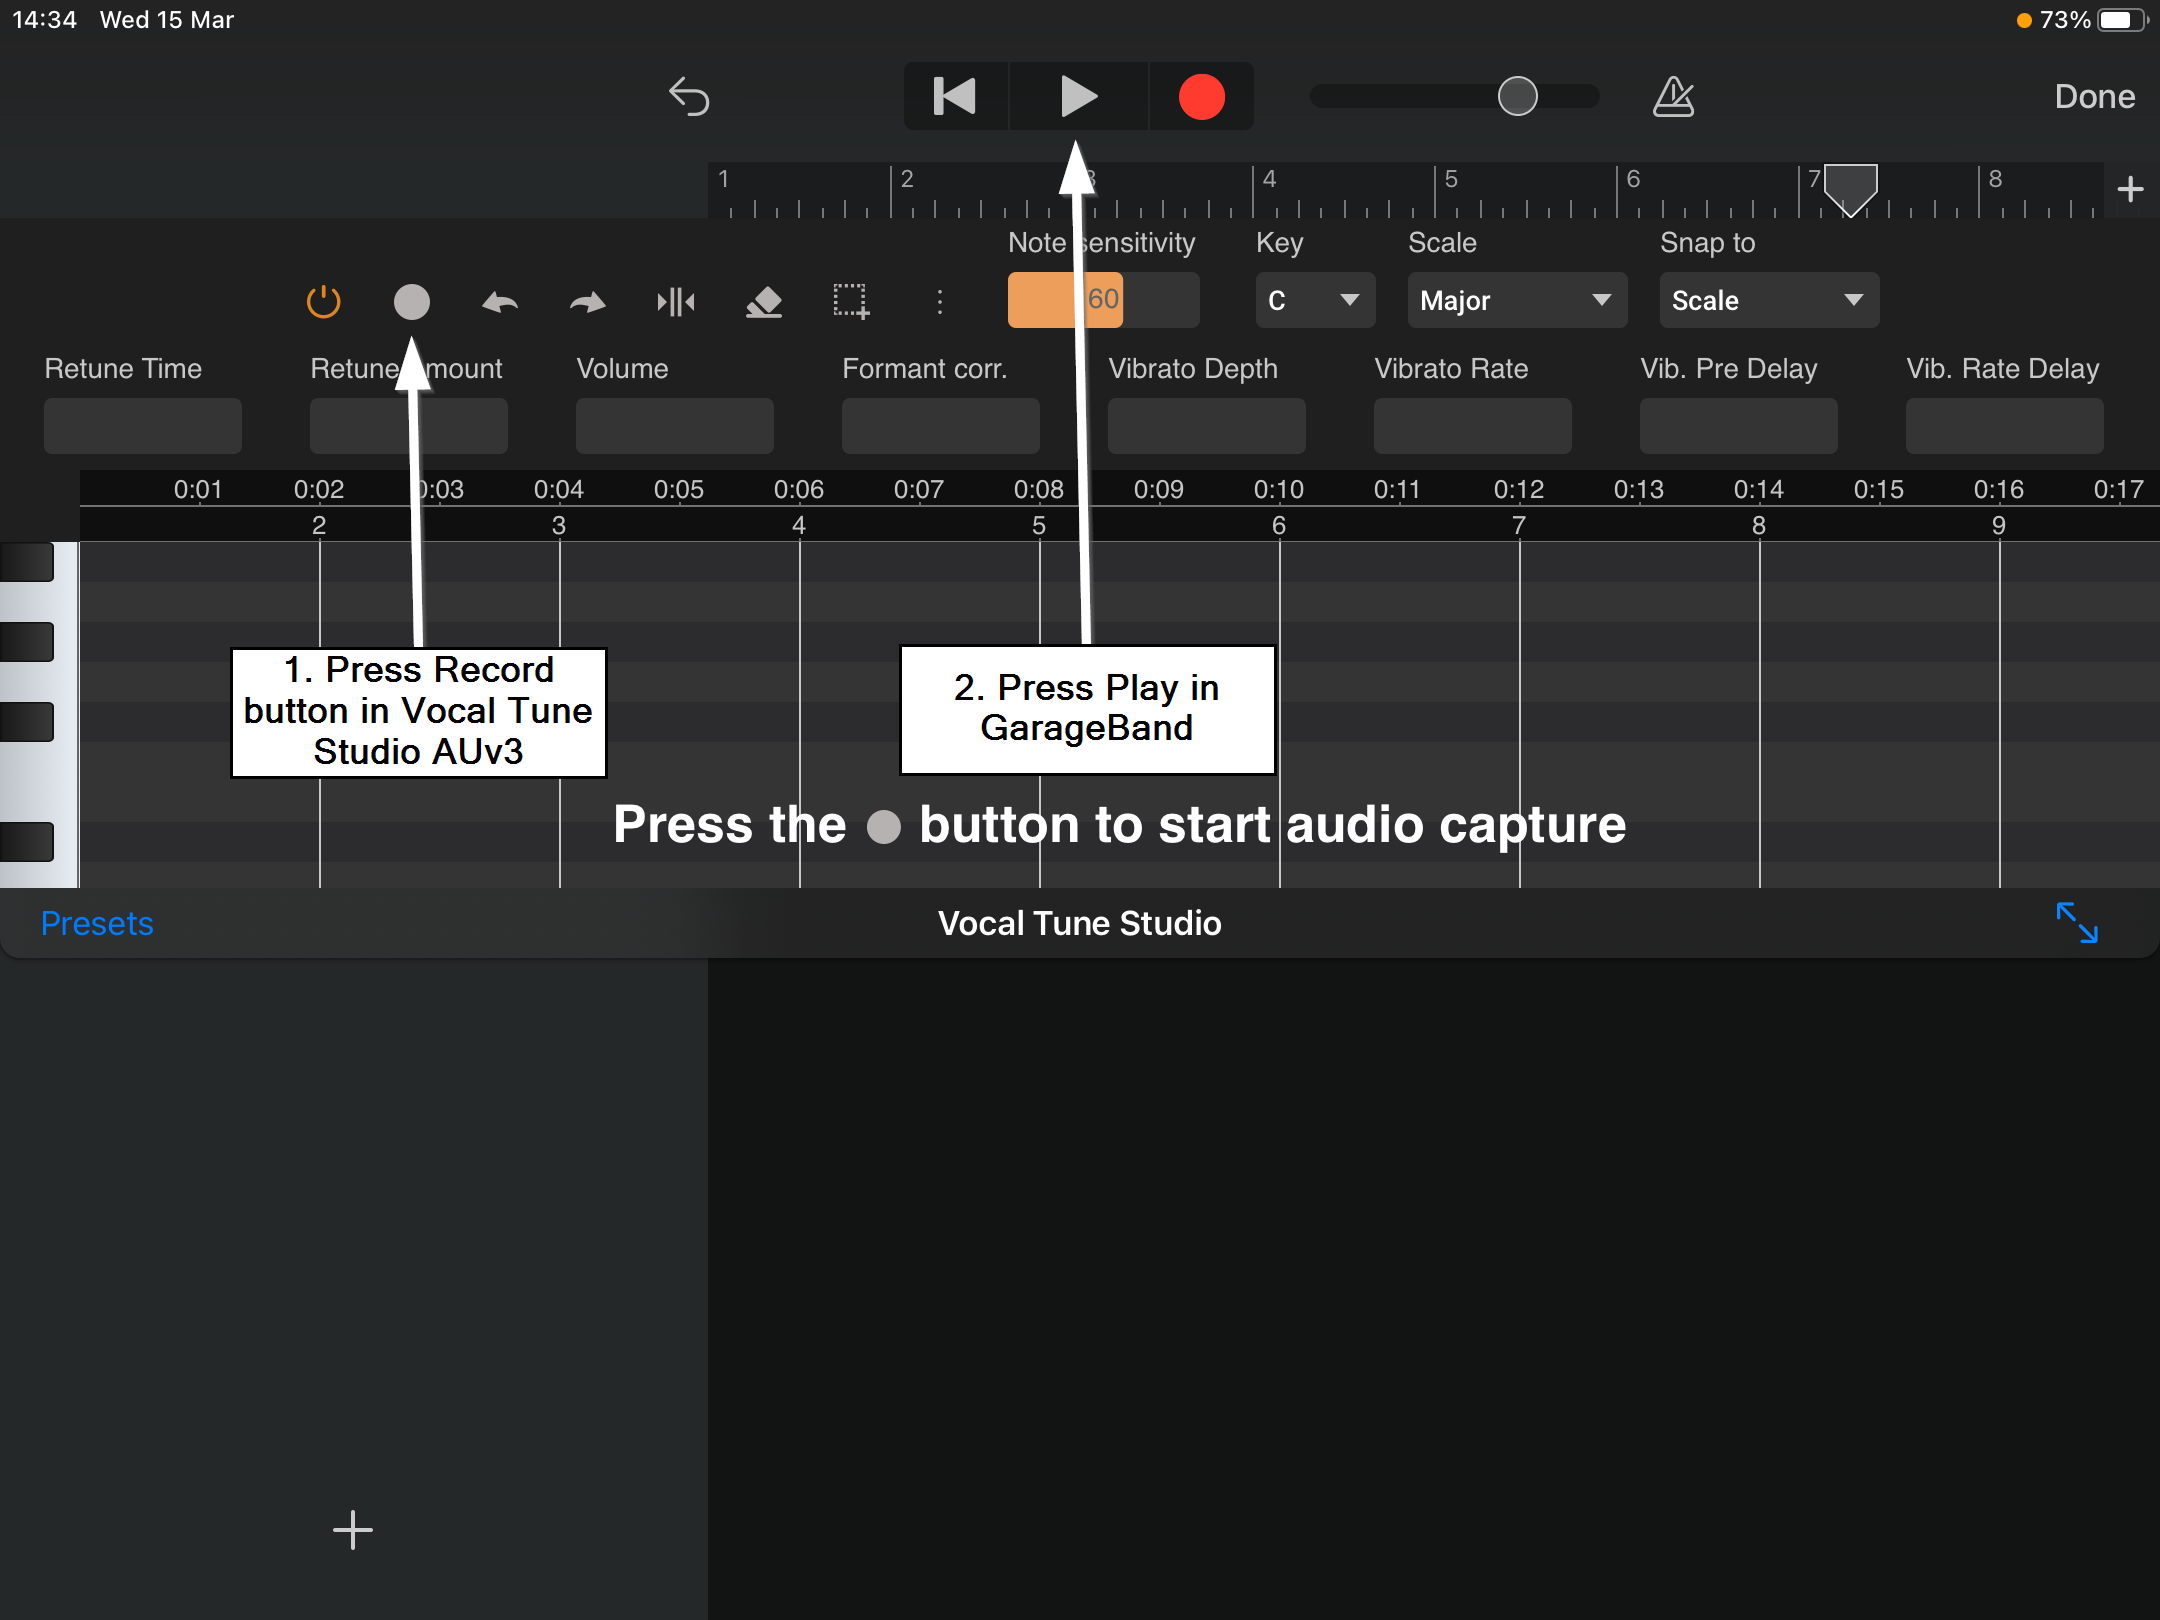
Vocal Tune Studio will analyze the captured audio after which point you can carry out any pitch and time corrections needed as explained in this manual.
To maximize the display of the AUv3 plug-in in GarageBand, press the maximize view ![]() button. Then use the minimize view
button. Then use the minimize view ![]() button to make it smaller again when required.
button to make it smaller again when required.
Press Done to close the Vocal Tune Studio AUv3 interface.