Recording MIDI
MIDI compositions can be created manually using the Piano Roll Editor or the Drum Pattern Sequencer, but it is also possible to live record your MIDI information using the onscreen keyboard, the onscreen drum pads, a connected external MIDI keyboard or other external MIDI equipment. You can either use the virtual instruments that you can select in the app (Soundfonts, Evolution One and Flowtones synths, Audio Unit instruments and IAA instruments) to produce audio on your device or drive external MIDI equipment like synthesizers connected by USB MIDI or Bluetooth.
Recording MIDI with the Onscreen Piano Keyboard
Recording MIDI with the onscreen keyboard allows you to live-record MIDI wherever you are and without connecting any external equipment or drive external MIDI equipment when you don't have a physical MIDI keyboard available.
For the first and most common case, create your MIDI Instrument Track using the Add Track ![]() button on the Arranger Screen and select your virtual instrument as described here. For driving external MIDI equipment, you need to create a plain (USB) MIDI track instead.
button on the Arranger Screen and select your virtual instrument as described here. For driving external MIDI equipment, you need to create a plain (USB) MIDI track instead.
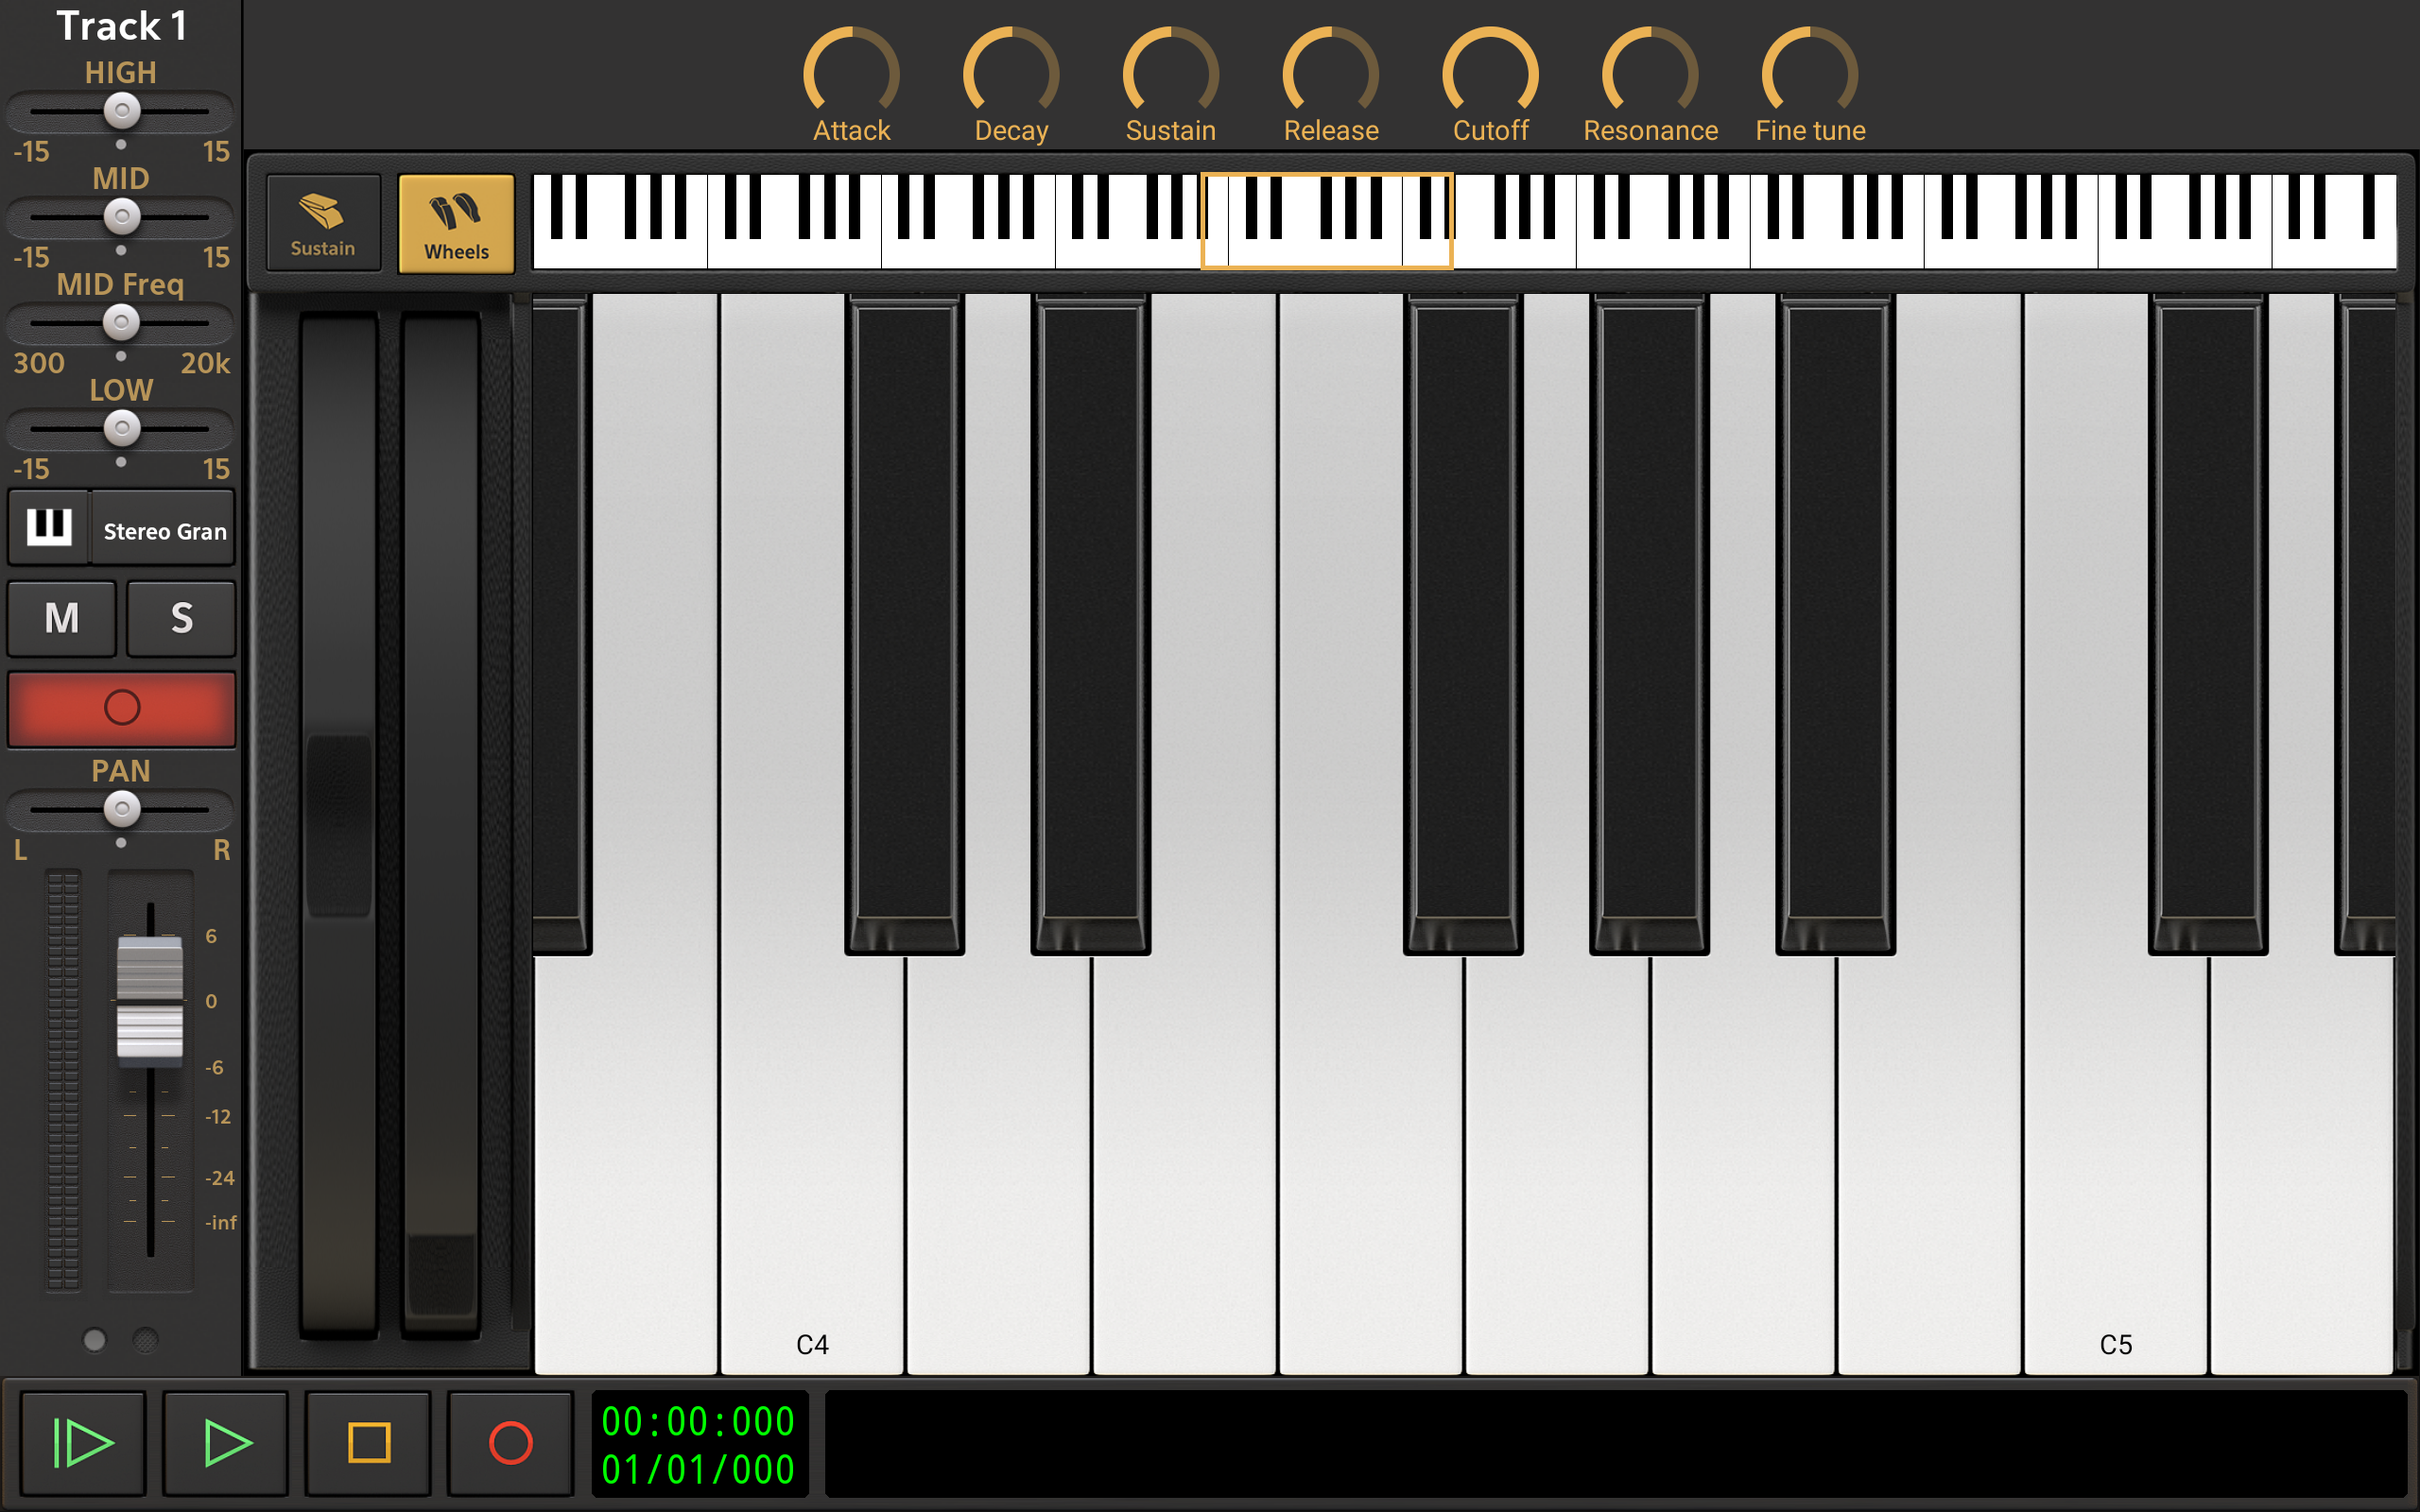
Now, you can open the virtual onscreen piano keyboard, seen below, by pressing either the Open Virtual Keyboard ![]() button or the Arm
button or the Arm ![]() button, both found on the track's Channel Strip. Both options also arm the track, lighting up the Arm button in red as can be seen in the screenshot, making it ready to recorded to.
button, both found on the track's Channel Strip. Both options also arm the track, lighting up the Arm button in red as can be seen in the screenshot, making it ready to recorded to.
From this screen, it is simply a case of pressing the Record ![]() button and playing the onscreen keyboard as you would a real one. All of the notes (MIDI events) you play will be recorded to a MIDI clip on the track. If you want to hear a metronome as you play (with or without a count-in) you can activate and deactivate it in the Tempo Settings. Press Stop
button and playing the onscreen keyboard as you would a real one. All of the notes (MIDI events) you play will be recorded to a MIDI clip on the track. If you want to hear a metronome as you play (with or without a count-in) you can activate and deactivate it in the Tempo Settings. Press Stop ![]() to stop recording.
to stop recording.
NOTE. The Evolution One Synthesizer screen includes its own onscreen virtual keyboard, so if you select that as an instrument, you will see that interface instead. It has its own playback transport controls though so you can still record using its keyboard, just as when using the keyboard shown in the screenshot above. Please note though, that while the Modulation Wheel and Pitch Bend Wheel actions will be recorded as part of the MIDI clip information, changes to other synth parameters made while recording will not create automation clips as is about to be described for the instrument parameters of soundfont/SFZ instruments. The Flowtones synthesizer screen has its own virtual keyboard and transport controls but no Modulation or Pitch Bend Wheels.
There are, as can be seen, other things available here so we shall now quickly run through some features of the interface shown.
- The keyboard itself labels the start of each new octave - C4 and C5 can be seen on the screenshot above. The small keyboard above the larger one is a Navigator
 , allowing you to move the area of the keyboard displayed and also resize it. The yellow rectangle indicates the area currently displayed. Tapping elsewhere on the navigator keyboard will jump the display to that area. Pressing, holding and sliding within the yellow rectangle also allows you to move it and reposition the viewpoint. Pinch with two fingers on the keyboard navigator to make the keys on the main display smaller, and therefore fit more of them onscreen at any one time. Pull out with two fingers on the navigator to make the keys larger.
- To the left of the main keyboard are the Modulation (Mod) Wheel (on the right) and the Pitch Bend Wheel (on the left)
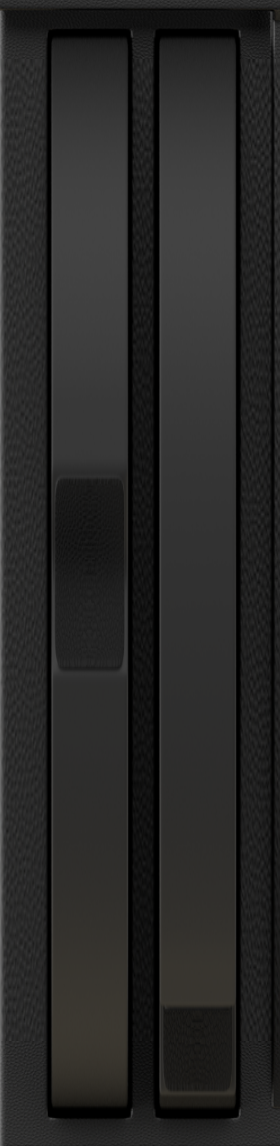 . These will be familiar to anyone who's used a physical MIDI keyboard. The Mod Wheel allows to add and vary the amount of modulation applied to notes as you play. The type of modulation will have been assigned by the creator of the soundfont/SFZ you're using (though, when using the Evolution One Synthesizer, you have the option to assign one of five options to be controlled by the mod wheel in the Synth Settings). The Pitch Bend Wheel does exactly what it says: it bends the pitch of the notes being played in real time. Move it upwards to bend the pitch upwards, move it down to bend the pitch down. The pitch bend wheel is 'spring loaded', meaning that letting go of it will mean it springs back to the center where no pitch bend is being applied. Any interactions with the mod wheel and pitch bend wheel made while recording will be recorded as MIDI events and can be seen, and edited, within the Piano Roll Editor. Mod wheel events can be found within the Control Change (CC) section of the Event Type Selector - select it from the CC options shown (Control Change 1 (Modulation Wheel)). Pitch bend events have their own section in the Event Type Selector - simply select Pitch Bend. The display of the mod wheel and pitch bend wheel can be switched on and off using the Wheels
  button.
NOTE. Though the Flowtones synth virtual keyboard doesn't have Mod or Pitch Bend Wheels, if you connect your device to an external MIDI keyboard, you can assign numerous parameters within Flowtones to be modulated by the Mod Wheel. You can also do this from within the app using automation and pitch bend can also be achieved by selecting it as the Event Type in the Piano Roll Editor as described here.
- Next to the Wheels button is the Sustain
 button. This imitates the behavior of a sustain pedal on a piano. When switched on, all notes played will ring out for as long as possible until they fade to silence. There are two ways to activate Sustain: when just tapping quickly on the button, the sustain remains pressed in and active. When you long-tap on the button, the sustain will only be active for as long as you hold it.
- If you want to select a different virtual instrument to use, please press the Open Instrument Selector
 button.
- Finally, above the keyboard display are the instrument parameter controls
 . These are discussed in greater detail here but with regard to this section, it is worth noting that any changes made to them while recording will also be recorded as long as the app is in Touch mode. Unlike the mod and pitch bend wheels though, these actions are not recorded as MIDI information, they are recorded as Automation. After recording has finished, they can be accessed, and edited, via the Automation
  mode. Simply select the relevant parameter from the list of options for the recorded automation to be displayed. For more information on automation, please see here.
NOTE. You can turn Vertical keyboard velocity on and off in the app Settings ![]() . When turned on, the higher up on the keyboard key you touch it, the lower the note's velocity which will be heard (and recorded). For more information about velocity, please see here.
. When turned on, the higher up on the keyboard key you touch it, the lower the note's velocity which will be heard (and recorded). For more information about velocity, please see here.
To exit the virtual keyboard display, disarm the track and return to the Arranger Screen, simply press either the Open Virtual Keyboard  button or the Arm
  button again.
Recording MIDI with the Onscreen Drum Pads
Recording MIDI with the onscreen drum pads also allows you to live-record MIDI wherever you are and without connecting any external equipment.
The important thing to note here is that, to use the onscreen Drum Pads, you need to create a MIDI Instrument track and NOT a Drum Pattern Track. Drum pattern tracks are set up to use the Drum Pattern Sequencer interface which doesn't cater for live recording and therefore you can't access the drum pads from such tracks. You can, though, always convert a drum pattern track to a MIDI instrument track if you want to record some drumming using the drum pads to beats already made using the drum pattern sequencer. Likewise you can also convert an instrument track to a drum track if you want to use the drum pattern sequencer after recording using the drum pads, though MIDI events which haven't been quantized and don't fit on the sequencer grid will be displayed transparently as 'ghost' events even though they are still present.
So, first, create your MIDI Instrument Track using the Add Track ![]() button on the Arranger Screen and select your virtual instrument as described here. You'll want to select a soundfont that contains a drum kit. The drum kits in the Default Sound Set can all be found in Bank 128, so you will need to scroll down and select Bank 128 to find them. For any drum kit soundfont purchased from the shop, you can directly select a preset since there is only one bank. For the right drum to be mapped to the right drum pad, the drums need to be mapped according to the General MIDI (GM) mapping standard for drums (as can be seen about halfway down here). All of the drum presets in the Default Sound Set and all of the drum soundfonts available to buy in the shop from Digital Sound Factory conform to the GM mapping and can be reliably used.
button on the Arranger Screen and select your virtual instrument as described here. You'll want to select a soundfont that contains a drum kit. The drum kits in the Default Sound Set can all be found in Bank 128, so you will need to scroll down and select Bank 128 to find them. For any drum kit soundfont purchased from the shop, you can directly select a preset since there is only one bank. For the right drum to be mapped to the right drum pad, the drums need to be mapped according to the General MIDI (GM) mapping standard for drums (as can be seen about halfway down here). All of the drum presets in the Default Sound Set and all of the drum soundfonts available to buy in the shop from Digital Sound Factory conform to the GM mapping and can be reliably used.
Now, you can open the virtual onscreen drum pads, seen below, by pressing either the Open Virtual Keyboard ![]() button or the Arm
button or the Arm ![]() button, both found on the track's Channel Strip. Both options also arm the track, lighting up the Arm button in red as can be seen in the screenshot, making it ready to recorded to.
button, both found on the track's Channel Strip. Both options also arm the track, lighting up the Arm button in red as can be seen in the screenshot, making it ready to recorded to.
NOTE. If you carry out the last step and find you're taken to the virtual piano keyboard screen rather than the drum pads, don't worry, you just need to change the MIDI Input setting for the track. Do this by pressing the MIDI Input ![]() button on the track's Channel Strip and selecting Drum pads on the left of the dialog shown. The drum kits in the Default Sound Set have been set up to use the drum pads by default, but the Digital Sound Factory drum soundfonts will require you to change this MIDI input setting to display the drum pads.
button on the track's Channel Strip and selecting Drum pads on the left of the dialog shown. The drum kits in the Default Sound Set have been set up to use the drum pads by default, but the Digital Sound Factory drum soundfonts will require you to change this MIDI input setting to display the drum pads.

NOTE. The number of drum pads displayed will depend on the size of your device's screen.
From this screen, it is simply a case of pressing the Record ![]() button and playing the onscreen drum pads. All of the notes (MIDI events) you play will be recorded to a MIDI clip on the track. If you want to hear a metronome as you play (with or without a count-in) you can activate and deactivate it in the Tempo Settings. Press Stop
button and playing the onscreen drum pads. All of the notes (MIDI events) you play will be recorded to a MIDI clip on the track. If you want to hear a metronome as you play (with or without a count-in) you can activate and deactivate it in the Tempo Settings. Press Stop ![]() to stop recording.
to stop recording.
Note the Edit ![]() button. When pressed and active, this allows you to press any of the drum pads and load a different drum sound if required. You are also given the option to edit the velocity for the drum pad, though this will only have an effect if you have Drum pad velocity turned off in the Settings (see the following note). Press the edit button again to deactivate the mode and allow the pads to be played again.
button. When pressed and active, this allows you to press any of the drum pads and load a different drum sound if required. You are also given the option to edit the velocity for the drum pad, though this will only have an effect if you have Drum pad velocity turned off in the Settings (see the following note). Press the edit button again to deactivate the mode and allow the pads to be played again.
NOTE. You can turn Drum pad velocity on and off in the app Settings ![]() . When turned on, the higher up on the drum pad you touch it, the higher the note's velocity which will be heard (and recorded). For more information about velocity, please see here.
. When turned on, the higher up on the drum pad you touch it, the higher the note's velocity which will be heard (and recorded). For more information about velocity, please see here.
To exit the drum pad display, disarm the track and return to the Arranger Screen, simply press your device's Back button.
Recording MIDI with an External MIDI Keyboard
If you have a compatible USB MIDI class-compliant keyboard or interface you will be able to use that keyboard to play and record MIDI within Audio Evolution Mobile.
When using virtual instruments on the device itself, create a MIDI Instrument Track using the Add Track ![]() button on the Arranger Screen and select your virtual instrument as described here. Once the track is created, the instrument will be controlled by the connected MIDI keyboard. For use with external synthesizers, please create a (plain) MIDI track, such that when playing back MIDI events, the MIDI events are sent to the chosen USB MIDI output. Now all you need to do is Arm
button on the Arranger Screen and select your virtual instrument as described here. Once the track is created, the instrument will be controlled by the connected MIDI keyboard. For use with external synthesizers, please create a (plain) MIDI track, such that when playing back MIDI events, the MIDI events are sent to the chosen USB MIDI output. Now all you need to do is Arm ![]() the track, press Record
the track, press Record ![]() and perform. To stop recording press Stop
and perform. To stop recording press Stop ![]() . Your performance will be recorded as events on a MIDI clip on the track. If you want to hear a metronome as you play (with or without a count-in) you can activate and deactivate it in the Tempo Settings. If you then want to manually edit the notes/events you've recorded, just press the Arm button again to disarm the track and return to the Arranger Screen, double-tap on the MIDI clip to open the Piano Roll Editor where you can edit as normal.
. Your performance will be recorded as events on a MIDI clip on the track. If you want to hear a metronome as you play (with or without a count-in) you can activate and deactivate it in the Tempo Settings. If you then want to manually edit the notes/events you've recorded, just press the Arm button again to disarm the track and return to the Arranger Screen, double-tap on the MIDI clip to open the Piano Roll Editor where you can edit as normal.
If your keyboard has velocity sensitive keys, the velocity levels will also be recorded to the MIDI clip. There is, though, an Ignore MIDI velocity option in the USB MIDI section of the Settings ![]() if you'd rather have every note recognized at the highest velocity level (127) and edit the velocities yourself using the piano roll editor.
if you'd rather have every note recognized at the highest velocity level (127) and edit the velocities yourself using the piano roll editor.
Likewise, any interactions with the keyboard's Modulation (Mod) Wheel and Pitch Bend Wheel, will be recognized and recorded as events in the MIDI clip. If you then want to edit those events in the piano roll editor, Mod wheel events can be found within the Control Change (CC) section of the Event Type Selector - select it from the CC options shown (Control Change 1 (Modulation Wheel)). Pitch bend events have their own section in the Event Type Selector - simply select Pitch Bend.
Lastly, there is further possible functionality available when using an external MIDI keyboard/controller if you assign different controls and instrument parameters within the app to the physical dials and buttons available on the keyboard/controller. To do this, you need to complete the MIDI Remote Setup process which is covered next, here.