Setting the Tempo
Tempo determines the speed of the project playback in musical terms. It is usually measured in BPM (Beats Per Minute). The project tempo determines the speed at which any MIDI in your project is played back. It also allows you to have an optional metronome click played when you're recording audio (you will want to use headphones when using the metronome so that the sound of the metronome isn't itself recorded). Thus, you can ensure that everything is in time when played back together. If the first thing you record is an audio track, it is a really good idea to get used to wearing headphones and having the metronome running to keep you in time: it will save you a lot of frustration later. Alternatively, you can start your piece using MIDI - say, a drum pattern - so that you'll have that to keep you in time through your headphones when recording audio.
NOTES. It might be stating the obvious to some of you, but it is worth pointing out that changing the tempo settings once audio and MIDI tracks exist in a project will change the speed (and therefore the relative length) of the MIDI clips but will leave the audio clips unaffected. You will need to Time Stretch the audio clips yourself or, probably more realistically, record the audio clips again at the new tempo.
In order to specify the tempo settings for your project, you can open the Tempo Settings, seen below, by pressing the Tempo ![]() button on the top row of the Arranger Screen or by tapping on the Playback Timer Display
button on the top row of the Arranger Screen or by tapping on the Playback Timer Display ![]() at the bottom of the user interface.
at the bottom of the user interface.
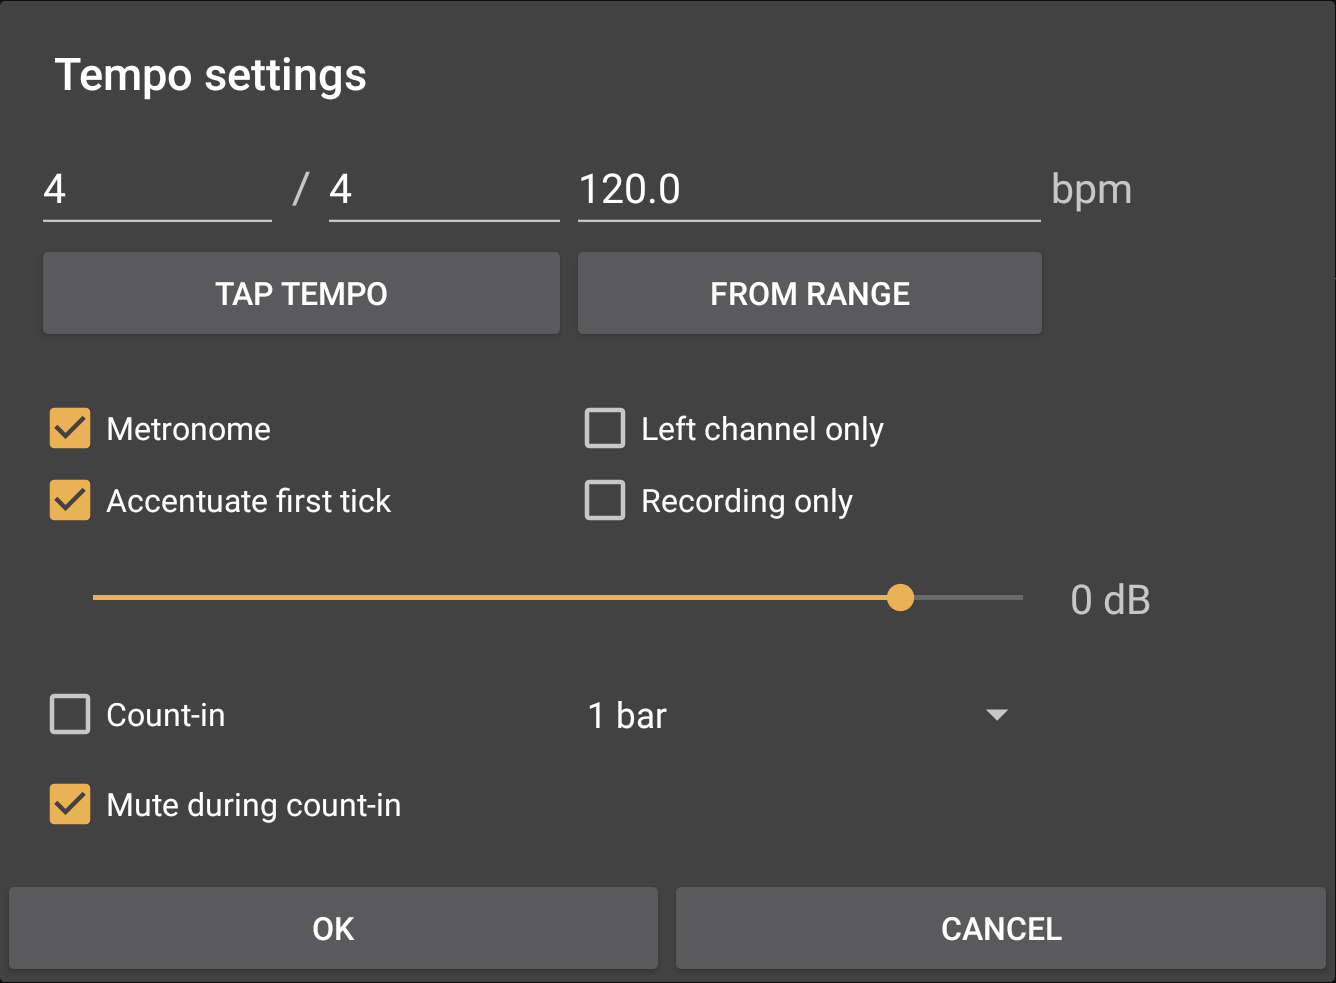
The first thing in the Tempo settings is the Time Signature. In the screenshot above, showing the default tempo settings, it is set to the most common time signature of 4/4. A time signature lets you know how the music is to be counted. The first number in the 'fraction' tells you how many beats there are per bar/measure. The second number indicates what length of note each beat represents. Common lengths of note are half notes (2), quarter notes (4), eighth notes (8) and sixteenth notes (16). So, in the example above, the time signature is 4/4, meaning you count four beats per bar and each beat represents a quarter note. Tap on the numbers shown to change them and enter your own choice of time signature.
Next is the BPM (Beats Per Minute) value. This specifies the overall speed of the project for MIDI playback and the metronome. Here it is set to 120 bpm. Combined with the time signature you can see how this setting results in each bar being two seconds long - 120 beats per minute = 2 beats per second. 4 beats per bar ÷ 2 beats per second = 2 seconds per bar. Tap on the number to enter your own BPM value.
If you're not sure what BPM value you want but have an idea of the sort of tempo you want for your project, you can simply tap your finger on the Tap Tempo button and this will translate your tapped tempo into a BPM value which is automatically entered for you.
If you already have a track present in your project and you want to match your tempo to that track but are unsure of its BPM, you can use the From Range function. Before entering the Tempo dialog, please use the Range ![]() mode to create a range spanning one bar of audio. Then when selecting the From Range button, the app will calculate the BPM from the time span of the range and the entered time signature. The important thing is to try to be as accurate as possible when selecting your range. If your track is a single bar loop, then it's easy: select the entire clip (use the Clip Magnet function within the Grid
mode to create a range spanning one bar of audio. Then when selecting the From Range button, the app will calculate the BPM from the time span of the range and the entered time signature. The important thing is to try to be as accurate as possible when selecting your range. If your track is a single bar loop, then it's easy: select the entire clip (use the Clip Magnet function within the Grid ![]() options to easily have the range snap to the clip boundaries). If your track contains many bar lengths of music you will need to be more careful. First, make sure you have 'No Grid' selected in the Grid options. This will ensure that you can set your range with complete freedom without any visual distractions or snapping-to. Now you want to set your range to one bar's length of music within the target track. You can reposition the boundaries of the the range by touching, holding and dragging at the edges and don't forget, you can zoom into the track using pinch/pull within the Timeline Area for greater accuracy. If you are not sure how to identify a single bar's length in your track, it can be useful to look at the waveform on the clip and identify recurring overall patterns.
options to easily have the range snap to the clip boundaries). If your track contains many bar lengths of music you will need to be more careful. First, make sure you have 'No Grid' selected in the Grid options. This will ensure that you can set your range with complete freedom without any visual distractions or snapping-to. Now you want to set your range to one bar's length of music within the target track. You can reposition the boundaries of the the range by touching, holding and dragging at the edges and don't forget, you can zoom into the track using pinch/pull within the Timeline Area for greater accuracy. If you are not sure how to identify a single bar's length in your track, it can be useful to look at the waveform on the clip and identify recurring overall patterns.

In the example above, you can see how there is an obvious repeating visual pattern throughout the clip. The range, in blue, has therefore been set to one complete cycle of this repeating pattern. This method won't always identify a bar's length but it's a good place to start. Once you've got your range selected, press From Range in the Tempo Settings display and the app will approximate the BPM as accurately as possible and automatically enter that value in the dialog.
The rest of the options in the Tempo Settings are concerned with the Metronome. The metronome provides an audible 'click track' for you to follow and allow you to play in time with the project tempo when recording live audio or MIDI. If you are using a microphone to record your performance you'll need to be wearing headphones to ensure that the sound of the metronome isn't picked up by the mic and included in the recording. The metronome will be started by pressing the Record ![]() button, in accordance with these options in theTempo Settings.
button, in accordance with these options in theTempo Settings.
Use the Metronome checkbox to turn the metronome on or off.
Left channel only, if active, means that the metronome will only be heard through the left audio channel. This can be useful if you want to hear the metronome through the left headphone speaker to keep you in time, but have your right ear uncovered so you can properly hear your own performance as you record.
Accentuate first tick does just that. It allows the first beat of every bar to be easily identified.
Recording only, when selected, ensures that the metronome will only be heard when recording and will not get in the way during playback.
The dB Slider allows you to set the volume of the metronome.
The Count-in checkbox turns the count-in feature for the metronome on and off. When on, the metronome will be heard before recording actually starts so as to count you in with the project tempo. The drop-down allows you to select between either a one bar count-in or a two bar count-in. The count-in will start to be heard according to (prior to) the current position of the Time Marker ![]() , at which point recording will start.
, at which point recording will start.
Finally, Mute during count-in allows you to have all other tracks temporarily muted while the count-in is heard if you are starting your recording after the beginning of the project (by positioning the Time Marker and arming the desired track). Note that if you want to hear a count-in (with other tracks temporarily muted or not) before a Punch In/Out recording, you need to make sure the Time Marker is positioned at the Punch In marker.This can be easily done by pressing the Jump ![]() button, which will open the 'Jump to' options. Simply select 'Punch In' from those options and the Time Marker will be moved to that point. You can also access the 'Jump to' options by double tapping on the Timeline/Marker Display to open the Marker options. From there you can select 'Jump to marker' which opens the 'Jump to' options.
button, which will open the 'Jump to' options. Simply select 'Punch In' from those options and the Time Marker will be moved to that point. You can also access the 'Jump to' options by double tapping on the Timeline/Marker Display to open the Marker options. From there you can select 'Jump to marker' which opens the 'Jump to' options.