MIDI Instrument and Drum Pattern Track Channel Strips
The MIDI Instrument and Drum Pattern Channel Strips share many of their functions with the audio channel strip, but there are also differences, specific to the nature of MIDI tracks.
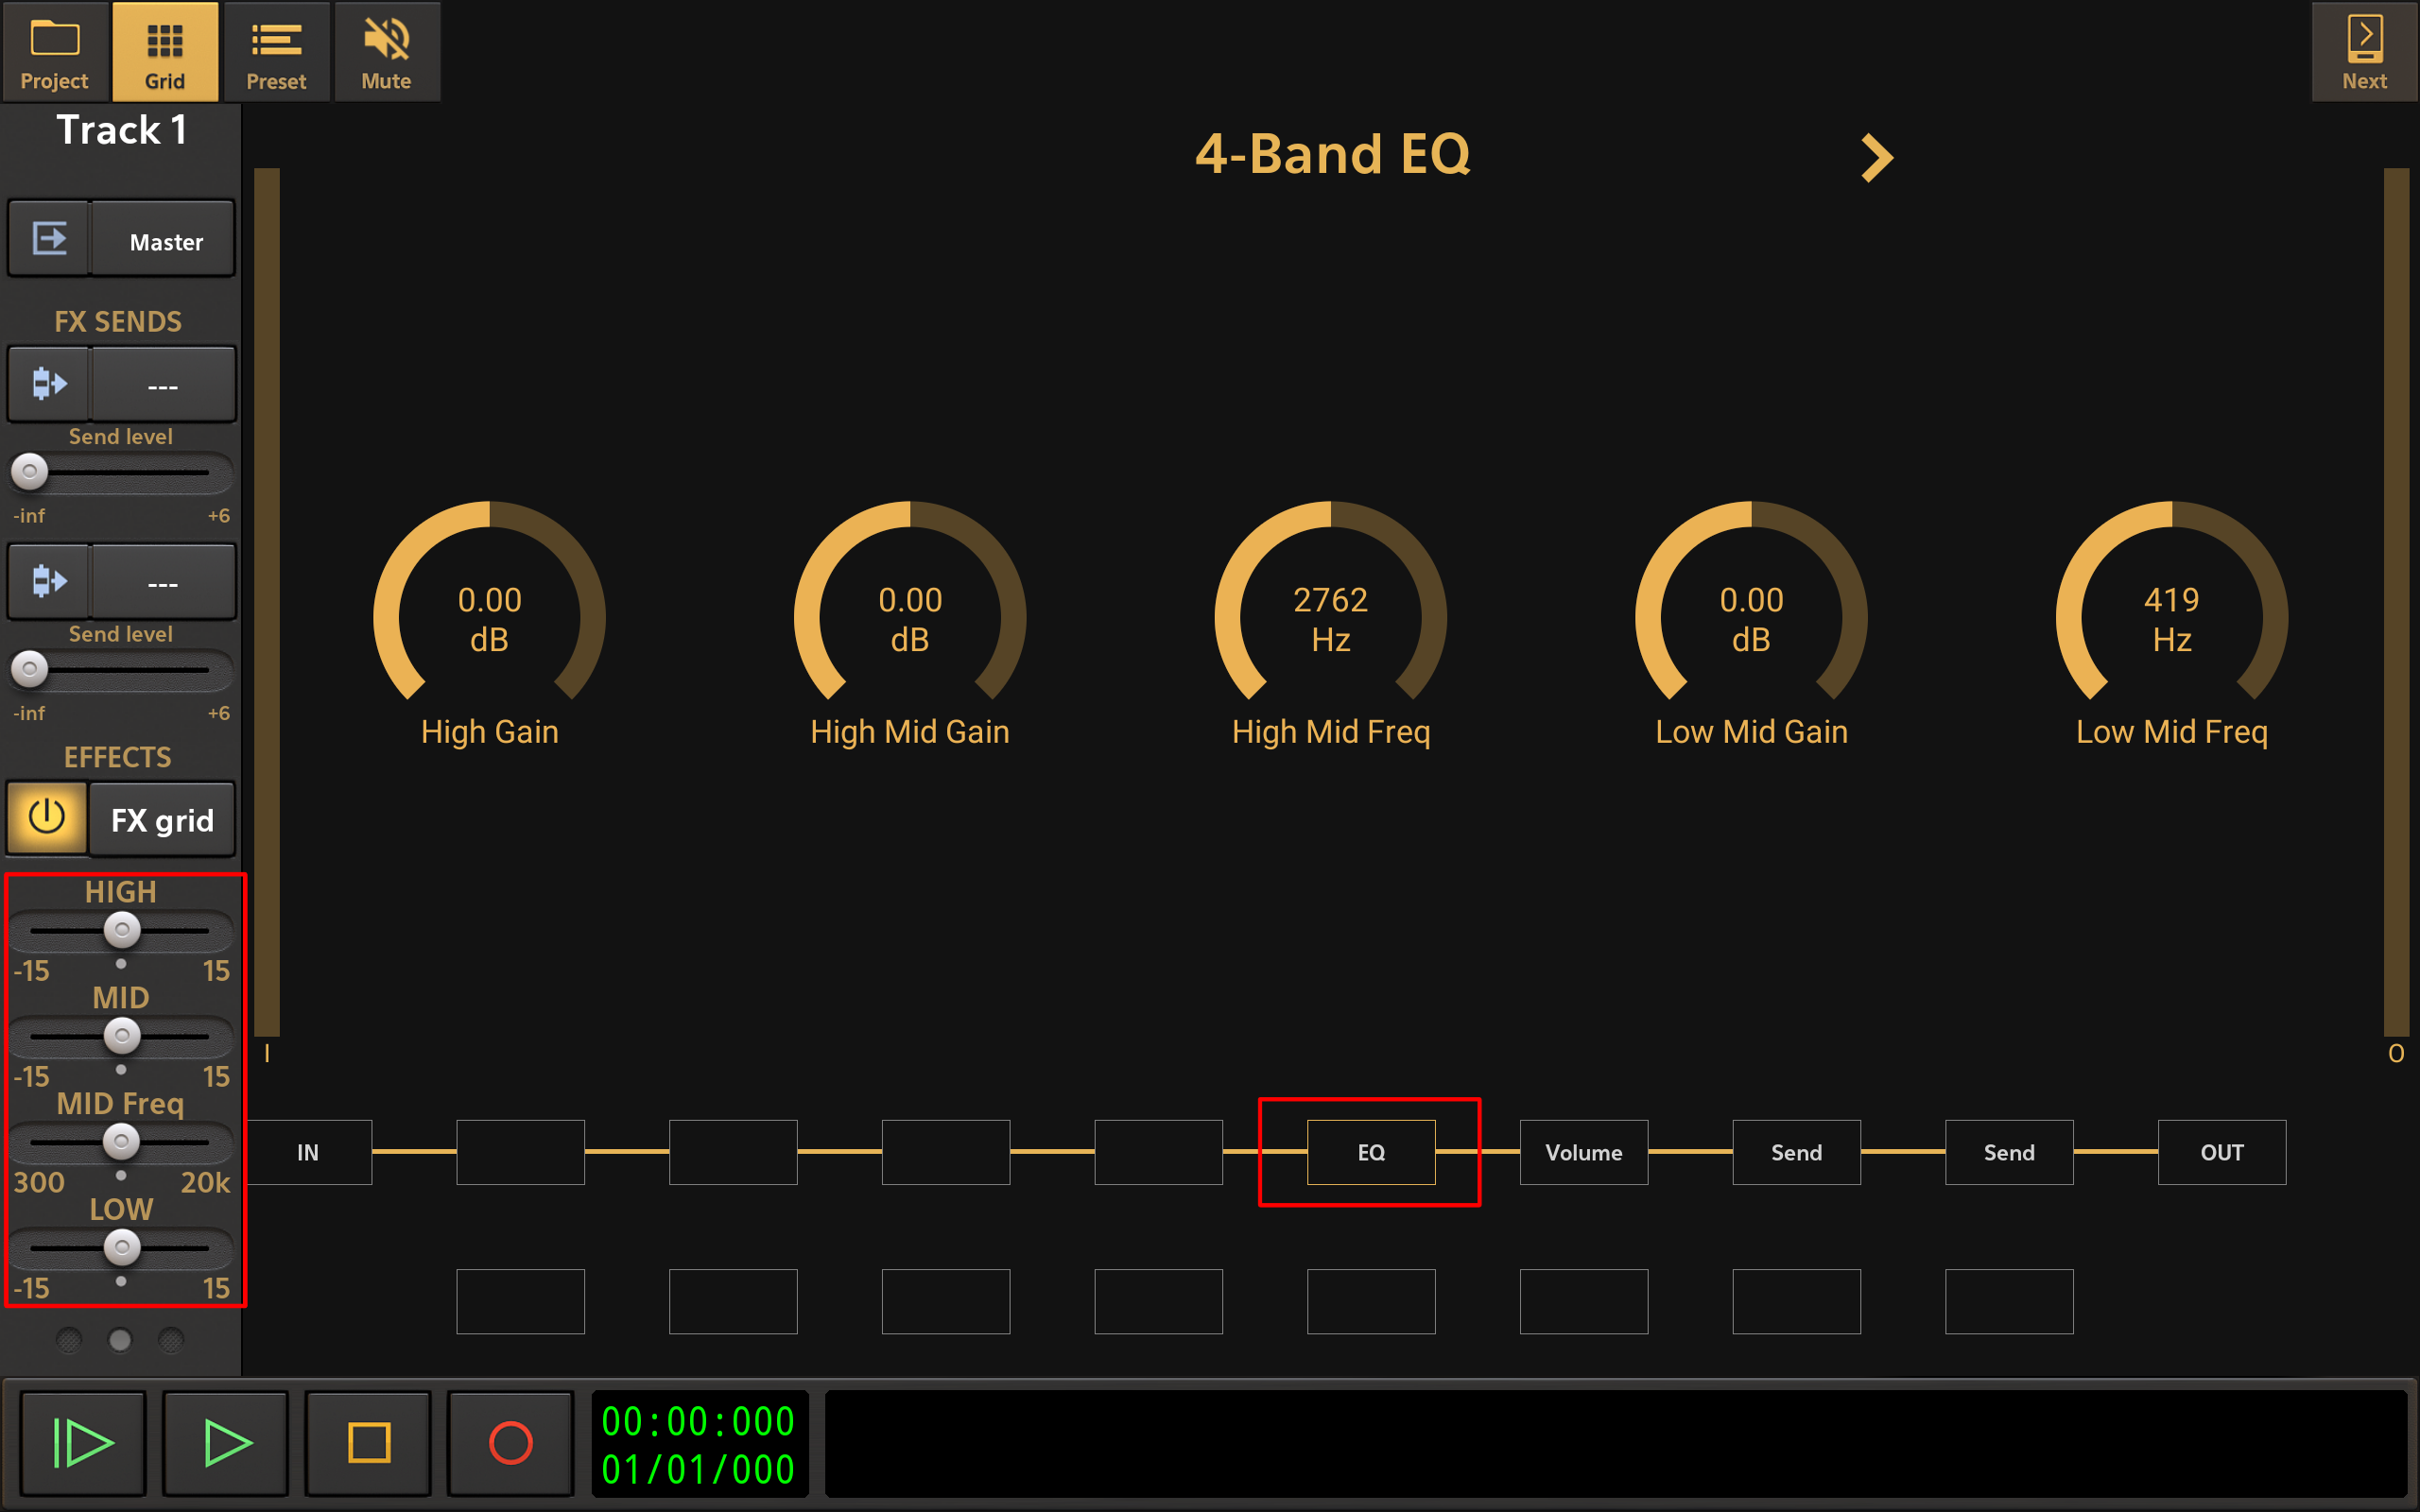
The MIDI events from MIDI clips on an instrument or drum pattern track are rendered as audio in real-time, depending on the instrument selected in the Instrument selection dialog. The audio that is produced flows through several processing stages before being sent to a Bus/Group or the Master mixer channel. These processing stages are implemented as a series of connected 'blocks', called the FX grid. For example, the audio would by default go through an EQ, then a Volume/Panning block and optional FX sends. If you would add effects like Delay or Reverb, these processing blocks would be placed on the FX grid as well. This grid can be visualized by pressing the FX grid button on the channel strip and would for example look like:

The controls on the channel strip can be seen as quick access controls to the parameters of the IN (mute), EQ, Volume and FX Send blocks. For example, moving the volume slider would change the Volume parameter in the Volume block, as can be seen later on in this section
NOTE. The MIDI channel strip functions are, like the audio channel strip's, shown over several 'pages'. The number of pages needed to cover the functions will vary depending on the size of the device screen. As such, you may not see all of the functions spread over two pages as shown here, but they will all be present nonetheless. Simply use the Page Selector at the bottom to access the different pages or, when on the Mixer Screen or Master and Groups Screen, move through the pages of all channel strips displayed simultaneously using the Next  button at the top left of those screens.
Page One Jump to Page Two Jump to Page Three
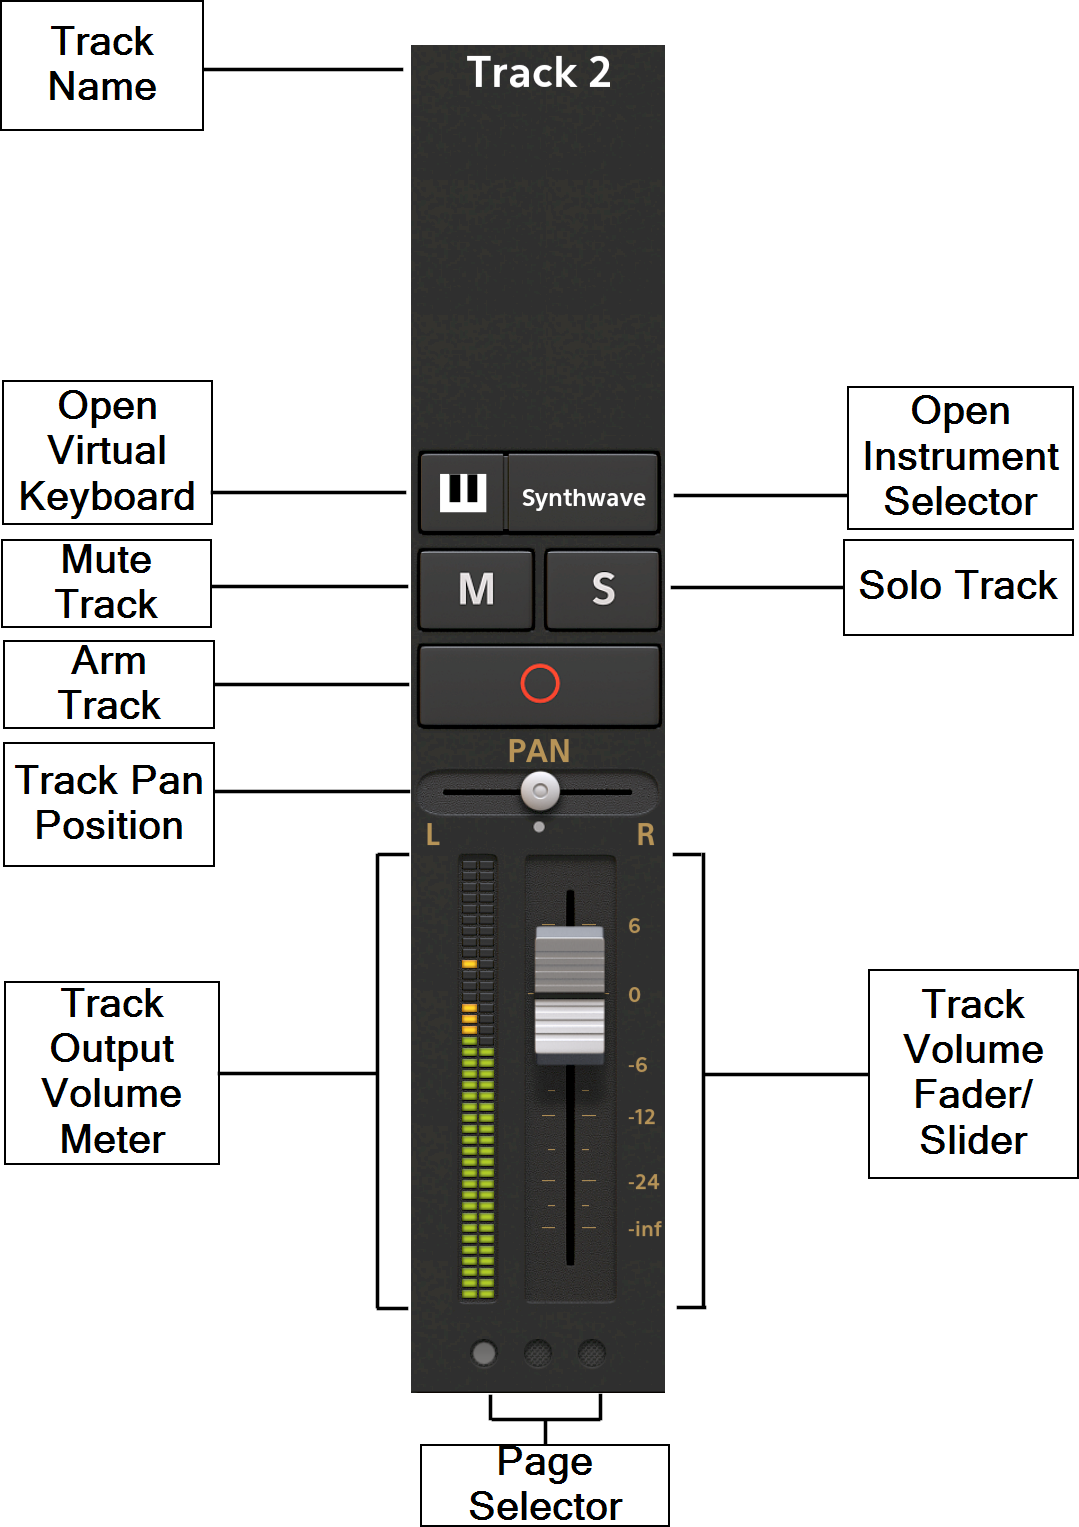
At the top of each channel strip is the Track Name ![]() . You can long-press on this display of the track name on the channel strip to open a dialog which will allow you to change the name. You can also rename your tracks using the Track Options which are accessed by long pressing in an empty area, containing no clips, of the desired track in the Timeline. Then select Rename Track and enter your chosen track name which will then be displayed at the top of tracks channel strip. Tracks which have been frozen will display a snowflake symbol next to their name
. You can long-press on this display of the track name on the channel strip to open a dialog which will allow you to change the name. You can also rename your tracks using the Track Options which are accessed by long pressing in an empty area, containing no clips, of the desired track in the Timeline. Then select Rename Track and enter your chosen track name which will then be displayed at the top of tracks channel strip. Tracks which have been frozen will display a snowflake symbol next to their name ![]() .
.
The Open Virtual Keyboard ![]() button (MIDI instrument track only), on the left, does exactly that: it displays the virtual keyboard, or drum pads, and other controls for the virtual instrument currently being used, as well as arming the track, ready to be recorded to. In the case of the Evolution One and Flowtones synthesizers, it opens the separate synthesizer interface. The same change in display can also be achieved by pressing the Arm
button (MIDI instrument track only), on the left, does exactly that: it displays the virtual keyboard, or drum pads, and other controls for the virtual instrument currently being used, as well as arming the track, ready to be recorded to. In the case of the Evolution One and Flowtones synthesizers, it opens the separate synthesizer interface. The same change in display can also be achieved by pressing the Arm ![]() button.
button.
The Open Instrument Selector ![]() button, on the right, opens the virtual instrument selection dialog. This allows you to freely assign a different virtual instrument to be controlled by the MIDI information on the track when you change your mind or want to experiment with different sounds. The button displays the name of the current preset for the selected virtual instrument.
button, on the right, opens the virtual instrument selection dialog. This allows you to freely assign a different virtual instrument to be controlled by the MIDI information on the track when you change your mind or want to experiment with different sounds. The button displays the name of the current preset for the selected virtual instrument.
The Mute ![]() button allows you to mute (silence) the selected track so that it is not heard in the mix. Muting a track manually by pressing this button will light the button yellow as seen here
button allows you to mute (silence) the selected track so that it is not heard in the mix. Muting a track manually by pressing this button will light the button yellow as seen here ![]() . Tracks will be automatically muted when another track, or tracks, have been soloed (see below). Tracks which have been automatically muted due to the soloing of other tracks, are indicated by a yellow rectangle around their Mute button like this
. Tracks will be automatically muted when another track, or tracks, have been soloed (see below). Tracks which have been automatically muted due to the soloing of other tracks, are indicated by a yellow rectangle around their Mute button like this ![]() . Long pressing a Mute button will open an Options dialog allowing you to Deactivate all mute buttons at once.
. Long pressing a Mute button will open an Options dialog allowing you to Deactivate all mute buttons at once.
The Solo ![]() button allows you to isolate the selected track (and temporarily mute all other tracks) so that it is the only one heard. You can, though, simultaneously solo as many tracks, or Groups, as you want, allowing you to hear the selection you require whilst muting the other tracks. Pressing the Solo button solos the track and lights the button green as seen here
button allows you to isolate the selected track (and temporarily mute all other tracks) so that it is the only one heard. You can, though, simultaneously solo as many tracks, or Groups, as you want, allowing you to hear the selection you require whilst muting the other tracks. Pressing the Solo button solos the track and lights the button green as seen here ![]() . Long pressing a Solo button will open an Options dialog allowing you to Deactivate all solo buttons at once.
. Long pressing a Solo button will open an Options dialog allowing you to Deactivate all solo buttons at once.
NOTE. A description of Groups can be found here and of Group Channel Strips here.
The Arm ![]() button (MIDI instrument track only), when active, arms the selected track to be recorded to when the Record
button (MIDI instrument track only), when active, arms the selected track to be recorded to when the Record ![]() button is pressed. For more information on this, see here. On MIDI tracks it also displays the virtual keyboard, or drum pads, and other controls for the selected virtual instrument. In the case of the Evolution One and Flowtones synthesizers, it opens the synth's separate interface.
button is pressed. For more information on this, see here. On MIDI tracks it also displays the virtual keyboard, or drum pads, and other controls for the selected virtual instrument. In the case of the Evolution One and Flowtones synthesizers, it opens the synth's separate interface.
The Track Pan Position ![]() slider allows you to position the track's audio within the stereo sound field, or panorama. Double tap the Track Pan Position control to open the Options to reset to center or to enter a value for greater precision. The slider values (for all sliders/fader controls within the channel strip) are displayed in the Playback Timer Display
slider allows you to position the track's audio within the stereo sound field, or panorama. Double tap the Track Pan Position control to open the Options to reset to center or to enter a value for greater precision. The slider values (for all sliders/fader controls within the channel strip) are displayed in the Playback Timer Display ![]() as they are changed.
as they are changed.
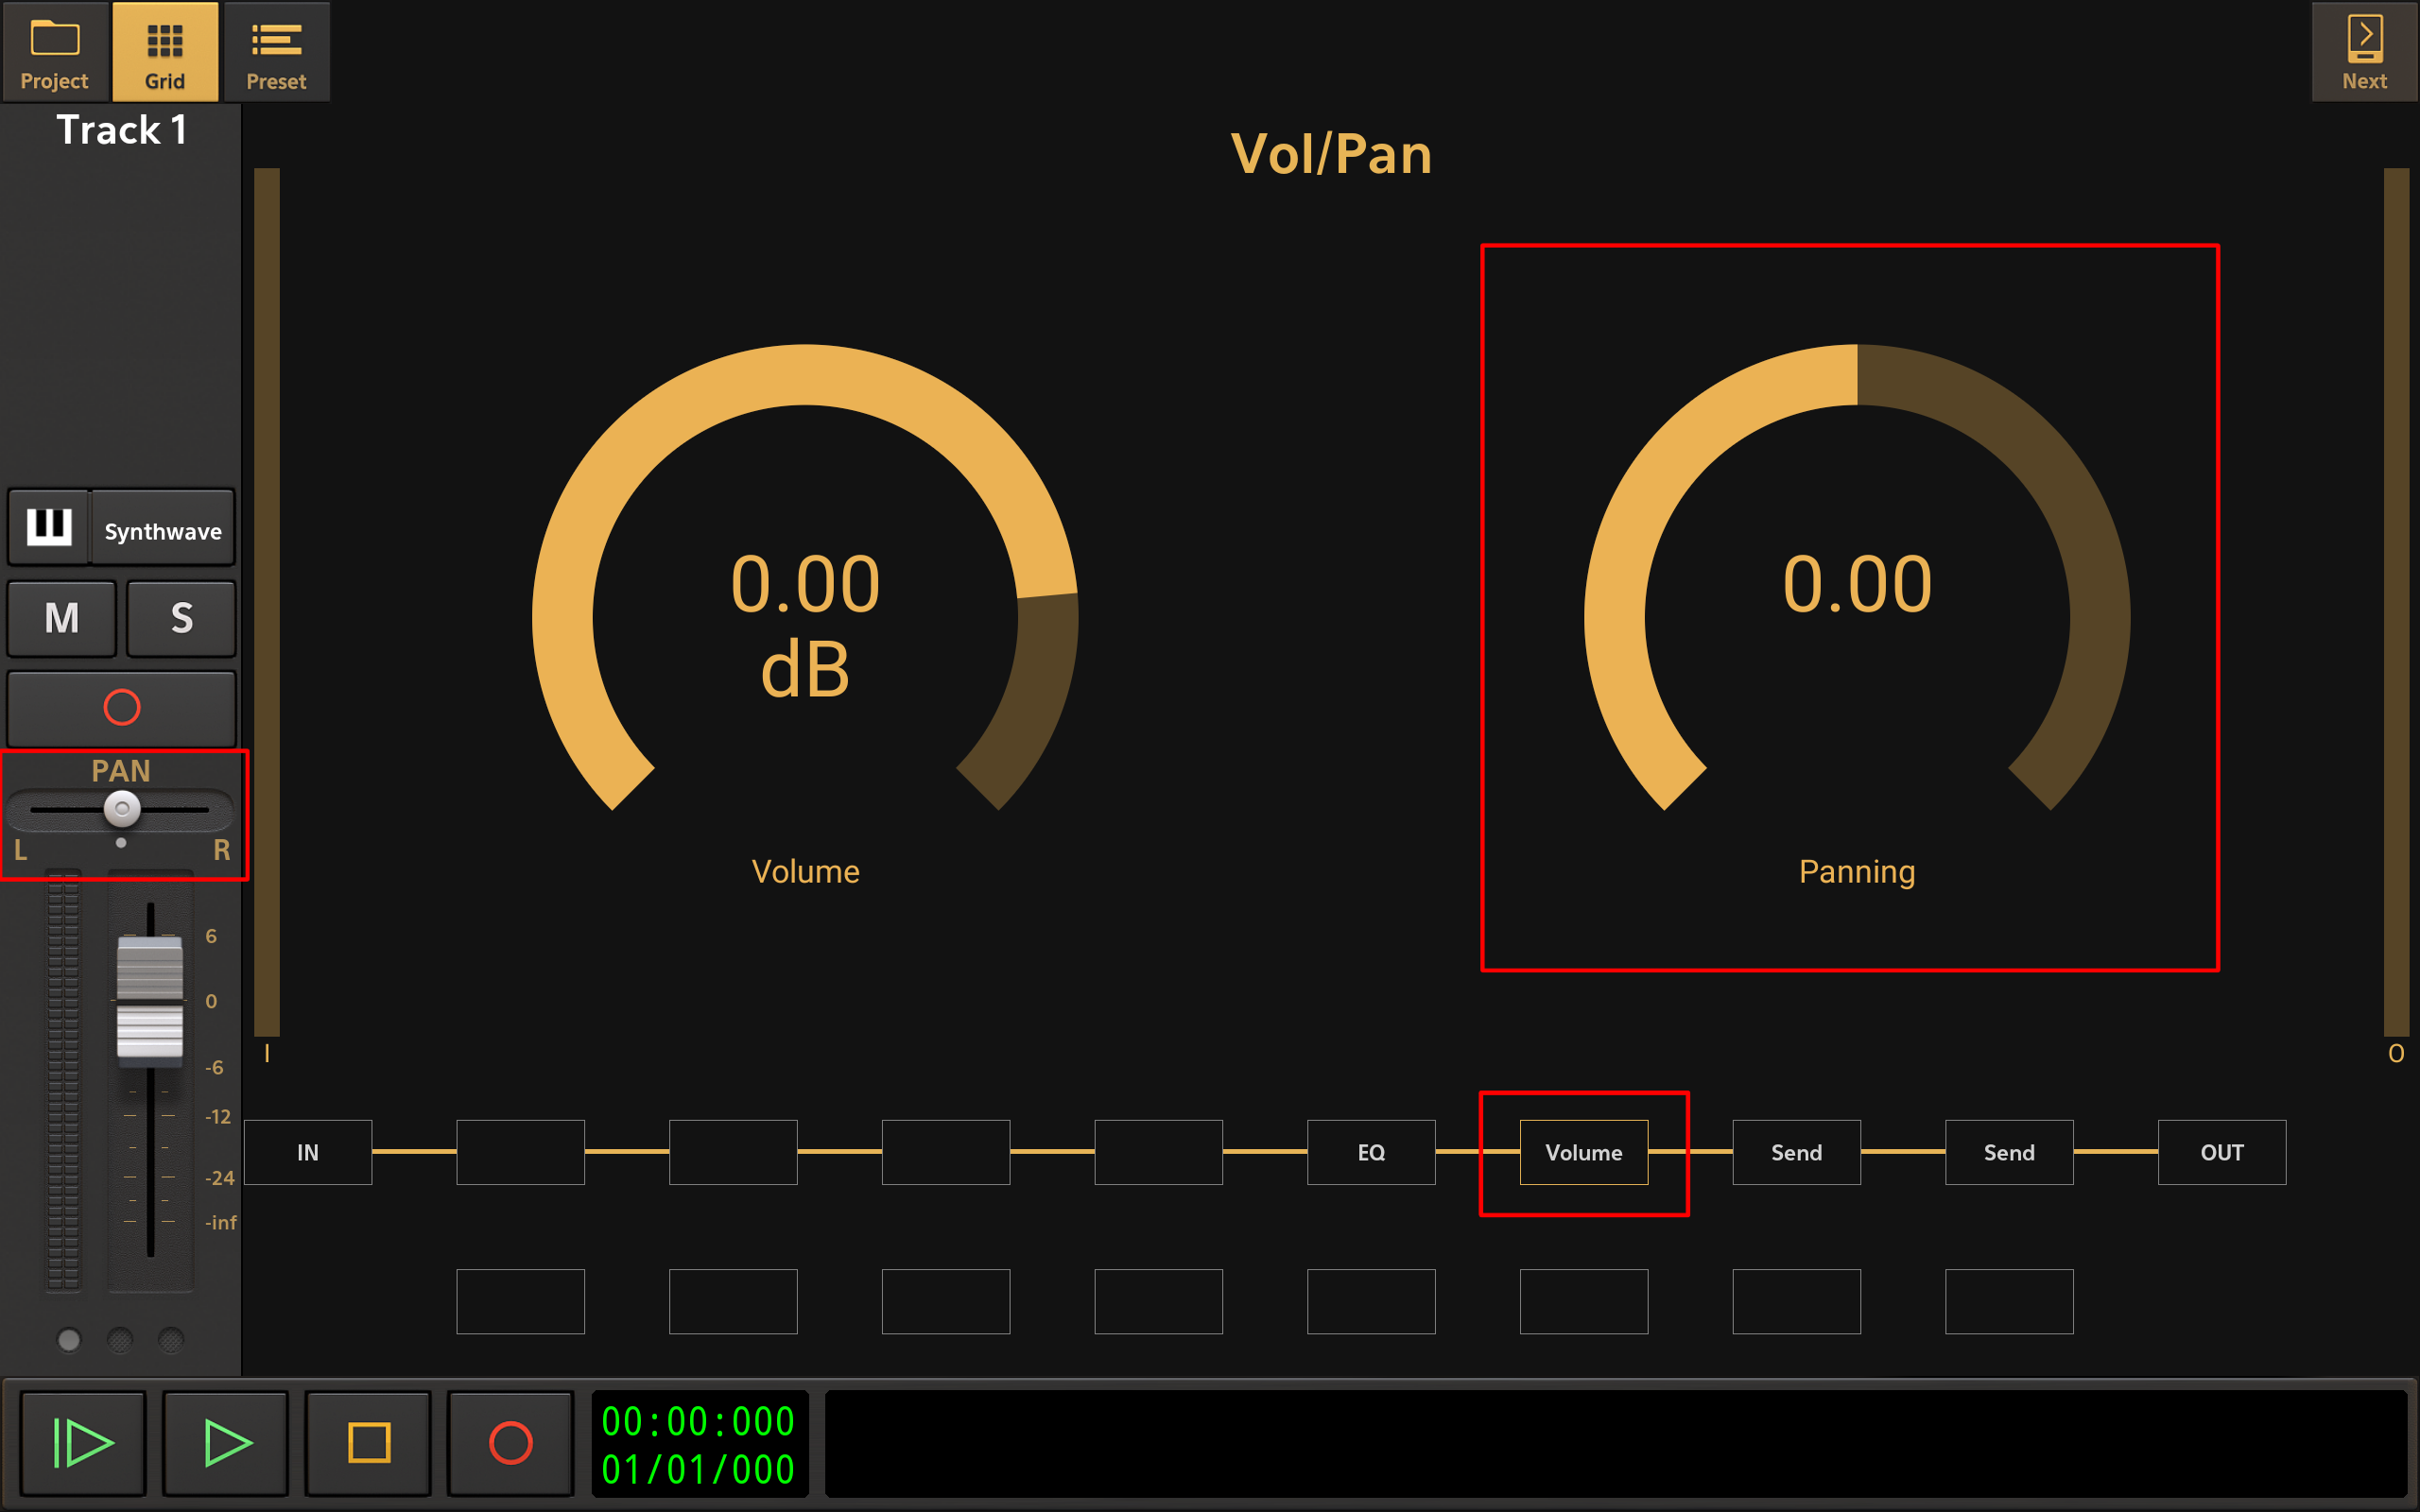
The Pan position slider controls the Pan dial in the Vol/Pan block displayed on the track's FX Grid (Effects Grid). highlighted in the image shown below (the block itself is labeled 'Volume'). Be aware then that changing the Pan position on the channel strip will simultaneously change the Pan dial in the Vol/Pan block controls accessed via the FX Grid screen and vice versa.
NOTE. You may have read that last section, talking about 'the track's audio' and thought, 'Audio? I thought we were talking about MIDI tracks here?'. It is important to remember that MIDI is just a set of instructions which determine how internal virtual instruments or external hardware instruments are to be played. By itself, MIDI contains no audio. But virtual instruments like those in Audio Evolution Mobile do generate audio when instructed to do so by the MIDI data on MIDI tracks and it is this audio which is outputted from the MIDI track and can therefore be controlled with the channel strip or processed with effects. This is the audio being referred to in this section.
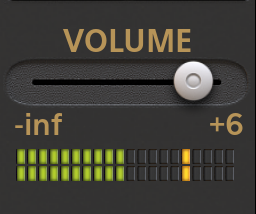
The Track Volume Output Meter ![]() allows you to monitor the audio output level of your track in real time. You can choose between having vertical volume display/controls (shown above) or horizontal display/controls (see below in the Track Volume Fader/Slider section), to save space, in the User Interface section of the Settings. Devices with smaller screens will default to using the horizontal display/controls.
allows you to monitor the audio output level of your track in real time. You can choose between having vertical volume display/controls (shown above) or horizontal display/controls (see below in the Track Volume Fader/Slider section), to save space, in the User Interface section of the Settings. Devices with smaller screens will default to using the horizontal display/controls.
The Track Volume Fader/Slider ![]() allows you to adjust the volume level of the track within the overall mix. As mentioned above in the Pan section, the volume fader controls the volume level dial in the Vol/Pan block (labeled Volume), always shown in the FX Grid and highlighted below.
allows you to adjust the volume level of the track within the overall mix. As mentioned above in the Pan section, the volume fader controls the volume level dial in the Vol/Pan block (labeled Volume), always shown in the FX Grid and highlighted below.
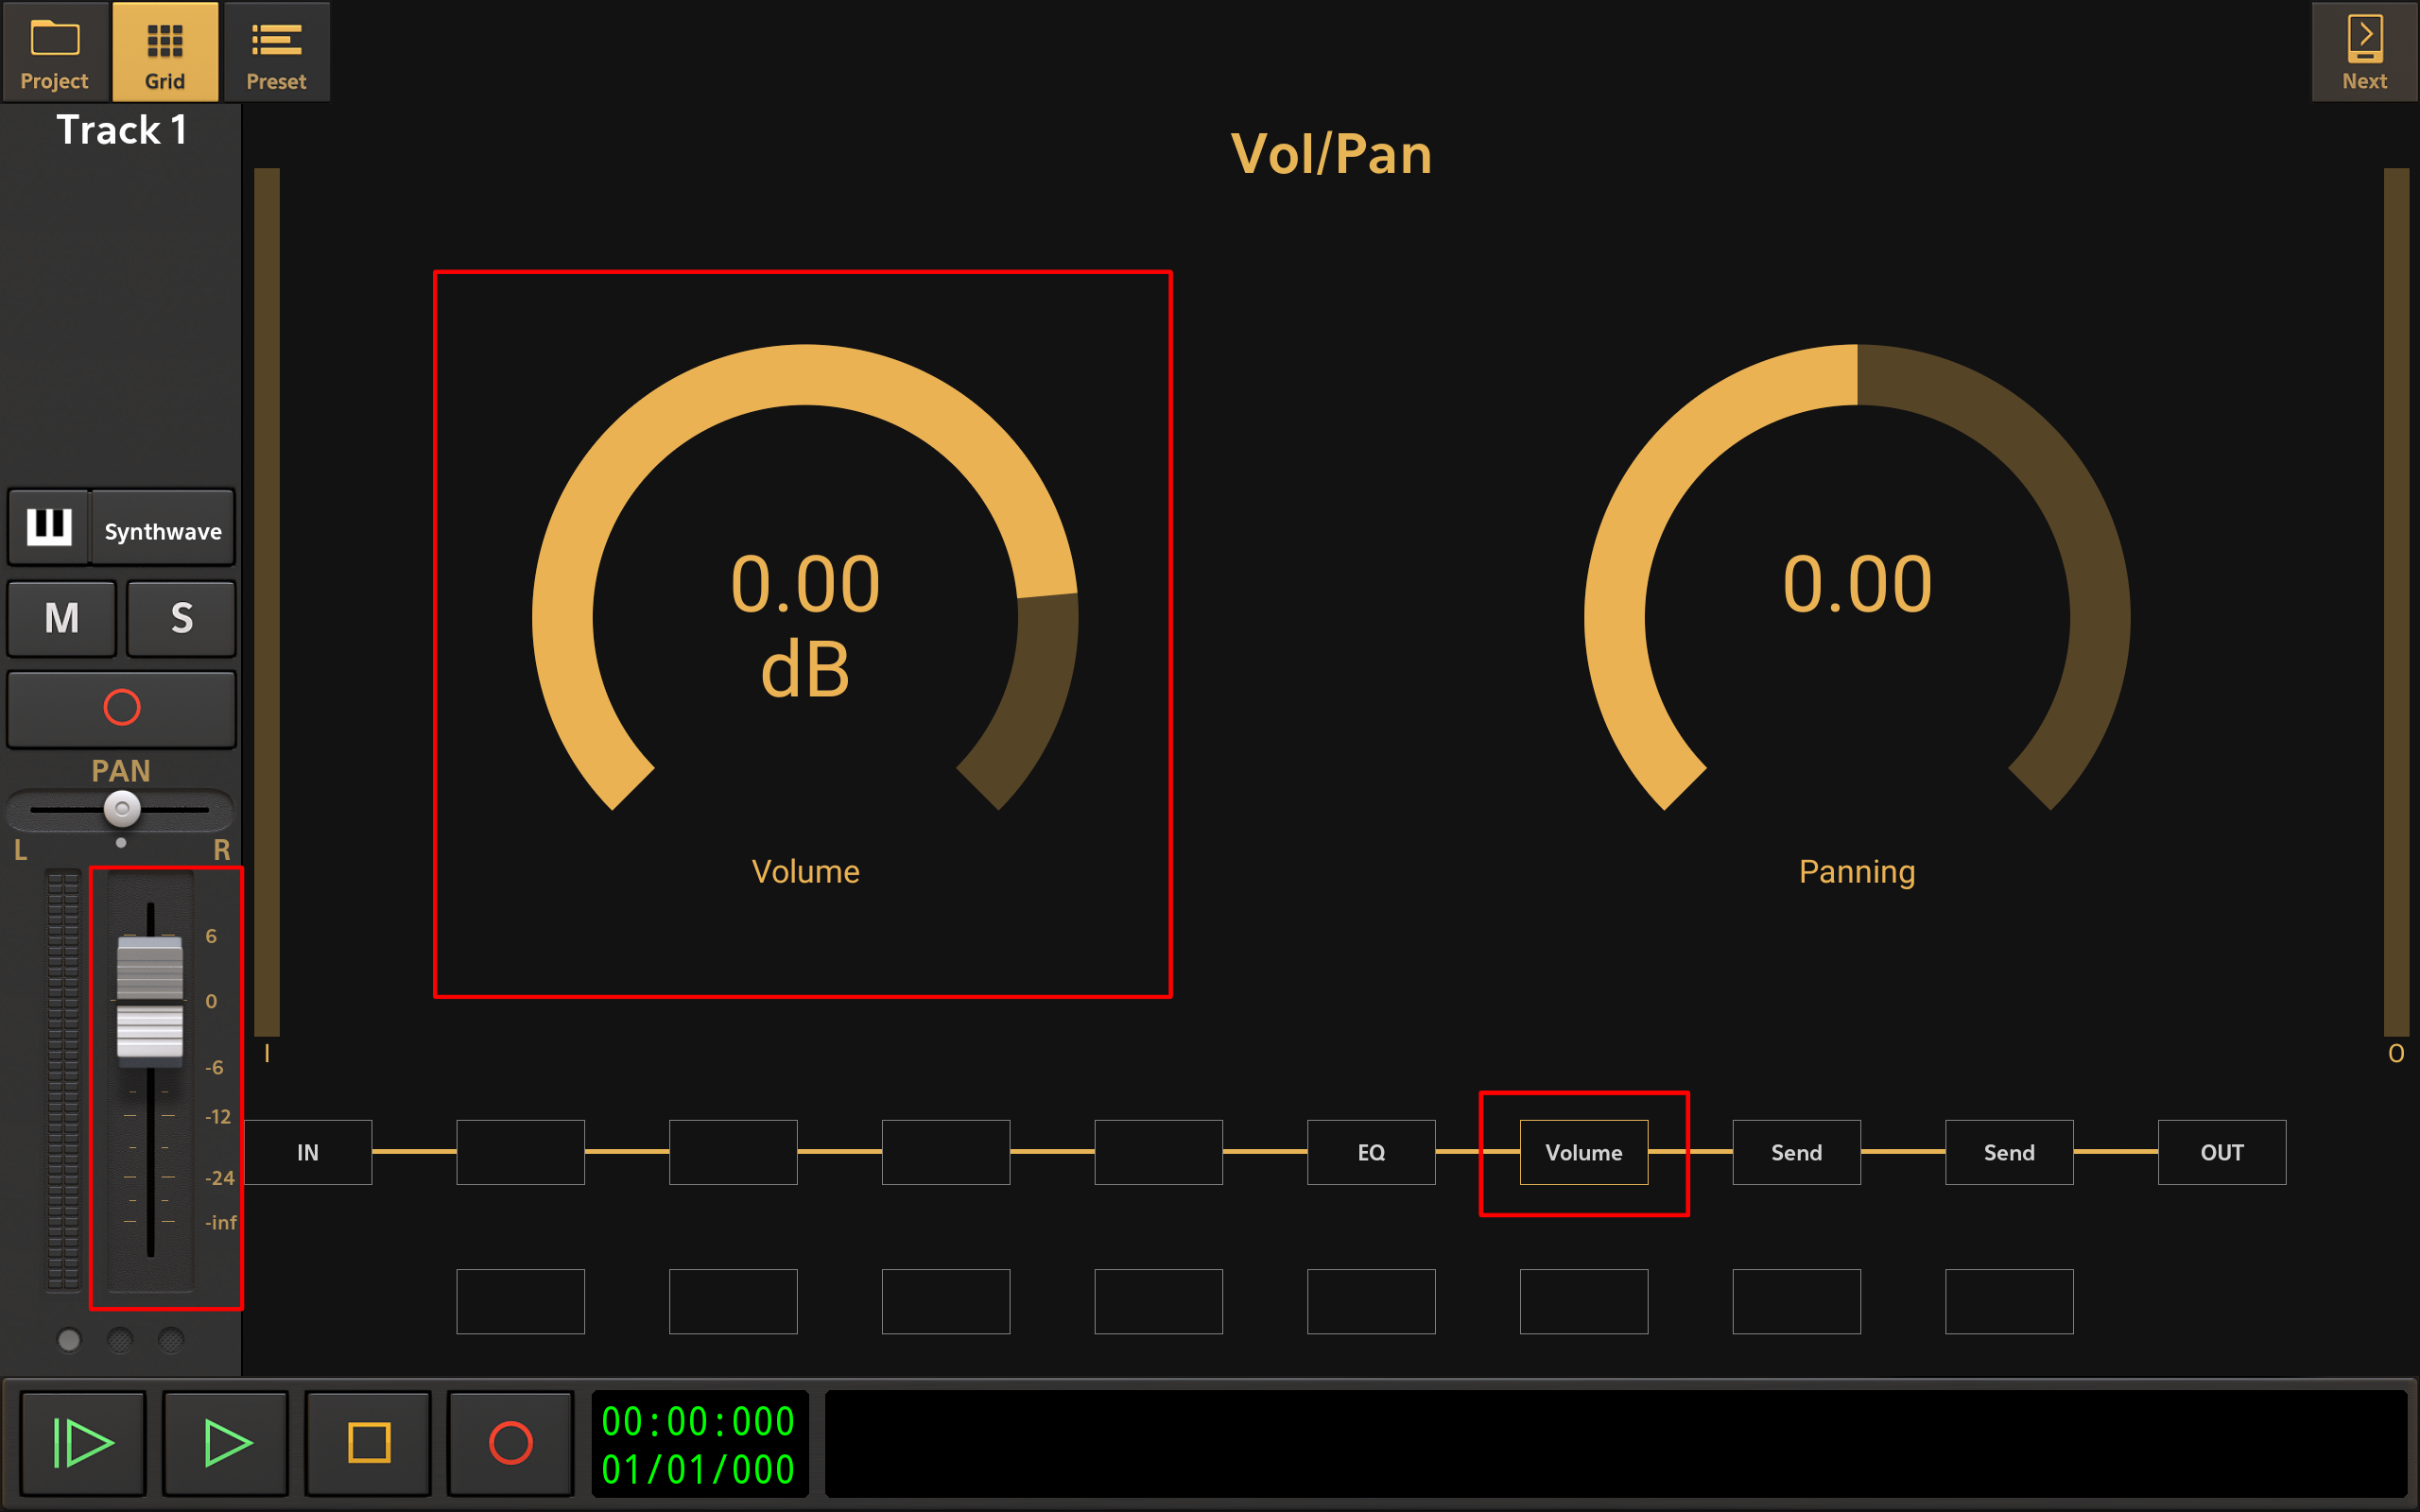
As already stated for Pan controls, be aware that changing the volume level using the fader on the channel strip also changes the volume dial in the Vol/Pan block controls, accessed via the FX Grid screen, and vice versa. Double tap the white fader handle to open the Options to reset to 0dB or to enter a value for greater precision. The slider values are displayed in the Playback Timer Display as they are changed. You can choose between having a vertical volume fader/slider (shown above) or a horizontal slider (below), to save space, in the User Interface section of the Settings. This requires a restart of the app to take effect. Devices with smaller screens will default to using the horizontal slider seen here.
The Page Selector ![]() allows you to move between the different pages of the channel strip. Depending on your device's screen size, more, or fewer, pages will be required to show all of the channel strip functions. Tap on the circles representing the pages to move through them. Alternatively, when on the Mixer Screen or Master and Groups Screen, you can move through the pages of all channel strips displayed simultaneously using the Next
allows you to move between the different pages of the channel strip. Depending on your device's screen size, more, or fewer, pages will be required to show all of the channel strip functions. Tap on the circles representing the pages to move through them. Alternatively, when on the Mixer Screen or Master and Groups Screen, you can move through the pages of all channel strips displayed simultaneously using the Next ![]() button at the top left of those screens.
button at the top left of those screens.
Page Two Jump to Page One Jump to Page Three
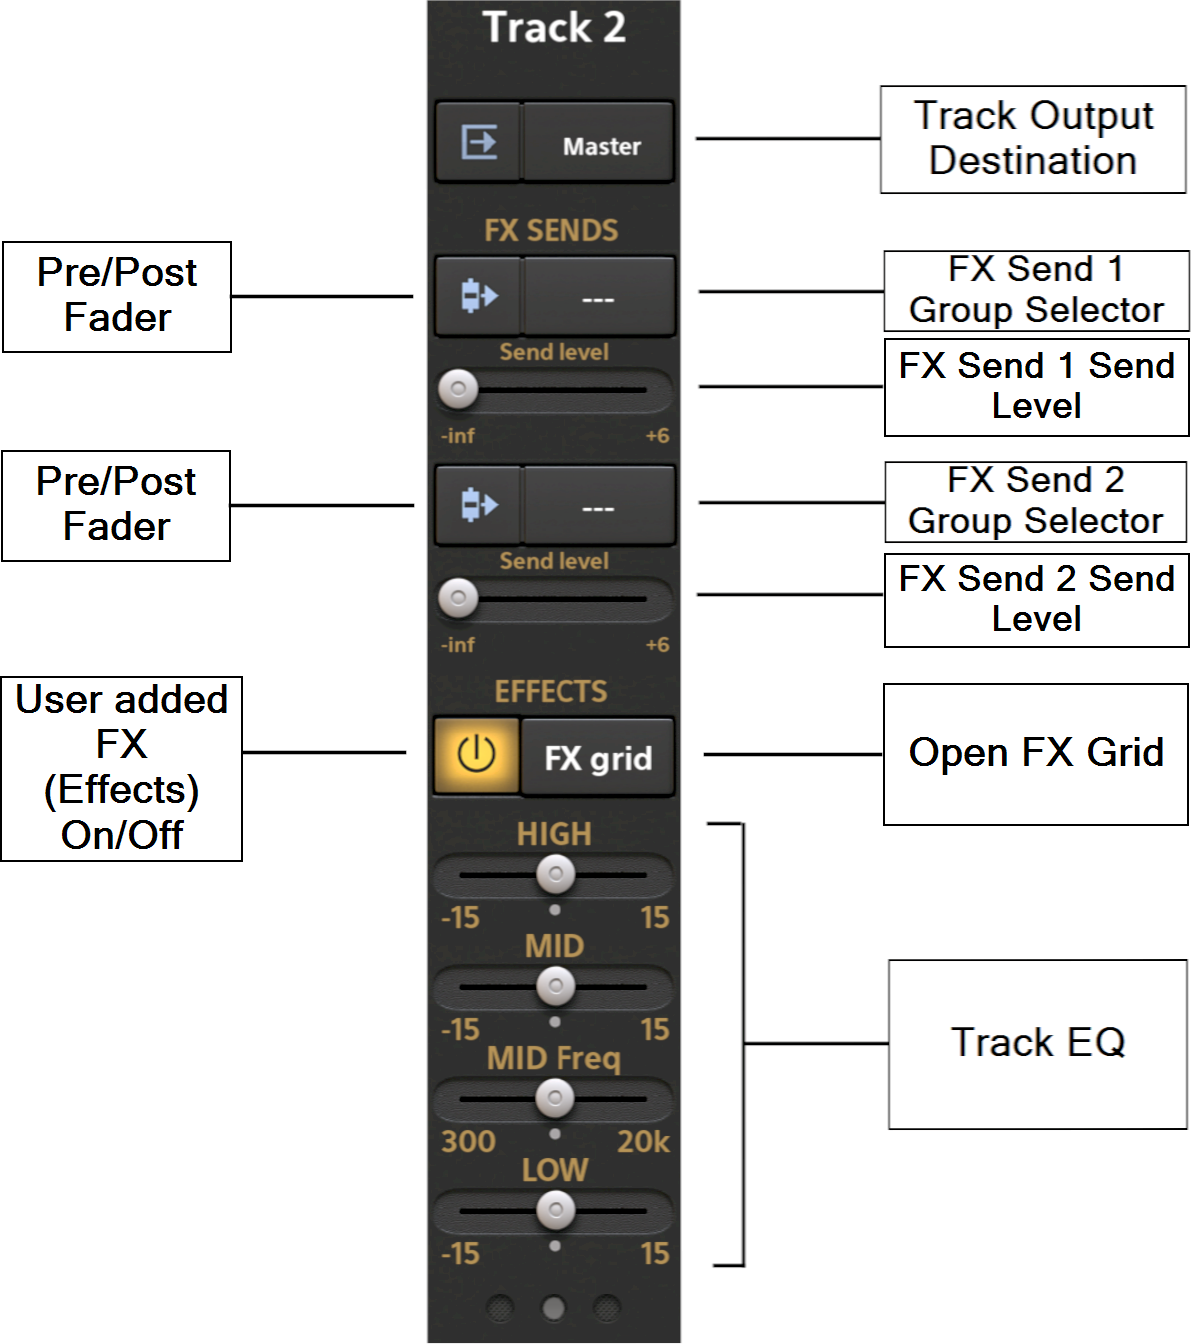
The Track Output ![]() button opens the track output options seen here.
button opens the track output options seen here.

This allows you to select the output routing for the track's audio after it has been through its entire effects chain on the FX Grid. By default, if no Groups have been created by the user, the only option shown in the Track Output will be the Master output. If the user has created groups on the Master and Groups Screen, they will also be displayed as options. Groups can be used for different purposes. Above, one group has been created and is therefore shown. In terms of the Track Output, routing specific tracks into different Groups, or bus channels, allows you to have submixes, each of which can have their overall volume controlled using a single Group fader on the Master and Groups Screen before finally being routed from there to the Master output. Imagine you have each element of a drum kit - the kick drum, the snare drum, the Hi-Hat etc. - on a separate track in your project. Routing all of those elements/tracks to the same Group would allow you to mix them all in relation to each other but then have a single fader to control the overall level of the entire drum kit in your mix.
As just mentioned, Groups can be used for mixing purposes, but they can also be used by the track's FX Sends as FX Returns. FX Sends route a copy of the track's audio to an auxiliary Group with effects placed on it. This Group can then be used to 'return' the processed signals which have passed through its effects back to the Master output, hence why it is referred to as an FX Return. This is a powerful feature which can really help to streamline your project and minimize the CPU load on your device. Put simply, if you want several tracks to use the same effect, with the same parameter setup, or the same chain of effects, you may as well send all of their audio signals through the same FX Return (Group) rather than applying that effect, or effects, separately to each individual track. This means only one instance of the effect, or effects chain, is used instead of several instances and therefore minimizes the CPU usage. By default, Audio Evolution Mobile provides two FX Sends for each track, though more can be added on the FX Grid if you need them. The two default FX Sends are shown on the FX Grid and the two FX Sends shown on the Channel Strip will control the first two FX Sends to appear in the FX Grid chain. Initially, this will, of course, be the two default FX Sends but should you add other FX Sends to the chain before those two then the controls on the Channel Strip will always control the first two from left to right.
The FX Send Group Selectors ![]() button, on the right, opens this Select Group dialog.
button, on the right, opens this Select Group dialog.
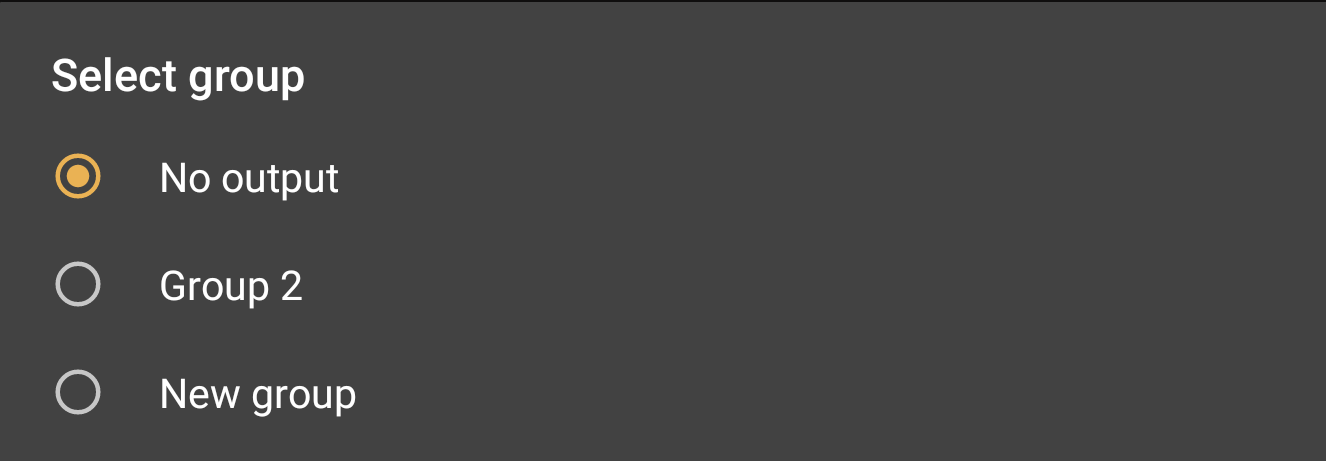
By default, 'No output' is selected since FX Sends aren't used until they are set up by the user. Once you have created a Group, it will appear in this dialog, as can be seen, but you can also press 'New Group' to create your own Group directly from this interface. Select your desired Group to use as your FX Return from the options.
The FX Sends are, like the EQ and Volume/Pan, also shown on the FX Grid. FX Send 1 is highlighted in red and FX Send 2 is highlighted in blue in the image below. As with those other controls, remember that any changes made on the Channel Strip will simultaneously be made in the controls on the FX Grid Page and vice versa (remembering that, as mentioned above, the FX Sends on the Channel Strips always control the first two Send blocks displayed on the effects chain from left to right on the FX Grid).
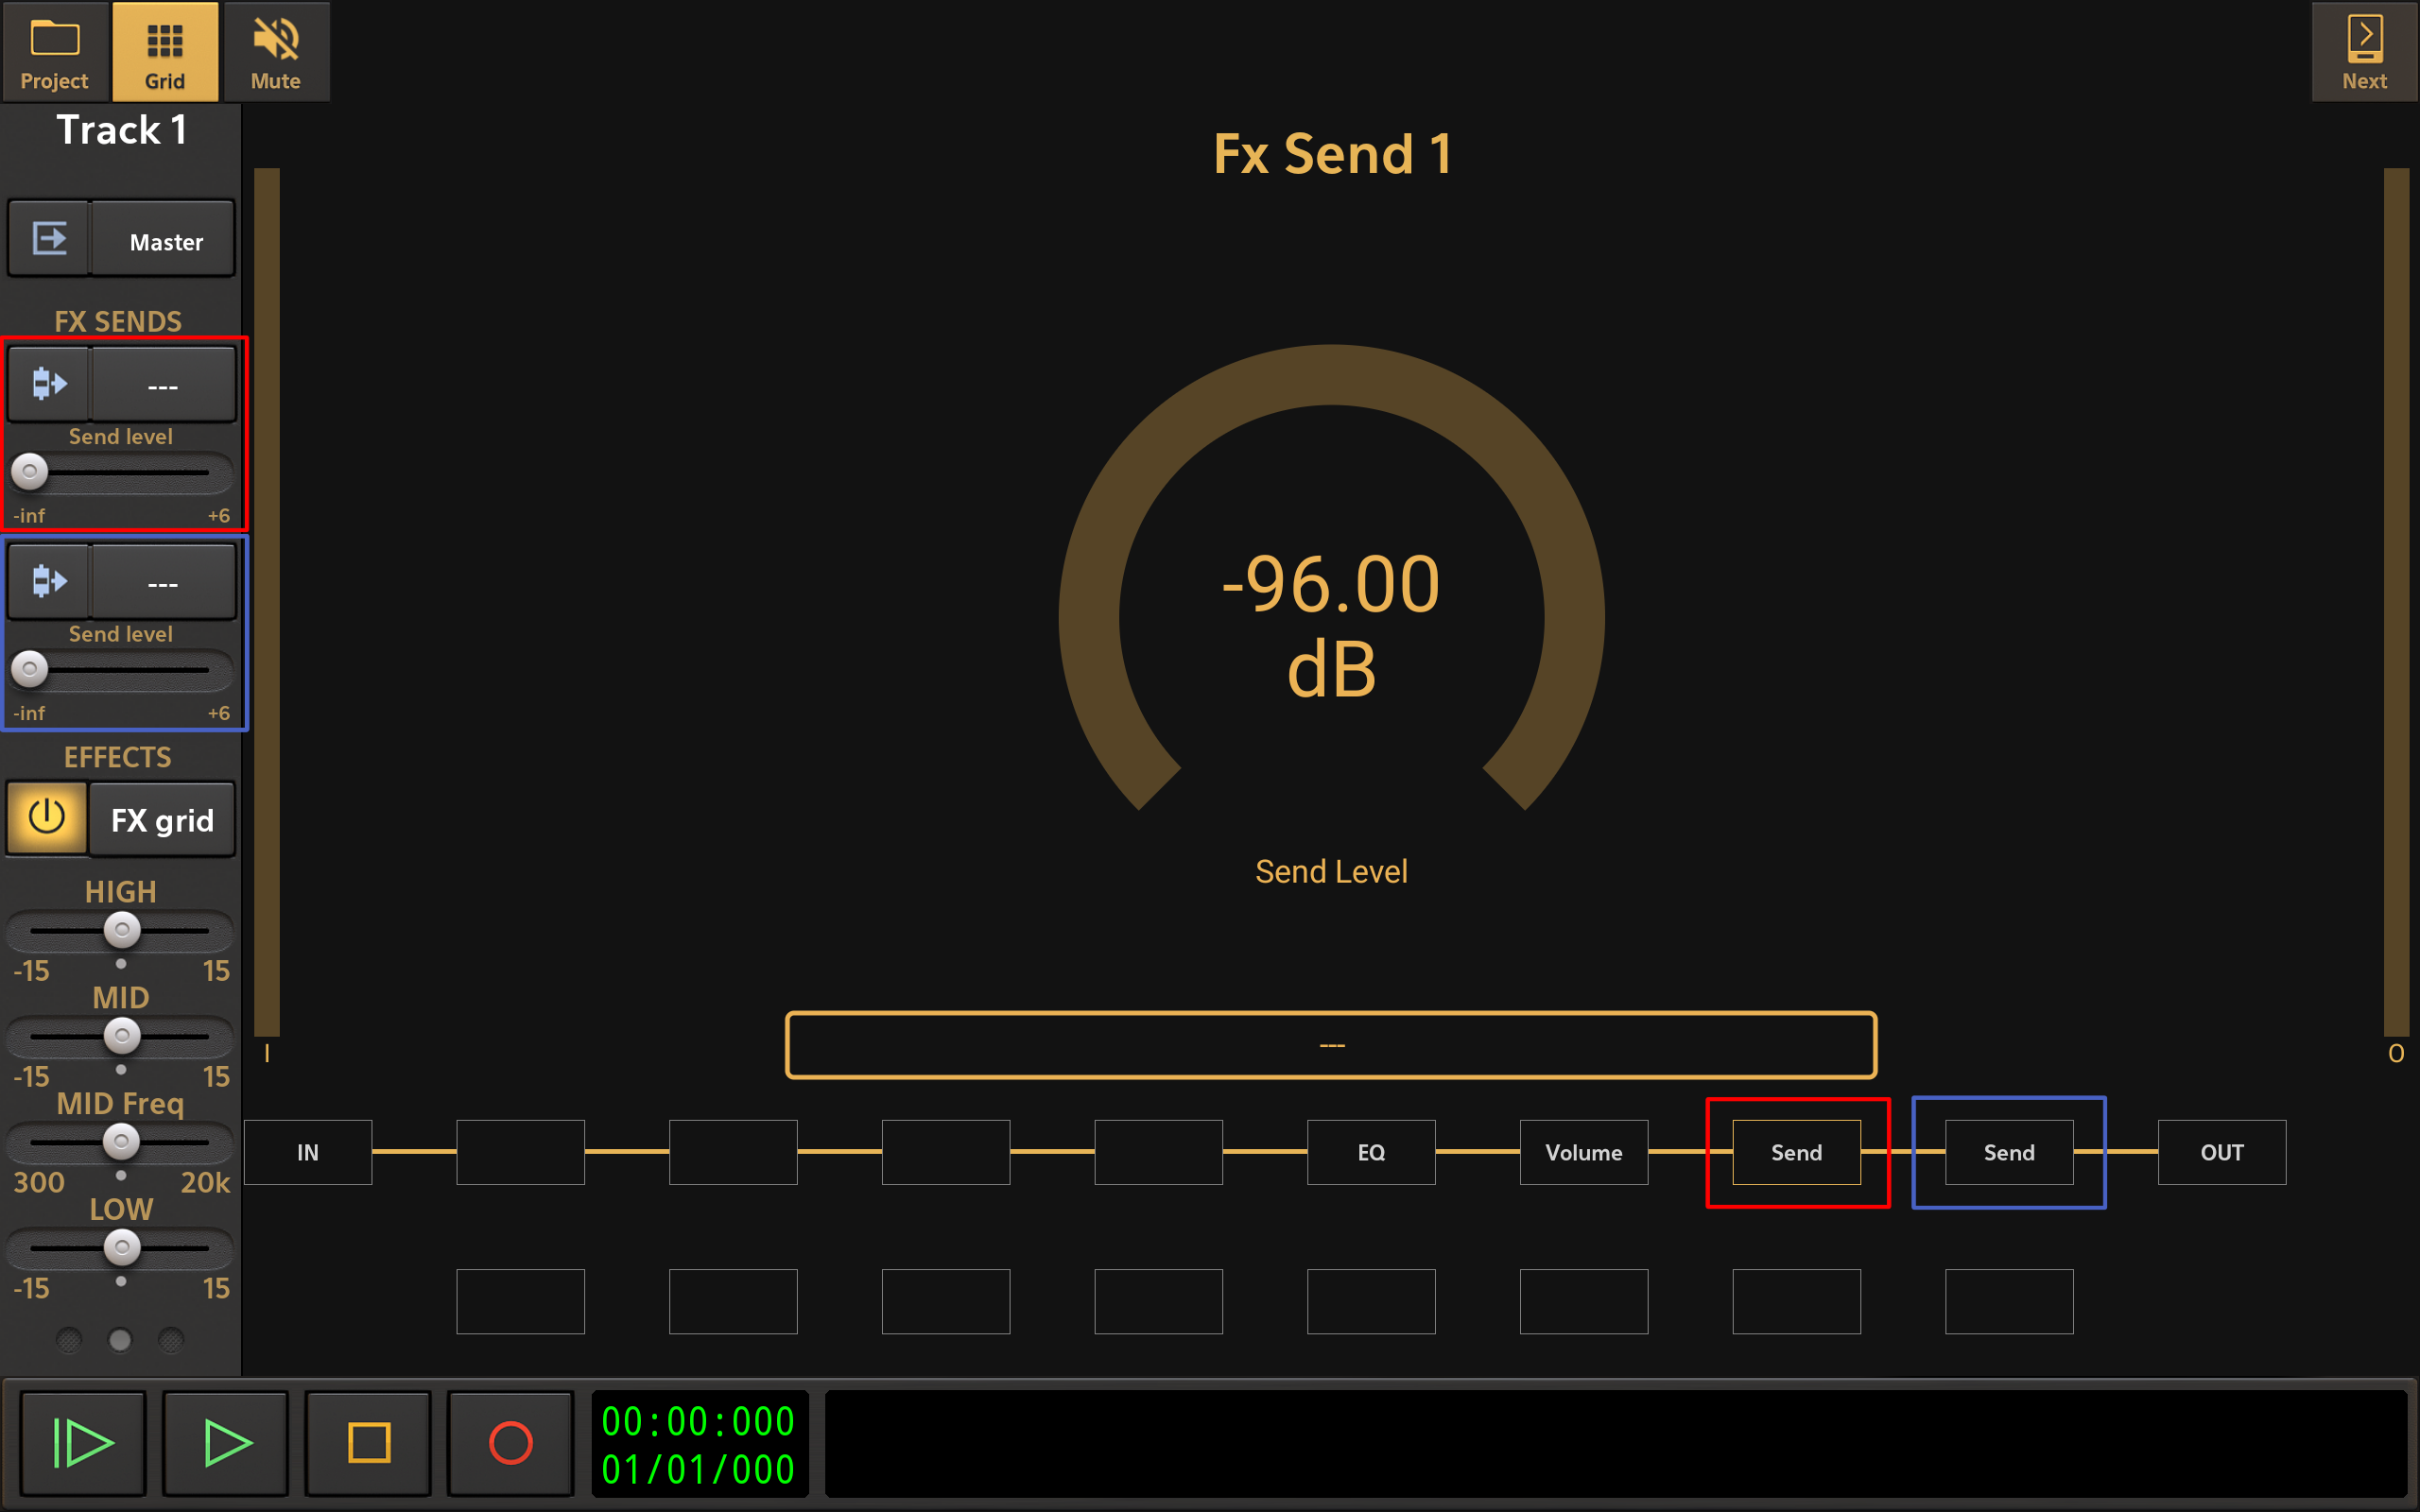
The Pre/Post Fader ![]() button, on the left, allows you to select whether you want the track's audio to be sent to the individual FX Return before (Pre) or after (Post) it passes through the Volume/Pan faders/sliders shown on the Channel strip and in the Volume block on the FX Grid. By default they are in the Post position. Pressing the button you will see the graphic change to indicate whether the FX Send, represented by the blue arrow/triangle, is before or after the fader handle represented. The best way to understand what is happening is probably to open the track's FX Grid. The track's channel strip will still be visible on the left so if you press the Pre/Post Fader buttons for the FX Send, you will be able to see how the Send moves position from being after (Post) the Volume block to being before (Pre) the volume block.
button, on the left, allows you to select whether you want the track's audio to be sent to the individual FX Return before (Pre) or after (Post) it passes through the Volume/Pan faders/sliders shown on the Channel strip and in the Volume block on the FX Grid. By default they are in the Post position. Pressing the button you will see the graphic change to indicate whether the FX Send, represented by the blue arrow/triangle, is before or after the fader handle represented. The best way to understand what is happening is probably to open the track's FX Grid. The track's channel strip will still be visible on the left so if you press the Pre/Post Fader buttons for the FX Send, you will be able to see how the Send moves position from being after (Post) the Volume block to being before (Pre) the volume block.
Post-fader is commonly used for (true) effect sends. In this case, the channel fader also influences how much signal is sent to the FX Return Group connected to the FX send. Otherwise, with pre-fader, having the channel fader down would still send audio to the effect, which is usually not desirable.
Pre-fader can be used for monitoring purposes if you have a USB audio interface with more than 2 outputs. You could create a submix using the FX sends and set the output of the bus to for example Output 3-4 on your USB audio interface.
When using an FX Send, the app sends a copy of the track's audio signal to pass through the effect on the FX Return. The Send Level ![]() slider determines the level of this audio signal sent to the auxiliary FX Return. In practice, this controls the amount of the effect you will hear applied to the track in the eventual output. Because of this, the FX Return, which has the desired effect placed on its FX Grid, will generally - depending on the type of effect, want to have the Mix level of the effect at 100% wet because the amount of effect applied to each track's signal using their FX Sends and the FX Return is controlled by their Send Level sliders, allowing them all to have different amounts of the effect applied as required. The Send Level is displayed in the Playback Timer Display as it is changed. Double tap the white slider handle to reset or to enter a value for greater precision.
slider determines the level of this audio signal sent to the auxiliary FX Return. In practice, this controls the amount of the effect you will hear applied to the track in the eventual output. Because of this, the FX Return, which has the desired effect placed on its FX Grid, will generally - depending on the type of effect, want to have the Mix level of the effect at 100% wet because the amount of effect applied to each track's signal using their FX Sends and the FX Return is controlled by their Send Level sliders, allowing them all to have different amounts of the effect applied as required. The Send Level is displayed in the Playback Timer Display as it is changed. Double tap the white slider handle to reset or to enter a value for greater precision.
NOTE. Since Groups can be used for different purposes, as we've just seen, it is wise to get into the habit of renaming your Groups with descriptive names. For example, if you have all of your individual drum tracks routed into a Group, rename that Group 'Drums'. If you have several tracks routed through the same reverb effect on an FX Return, rename that FX Return Group 'Reverb'. To do this, simply long press on the Group's name on its channel strip in the Master and Groups Screen view. Enter your desired name into the dialog which appears. This will really help you keep track of things as you work on your project.
The FX Grid ![]() button, on the right, displays the FX (Effects) Grid for the selected track. The FX Grid allows you to insert effects, either in serial or in parallel, and add additional FX Sends should you require them for the selected track. As already described, some of the blocks shown on the grid represent controls which are simultaneously available on the track's channel strip. For more information on the FX Grid, see here.
button, on the right, displays the FX (Effects) Grid for the selected track. The FX Grid allows you to insert effects, either in serial or in parallel, and add additional FX Sends should you require them for the selected track. As already described, some of the blocks shown on the grid represent controls which are simultaneously available on the track's channel strip. For more information on the FX Grid, see here.
The User Added FX On/Off ![]() button, on the left, allows you to enable or disable all of the 'true' effects (as opposed to FX Sends) you, the use, have added to the FX Grid for the selected track with one simple button press. This can be very useful if you want to quickly hear how the track sounds without any of the effects you've added. As stated, any FX Sends added by the user will not be controlled by this on/off button, and neither will the default, non-user created, blocks which exist on every FX Grid - the EQ block, the Volume/Pan block and the two default Send blocks.
button, on the left, allows you to enable or disable all of the 'true' effects (as opposed to FX Sends) you, the use, have added to the FX Grid for the selected track with one simple button press. This can be very useful if you want to quickly hear how the track sounds without any of the effects you've added. As stated, any FX Sends added by the user will not be controlled by this on/off button, and neither will the default, non-user created, blocks which exist on every FX Grid - the EQ block, the Volume/Pan block and the two default Send blocks.
The Track EQ ![]() gives you quick access to the most basic equalizer controls in Audio Evolution Mobile for shaping the frequencies heard on the track. These can be useful for making quick adjustments as you work. You may, though, eventually decide that you want to set them back to their default (inactive) values and use the more advanced EQ controls available to fine tune your mix before exporting. If so, double tap the slider handles, and select 'Reset EQ to Center' from the Options pop-up which appears. This pop-up also allows you to enter a value for the slider's position should you need greater position. If you'd rather not have the EQ displayed on the channel strip, to save space, you can turn its display off in the Mixer Channel Display section of the Settings. The slider values (for all sliders/fader controls within the channel strip) are displayed in the Playback Timer Display
gives you quick access to the most basic equalizer controls in Audio Evolution Mobile for shaping the frequencies heard on the track. These can be useful for making quick adjustments as you work. You may, though, eventually decide that you want to set them back to their default (inactive) values and use the more advanced EQ controls available to fine tune your mix before exporting. If so, double tap the slider handles, and select 'Reset EQ to Center' from the Options pop-up which appears. This pop-up also allows you to enter a value for the slider's position should you need greater position. If you'd rather not have the EQ displayed on the channel strip, to save space, you can turn its display off in the Mixer Channel Display section of the Settings. The slider values (for all sliders/fader controls within the channel strip) are displayed in the Playback Timer Display ![]() as they are changed.
as they are changed.
The EQ sliders on the channel strip also control the parameters of the EQ, always shown in the track's FX Grid (Effects Grid) and highlighted below. The EQ interface accessed via the FX Grid screen also offers a Low Mid band which doesn't fit on the channel strip display. Be aware, then, that changing the sliders on the channel strip will simultaneously change the dials on the EQ display and vice versa.
Page Three Jump to Page One Jump to Page Two
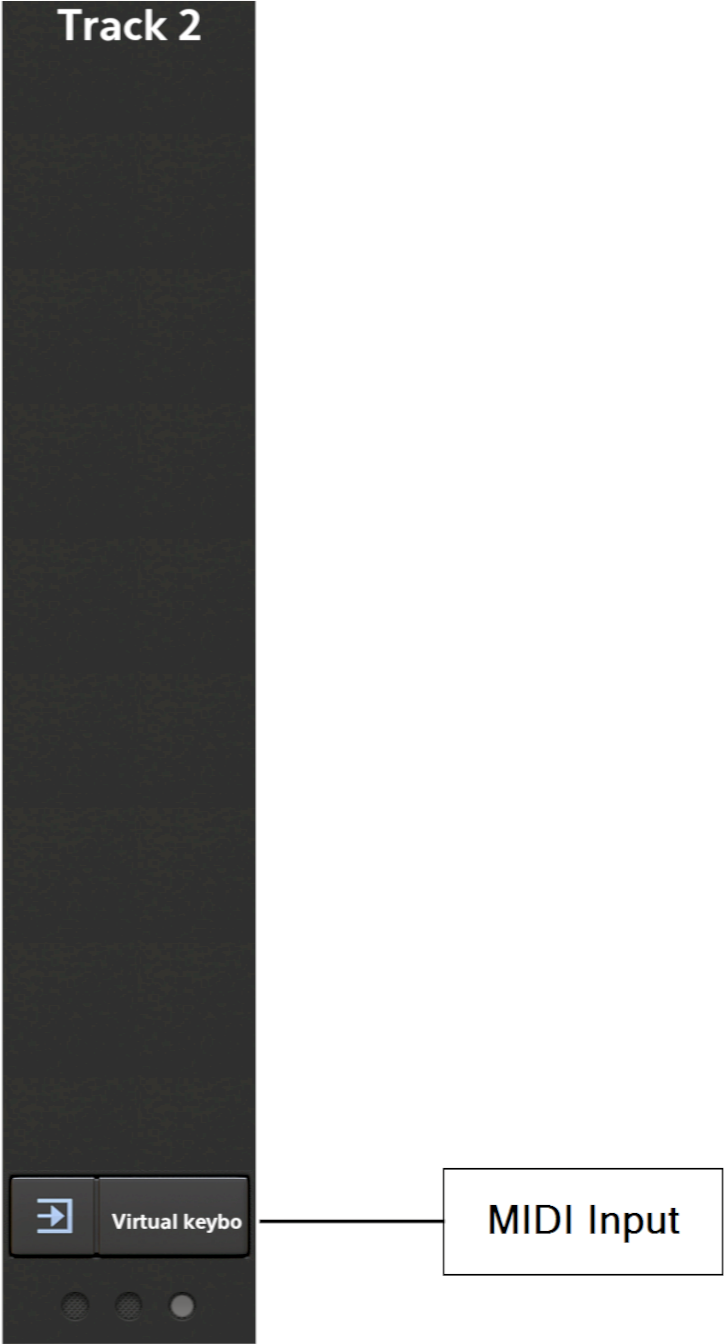
The MIDI Input ![]() button opens the following dialog to allow you to specify the MIDI input options for the selected track. This is where you can select whether the Virtual keyboard or the Drum pads are displayed onscreen for playing the selected virtual instrument (this will only have effect when using a MIDI instrument track, not a Drum Pattern track since the latter requires to enter (quantized) MIDI events through the pattern editor). You can also select any connected MIDI device as the MIDI input for the track.
button opens the following dialog to allow you to specify the MIDI input options for the selected track. This is where you can select whether the Virtual keyboard or the Drum pads are displayed onscreen for playing the selected virtual instrument (this will only have effect when using a MIDI instrument track, not a Drum Pattern track since the latter requires to enter (quantized) MIDI events through the pattern editor). You can also select any connected MIDI device as the MIDI input for the track.

The Channel Information of the incoming MIDI events can be kept when enabling Keep. This is useful for keeping MPE information from for example ROLI devices that require MIDI channel information to be kept unchanged. For ROLI devices, this option is turned on by default. When this option is disabled, then the app will override the MIDI channel.
The Channel filter can be used to record only from a specific MIDI channel. If you for instance have a split area on your MIDI keyboard or have multiple MIDI keyboards attached, you could for example create two tracks, with one having a channel filter for MIDI channel 1 and the other for MIDI channel 2. With both tracks armed, you could record onto separate tracks where MIDI events with channel 1 would be recorded onto one track and MIDI events with channel 2 being recorded on the other track.
NOTE. In order to use the on-screen drum pads to play drums, you must remember to select a drum instrument/preset for use on a MIDI Instrument track rather than creating a Drum Pattern track, which will expect you to be using the drum pattern sequencer grid rather than inputting and recording a live finger-drumming performance. Drum presets are usually in bank 128 when using Soundfonts.