The Drum Pattern Sequencer
Whilst it is possible to load drum kit presets and create your beats on the piano roll, where each type of drum and percussion (kick, snare, hi-hat etc.) is mapped to a single note, the Drum Pattern Sequencer is specially designed to make the creation of beats much easier. The Drum Pattern Sequencer has been designed to be used with Soundfont/SFZ drum virtual instruments which have been mapped according to the General MIDI (GM) Drum Mapping standard (as can be seen about halfway down here). Loading Soundfont/SFZ drum virtual instruments whose drums have not been mapped accordingly will result in, at best, drums having the wrong name allocated to them on the left; at worst, them not appearing on any of the MIDI notes used by the sequencer at all and therefore not accessible. In such cases you will need to use the standard piano roll editor to create your beats. The drum presets in the Default Sound Set, and all of the Digital Sound Factory drum soundfonts available to buy via the Soundfont Shop, are all mapped according to the GM Standard. Likewise, any Audio Unit instrument you select would need to be mapped according to the GM standard.
To open the Drum Pattern Sequencer, first create a Drum Pattern track using the Add Track ![]() button on the Arranger Screen. Choose the drum preset you'd like to use from the selection screen shown (by default the Standard drum kit from the Default Sound Set will be chosen on that selection screen) or select Multi-instrument to create your own custom kit. After selecting your drum instrument, the drum pattern sequencer screen seen here will automatically open and a MIDI clip will be placed on the track's timeline.
button on the Arranger Screen. Choose the drum preset you'd like to use from the selection screen shown (by default the Standard drum kit from the Default Sound Set will be chosen on that selection screen) or select Multi-instrument to create your own custom kit. After selecting your drum instrument, the drum pattern sequencer screen seen here will automatically open and a MIDI clip will be placed on the track's timeline.

NOTE. If your device screen is too small to display all of the buttons along the top shown here at the same time, the More ![]() button will be displayed, and will allow you to access the functions you're missing.
button will be displayed, and will allow you to access the functions you're missing.
NOTE. Further control over the way samples are used within a drum pattern track are available by choosing Multi-instrument in the drum instrument selection dialog. Within a multi-instrument drum pattern, each sample has its own channel strip, with FX Grid etc. and an ADSR button which reveals other controls to fine tune the sample. These controls can be available for existing kits by selecting Multi-instrument and choosing that kit as the base instrument for the multi-instrument kit. For full details on multi-instrument drum instruments, please see here.
1 Project ![]() button. You cannot access any Project functions from the drum pattern sequencer screen which is why the Project button is grayed out. Return to the Arranger Screen using the Next button to access those functions.
button. You cannot access any Project functions from the drum pattern sequencer screen which is why the Project button is grayed out. Return to the Arranger Screen using the Next button to access those functions.
2 Scroll mode ![]() button. Activating the Scroll mode allows you to freely move through the drum pattern sequencer without accidentally placing, or deleting, any events on the sequencer.
button. Activating the Scroll mode allows you to freely move through the drum pattern sequencer without accidentally placing, or deleting, any events on the sequencer.
3 Draw mode ![]() button, shown here in its 'lit up' active state. Draw mode allows you to add and remove events (tap to add, tap again to remove) to and from the drum pattern. You can also tap-and-slide to enter a lot of drum notes quickly.
button, shown here in its 'lit up' active state. Draw mode allows you to add and remove events (tap to add, tap again to remove) to and from the drum pattern. You can also tap-and-slide to enter a lot of drum notes quickly.
4 Edit Velocity mode ![]() button. Edit velocity mode allows you to adjust the velocity for each individual event. Although velocity is often thought of as volume, please see here for a description of how velocity differs from volume. Select the desired drum type from the Drum Type Selector on the left and the velocities of the events present for that type of drum will be displayed as adjustable bars/columns on the screen, seen below. These bars can be moved up and down with your finger, from 0 to 127, to set each note's velocity. The Piano roll editor event selection time can be user defined in the User interface section of the Settings
button. Edit velocity mode allows you to adjust the velocity for each individual event. Although velocity is often thought of as volume, please see here for a description of how velocity differs from volume. Select the desired drum type from the Drum Type Selector on the left and the velocities of the events present for that type of drum will be displayed as adjustable bars/columns on the screen, seen below. These bars can be moved up and down with your finger, from 0 to 127, to set each note's velocity. The Piano roll editor event selection time can be user defined in the User interface section of the Settings ![]() if the bars aren't responding to your touch as quickly as you'd like. The velocity level will be displayed in the Playback Timer Display as the bars are adjusted. As can be seen here, the events to which each velocity bar belongs are shown as outlines when in Velocity mode.
if the bars aren't responding to your touch as quickly as you'd like. The velocity level will be displayed in the Playback Timer Display as the bars are adjusted. As can be seen here, the events to which each velocity bar belongs are shown as outlines when in Velocity mode.

5 Range mode ![]() button. Turning on Range mode allows you to make a selection from the events present in the pattern. To do so, simply touch, hold and slide your finger across the area of the pattern you'd like to select. The range mode, when using the drum pattern sequencer, automatically selects ALL of the drum types' events so you only need to make your selection along the x/time axis. Tap outside the selected range to clear the selection.
button. Turning on Range mode allows you to make a selection from the events present in the pattern. To do so, simply touch, hold and slide your finger across the area of the pattern you'd like to select. The range mode, when using the drum pattern sequencer, automatically selects ALL of the drum types' events so you only need to make your selection along the x/time axis. Tap outside the selected range to clear the selection.
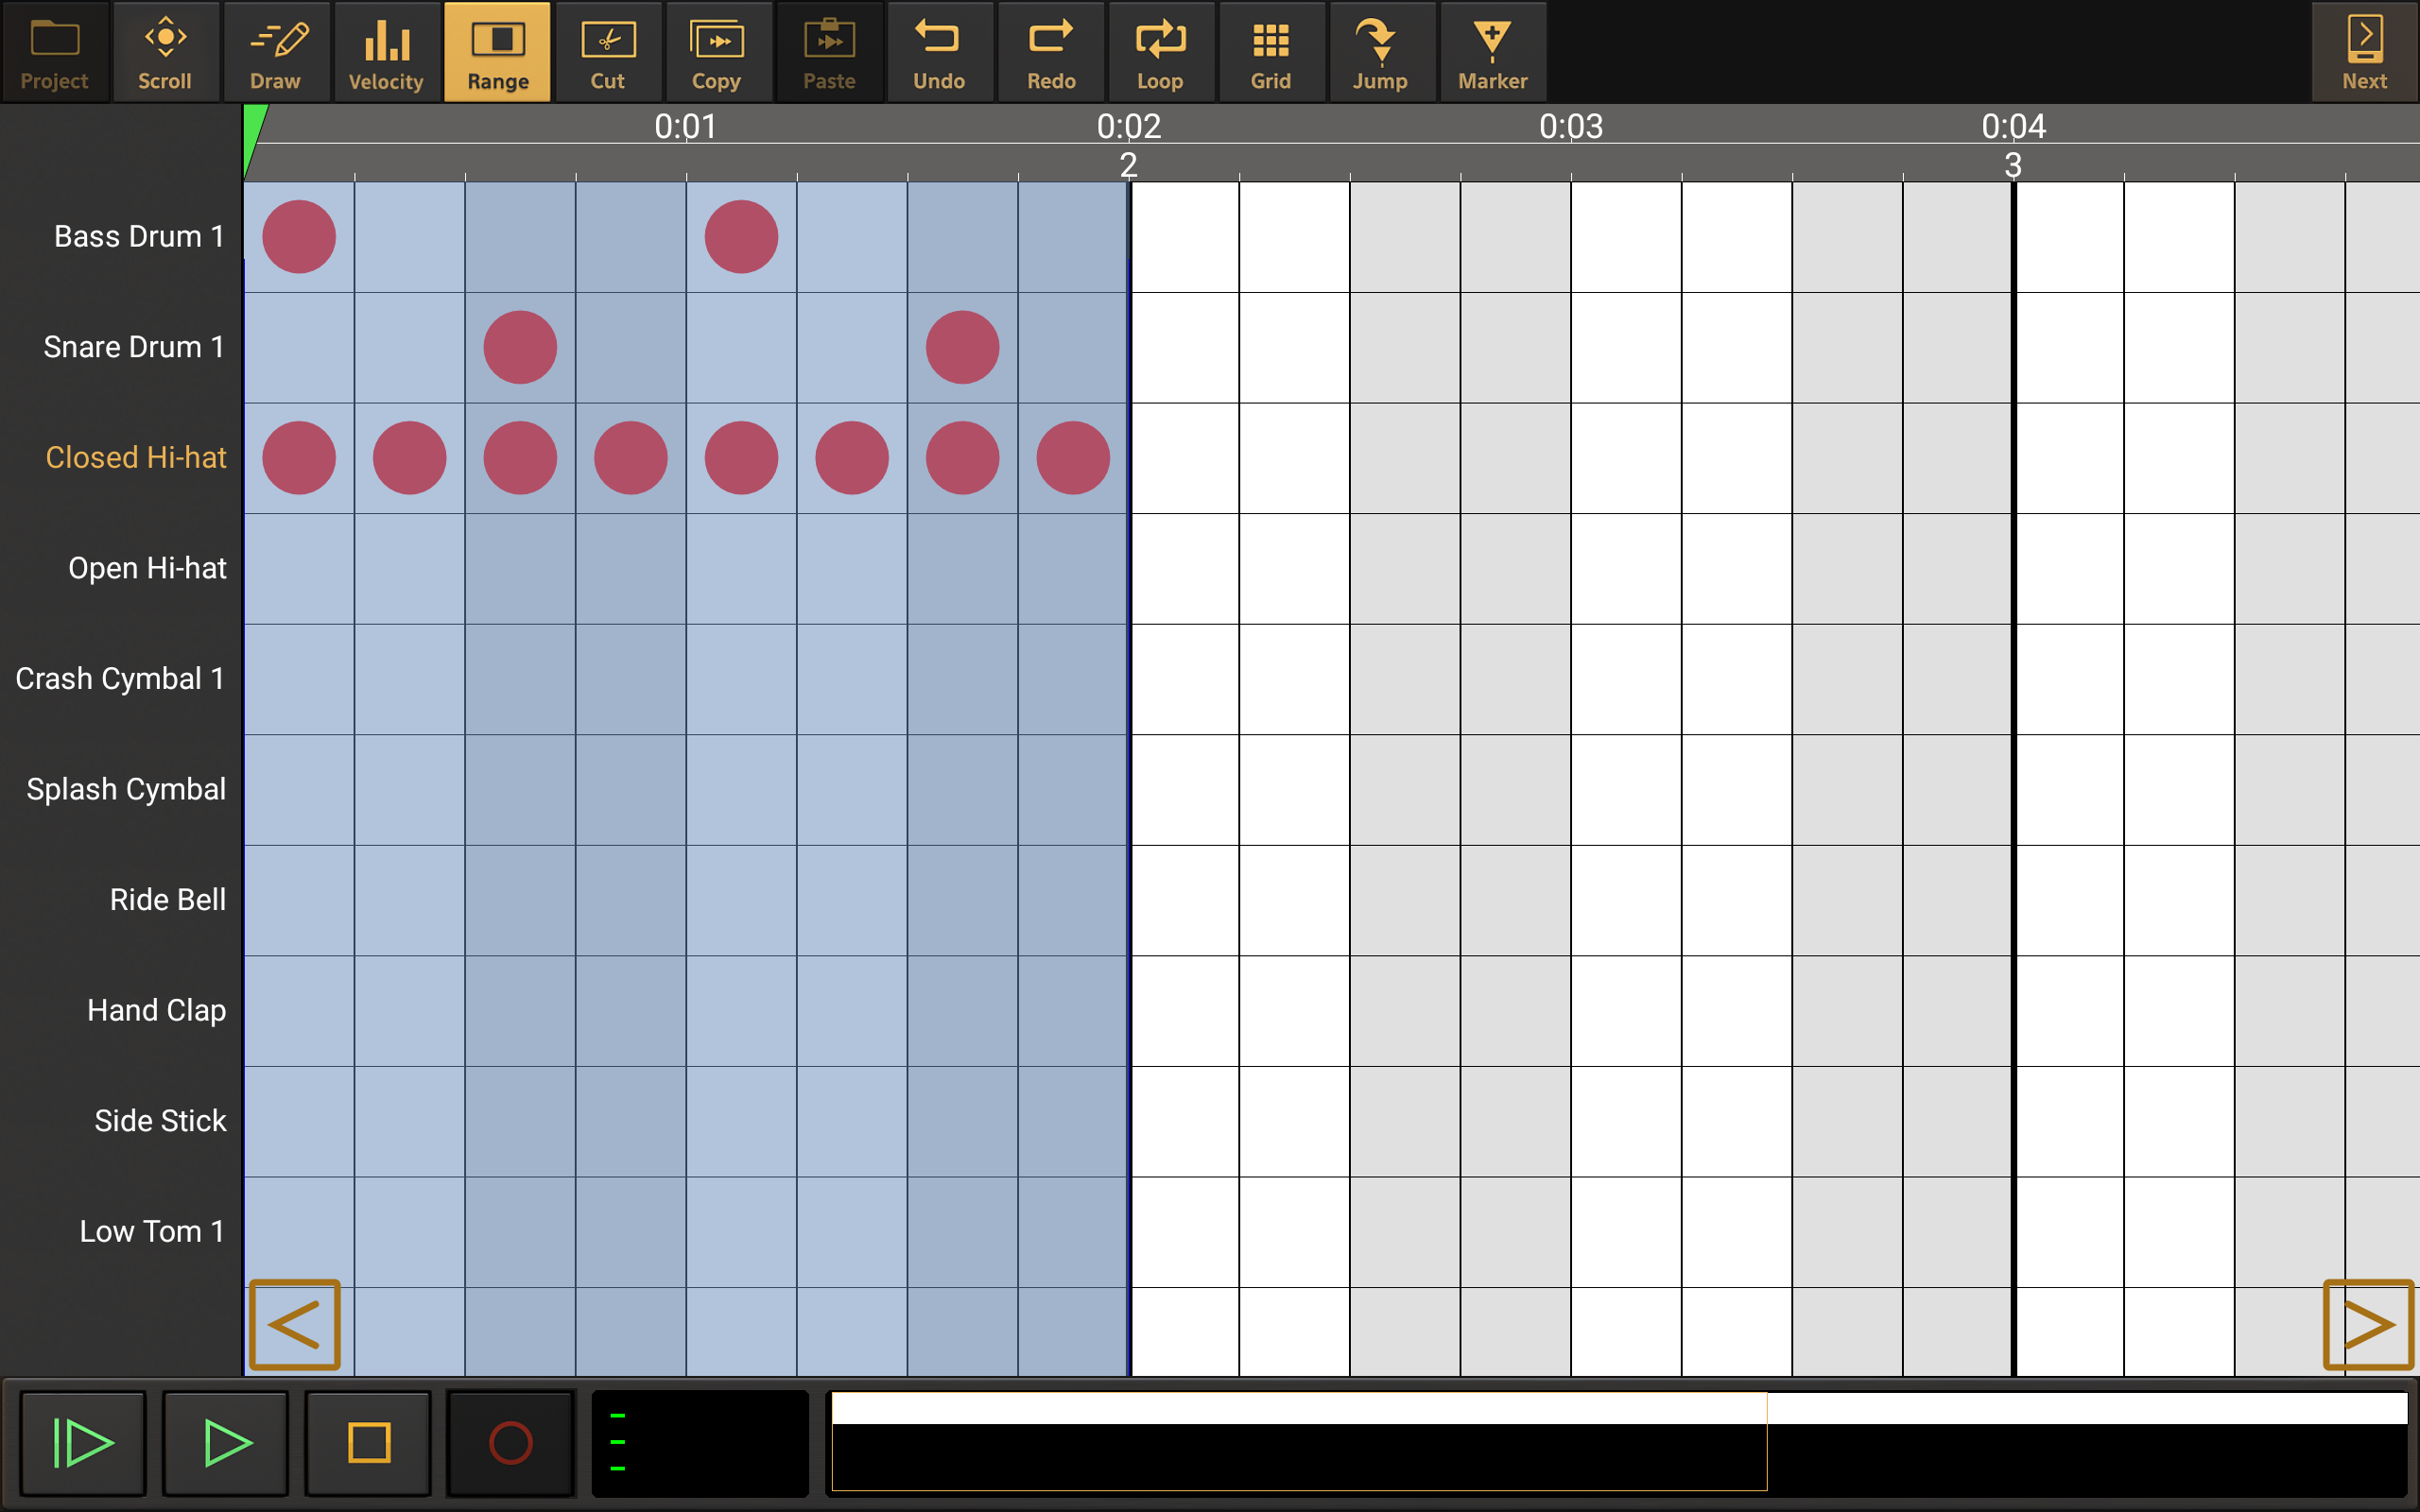
Tap inside the blue selected range, seen above, to open the drum pattern Range options seen here.
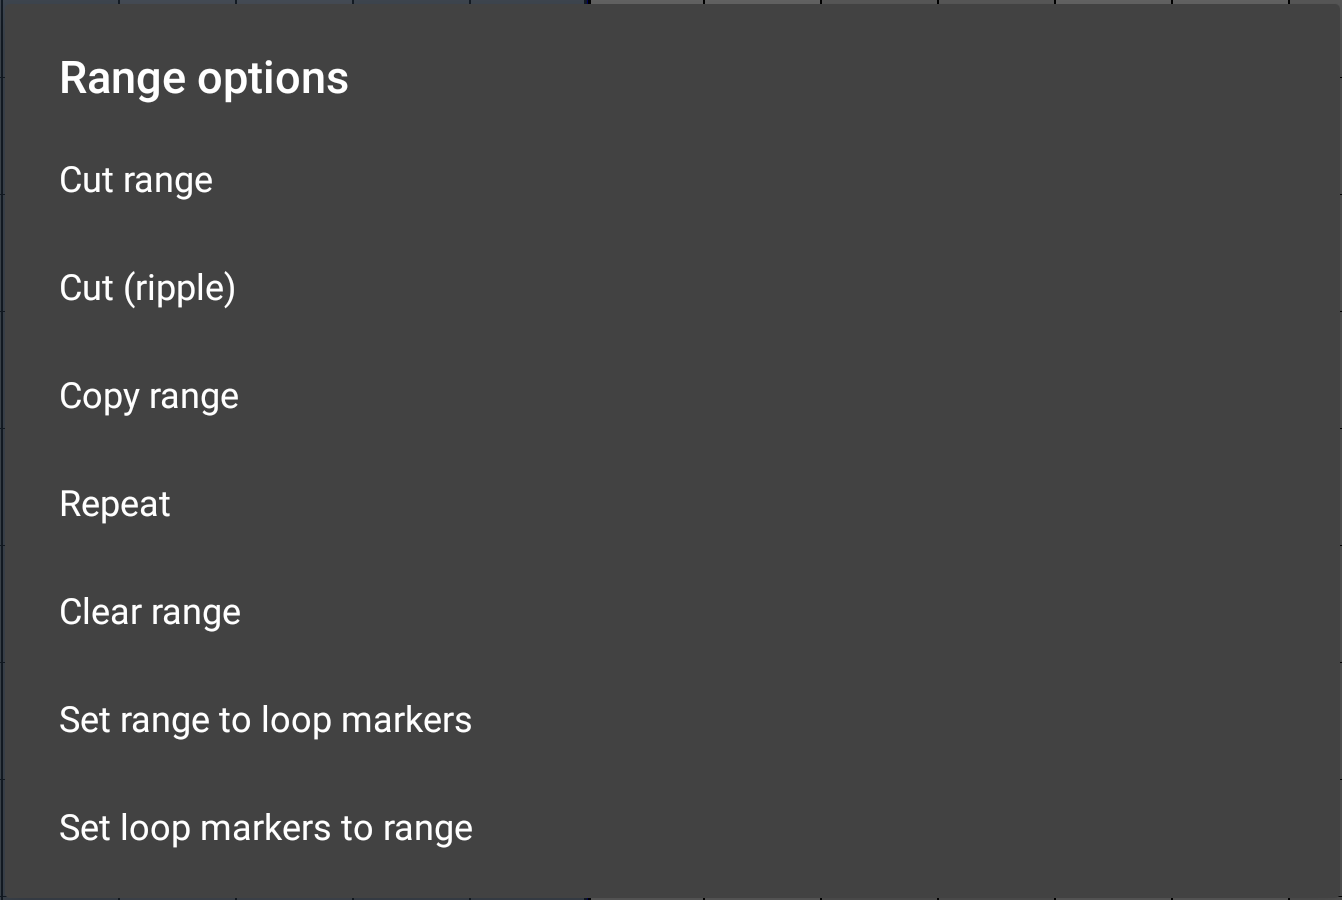
As can be seen, these options allow you Cut the range (remove the selected events and copy them to the clipboard); Cut (ripple), which does the same but also shifts any events to the right of the material cut to the left to fill the gap; Copy the range to the clipboard; Repeat the selected events by the number of times entered onto the dialog which will appear; Clear the range if you want to make a new selection; Set the range to the loop markers and Set the loop markers to the range. Once a range is selected, the Cut/Cut (ripple) and Copy functions can also be performed without opening these Range Options using the Cut ![]() and Copy
and Copy ![]() buttons. Cut (ripple) will be offered as an option once the Cut button has been pressed.
buttons. Cut (ripple) will be offered as an option once the Cut button has been pressed.
6 Cut ![]() button. Once you have a Range selected, pressing the Cut button will remove that content from the sequencer and copy it to the clip board, ready to be pasted elsewhere if necessary. Once pressed, you will be given the opportunity to choose between Cut, as just described, and Cut (ripple), which does the same but also shifts any events to the right of the material cut to the left to fill the gap that would have otherwise have been left. If no range has been selected, the Cut button will be grayed out as seen in the screenshot above.
button. Once you have a Range selected, pressing the Cut button will remove that content from the sequencer and copy it to the clip board, ready to be pasted elsewhere if necessary. Once pressed, you will be given the opportunity to choose between Cut, as just described, and Cut (ripple), which does the same but also shifts any events to the right of the material cut to the left to fill the gap that would have otherwise have been left. If no range has been selected, the Cut button will be grayed out as seen in the screenshot above.
7 Copy ![]() button. Once you have a Range selected, pressing the Copy button will copy that content to the clip board, ready to be pasted elsewhere. If no range has been selected, the Copy button will be grayed out as seen in the screenshot above.
button. Once you have a Range selected, pressing the Copy button will copy that content to the clip board, ready to be pasted elsewhere. If no range has been selected, the Copy button will be grayed out as seen in the screenshot above.
8 Paste ![]() button. Pressing the Paste button pastes any content present on the clipboard onto the drum pattern sequencer at the current position of the green Time Marker
button. Pressing the Paste button pastes any content present on the clipboard onto the drum pattern sequencer at the current position of the green Time Marker ![]() . Position the time marker by tapping once on the Timeline/Marker Display; by touching, holding and sliding the time marker or by sliding your finger in the MIDI Clip Overview/Scrollpad. You can also use the Jump to button. Be aware of drum pattern Grid resolution setting and that the Time Marker will snap-to the grid as it is moved.
. Position the time marker by tapping once on the Timeline/Marker Display; by touching, holding and sliding the time marker or by sliding your finger in the MIDI Clip Overview/Scrollpad. You can also use the Jump to button. Be aware of drum pattern Grid resolution setting and that the Time Marker will snap-to the grid as it is moved.
Once the Paste button has been pressed, you will be given the option to either Paste or Paste (insert). Paste overwrites any existing content with the events on the clipboard. Paste (insert) pastes the clipboard content onto the drum pattern sequencer and shifts any existing content from the point of the time marker to the right to accommodate the pasted content.
9 Undo ![]() button. The Undo button undoes the last edit made on the clips and tracks within the piano roll should you make a mistake. The undo stack is unlimited, so you can undo all the way back to when you started editing. The Undo list is emptied when the app is closed and will therefore be empty when the app is next launched.
button. The Undo button undoes the last edit made on the clips and tracks within the piano roll should you make a mistake. The undo stack is unlimited, so you can undo all the way back to when you started editing. The Undo list is emptied when the app is closed and will therefore be empty when the app is next launched.
10 Redo ![]() button. The Redo button re-applies the last edit undone using the Undo button as long as no further edits have taken place since using the Undo function.
button. The Redo button re-applies the last edit undone using the Undo button as long as no further edits have taken place since using the Undo function.
11 Loop mode ![]() button. Pressing the Loop button displays the loop markers
button. Pressing the Loop button displays the loop markers ![]() and engages looped playback mode. The loop markers can be moved by touching, holding and sliding them to the desired time point. Be aware of the the drum pattern sequencer Grid resolution setting and that the markers will snap-to the grid as they are moved. Press the Loop button again to turn loop mode off.
and engages looped playback mode. The loop markers can be moved by touching, holding and sliding them to the desired time point. Be aware of the the drum pattern sequencer Grid resolution setting and that the markers will snap-to the grid as they are moved. Press the Loop button again to turn loop mode off.
12 Grid ![]() button. The Grid button opens the Grid Resolution options for the drum pattern sequencer, seen here.
button. The Grid button opens the Grid Resolution options for the drum pattern sequencer, seen here.
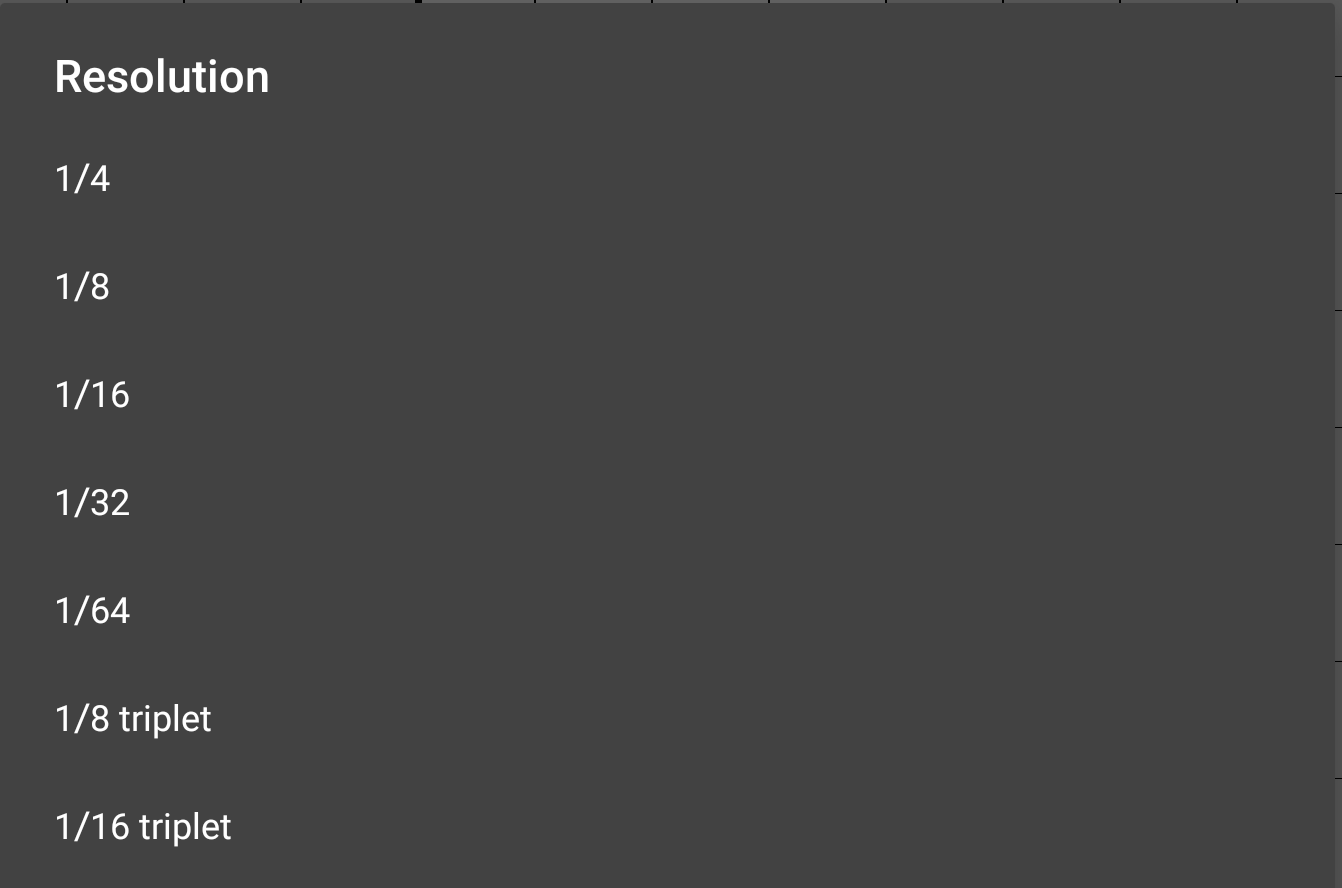
From these options, you can select the musical time increment represented on the sequencer from 1/4 beat to 1/64 beat, with 1/8 triplet beat and 1/16 triplet beat also available. Please note that if you return to a lower resolution from a higher one, the events which cannot be be displayed on the lower resolution grid will be represented as transparent 'ghost' events to keep you aware of their presence even though they can't be displayed properly on the current grid. Here is an example.
![]()
Here, four events have been placed for Bass Drum 1 on a 1/16 beat grid. Then, the grid resolution was changed to 1/8 triplet beat and four more events placed. Finally, the grid resolution has been switched back to 1/16 beat, seen above. Since the 1/8 triplet beat events can't be displayed within the 1/16 beat resolution grid, they are shown as transparent 'ghost' events. They are still present though and will be heard during playback.
NOTE. Don't forget that the appearance of the drum pattern sequencer grid will also be affected by the Time Signature settings in the Tempo Options.
13 Jump to ![]() button. Pressing the Jump button displays the Jump-to options. These allow you to quickly and easily jump the Time Marker
button. Pressing the Jump button displays the Jump-to options. These allow you to quickly and easily jump the Time Marker ![]() and your viewpoint to one of the options available, just as when on the Arranger Screen. For full details, please see here.
and your viewpoint to one of the options available, just as when on the Arranger Screen. For full details, please see here.
14 Marker ![]() button. The Marker button allows you to place a blue marker
button. The Marker button allows you to place a blue marker ![]() in the Timeline/Marker display at the current position of the Time Marker. Position the time marker by tapping once on the Timeline/Marker Display; by touching, holding and sliding the time marker or by sliding your finger in the MIDI Clip Overview/Scrollpad. You can also use the Jump to button. Be aware of drum pattern Grid resolution setting and that the Time Marker will snap-to the grid as it is moved. You will offered the chance the name your marker as you create it. Once created, you can reposition the marker by touching, holding and sliding the marker's blue handle/name display. For full details, please see here and here.
in the Timeline/Marker display at the current position of the Time Marker. Position the time marker by tapping once on the Timeline/Marker Display; by touching, holding and sliding the time marker or by sliding your finger in the MIDI Clip Overview/Scrollpad. You can also use the Jump to button. Be aware of drum pattern Grid resolution setting and that the Time Marker will snap-to the grid as it is moved. You will offered the chance the name your marker as you create it. Once created, you can reposition the marker by touching, holding and sliding the marker's blue handle/name display. For full details, please see here and here.
15 Next ![]() button. Pressing the Next button takes you back to the Arranger Screen. From there, repeated presses will cycle through the Mixer screen, the Master Screen and back to the Arranger Screen again. In order to open the Drum Pattern Sequencer again, double tap on a MIDI clip on a Drum Pattern track.
button. Pressing the Next button takes you back to the Arranger Screen. From there, repeated presses will cycle through the Mixer screen, the Master Screen and back to the Arranger Screen again. In order to open the Drum Pattern Sequencer again, double tap on a MIDI clip on a Drum Pattern track.
16 Drum Type Selector  . The different drum types are shown on the left of the drum pattern sequencer. Tap on the drum's name to select it (for example, to adjust the velocity of the events of that drum type). Alternatively, a drum type will be automatically selected any time an event is placed on its row on the sequencer grid.
Depending on the size of your device screen, you may need to scroll down to see all of the drums available in the kit by default. At the bottom of the list there is a '+' icon. This is important, as pressing it allows you to load further drum and percussion sounds into the list and make them available to use on the sequencer. Please remember though that these are based on the General MIDI (GM) drum mapping standard (see here), so a soundfont/SFZ may or may not be mapped according to this standard and, even if it is, it may or may not contain all of the drum and percussion types offered here.
17 Jump Viewpoint Left ![]() button. Pressing this button jumps your viewpoint of the drum pattern sequencer to the next 'screen's worth' (with some room for comfort) to the left.
button. Pressing this button jumps your viewpoint of the drum pattern sequencer to the next 'screen's worth' (with some room for comfort) to the left.
18 Jump Viewpoint Right ![]() button. Pressing this button jumps your viewpoint of the drum pattern sequencer to the next 'screen's worth' (with some room for comfort) to the right.
button. Pressing this button jumps your viewpoint of the drum pattern sequencer to the next 'screen's worth' (with some room for comfort) to the right.
19 Playback Transport Controls ![]() . These are the controls for starting and stopping playback and recording. Recording when on the drum pattern sequencer screen is not possible, hence why the Record button is grayed out.
. These are the controls for starting and stopping playback and recording. Recording when on the drum pattern sequencer screen is not possible, hence why the Record button is grayed out.
![]() Start Playback from the beginning of the project.
Start Playback from the beginning of the project.
![]() Playback from the position of the Time Marker (The green marker
Playback from the position of the Time Marker (The green marker ![]() in the Timeline/Marker Display).
in the Timeline/Marker Display).
![]() Stop Playback.
Stop Playback.
![]() Record. Not possible from the Drum Pattern Sequencer screen.
Record. Not possible from the Drum Pattern Sequencer screen.
20 Playback Timer Display ![]() . This display shows the current time during playback and recording. When playback and recording are stopped it displays the current position of the Time Marker (the green marker
. This display shows the current time during playback and recording. When playback and recording are stopped it displays the current position of the Time Marker (the green marker ![]() shown in the Timeline/Marker Display). Tapping the Playback Time Display once will open the Tempo options for the current project. The top counter shows the time in minutes, seconds and milliseconds. The bottom counter shows the time in bars (or measures), beats and ticks (the resolution is 192 ticks per beat) according to the project Tempo settings. This is also the place where most parameter levels are displayed as they are being changed.
shown in the Timeline/Marker Display). Tapping the Playback Time Display once will open the Tempo options for the current project. The top counter shows the time in minutes, seconds and milliseconds. The bottom counter shows the time in bars (or measures), beats and ticks (the resolution is 192 ticks per beat) according to the project Tempo settings. This is also the place where most parameter levels are displayed as they are being changed.
21 MIDI Clip Overview / Scrollpad ![]() . Working on the same principle as the Project Overview/Scrollpad on the Arranger Screen, this area represents the entire MIDI clip you're currently editing in the drum pattern sequencer. Sliding you finger across it allows you to very quickly move your viewpoint to a particular point and simultaneously position the Time Marker
. Working on the same principle as the Project Overview/Scrollpad on the Arranger Screen, this area represents the entire MIDI clip you're currently editing in the drum pattern sequencer. Sliding you finger across it allows you to very quickly move your viewpoint to a particular point and simultaneously position the Time Marker ![]() .
.
22 Drum Pattern Sequencer Grid. This is the main area of the drum pattern sequencer, the place where you add and edit MIDI events. Sliding with one finger in this area will move the piano roll viewpoint around. Use pinch/pull to zoom in and out. When you reach the part of the sequencer which has a red overlay, this indicates that that area is beyond the current clip size. However, unlike the piano roll editor, placing MIDI events in that area will automatically enlarge the clip to include those events as long as they are at the end of that clip. Be aware, though, that if this causes the clip to overlap with another clip on the timeline, both will be heard in playback. If you place events in the red area before the beginning of that clip, you will need to trim the clip manually by selecting it and using the Clip Trimming Handles on the Arranger Screen if you want them to be heard.
NOTE. Don't forget that the appearance of the drum pattern sequencer grid will also be affected by the Time Signature settings in the Tempo Options.
23 Timeline/Marker Display ![]() . The numbers on the top show the the duration in minutes and seconds. The numbers on the bottom show the duration in musical bars according to the Tempo Settings. Any Markers and Tempo changes you add to your project will be displayed here as well as the Loop markers when Loop Mode is active and Punch In and Punch Out markers when they are present. For more information on Punch In/Out see here. For more information on Tempo Changes, see here. Single tap on the Timeline/Marker Display to move the Time Marker to that point. Double tap on the Timeline/Marker Display to open the Marker Options.
. The numbers on the top show the the duration in minutes and seconds. The numbers on the bottom show the duration in musical bars according to the Tempo Settings. Any Markers and Tempo changes you add to your project will be displayed here as well as the Loop markers when Loop Mode is active and Punch In and Punch Out markers when they are present. For more information on Punch In/Out see here. For more information on Tempo Changes, see here. Single tap on the Timeline/Marker Display to move the Time Marker to that point. Double tap on the Timeline/Marker Display to open the Marker Options.