Vocal Tune Studio User Interface Time only Mode
The Vocal Tune Studio Time only mode user interface, with a demonstration audio clip loaded, is shown below. This screenshot shows the user interface on a tablet screen but the same layout is also used for smaller phone screens. On any size screen, always remember that you can zoom in using pinch/pull with two fingers to gain greater accuracy with your edits. Any audio can be opened in Time only mode. The interface as shown below shows the Happy Birthday To You vocal clip, used for the tutorial in this manual, loaded. This is a monophonic (single channel) audio file. If a stereo audio file were loaded, the waveforms of both channels, left and right, would be represented in the user interface.
Instructions on how to use Vocal Tune Studio Time only mode can be found in the previous section here.
NOTE. Real time time stretching like this is a very CPU intensive task and, for that reason and because of the enormous number of varied devices Vocal Tune Studio needs to be able to run on, the time stretching factor in Vocal Tune Studio has been limited to between 0.33x and 3.0x of the original duration. This should be adequate for most needs but, if not, a possible workaround could be to apply the maximum/minimum stretching limit, render the clip to audio file and then reload that rendered audio to open in Vocal Tune Studio again where the required part could be stretched within the limits again. The current stretch factor used for each section to the right of an anchor/stretch point is displayed next to the anchor/stretch points at the top of the display.
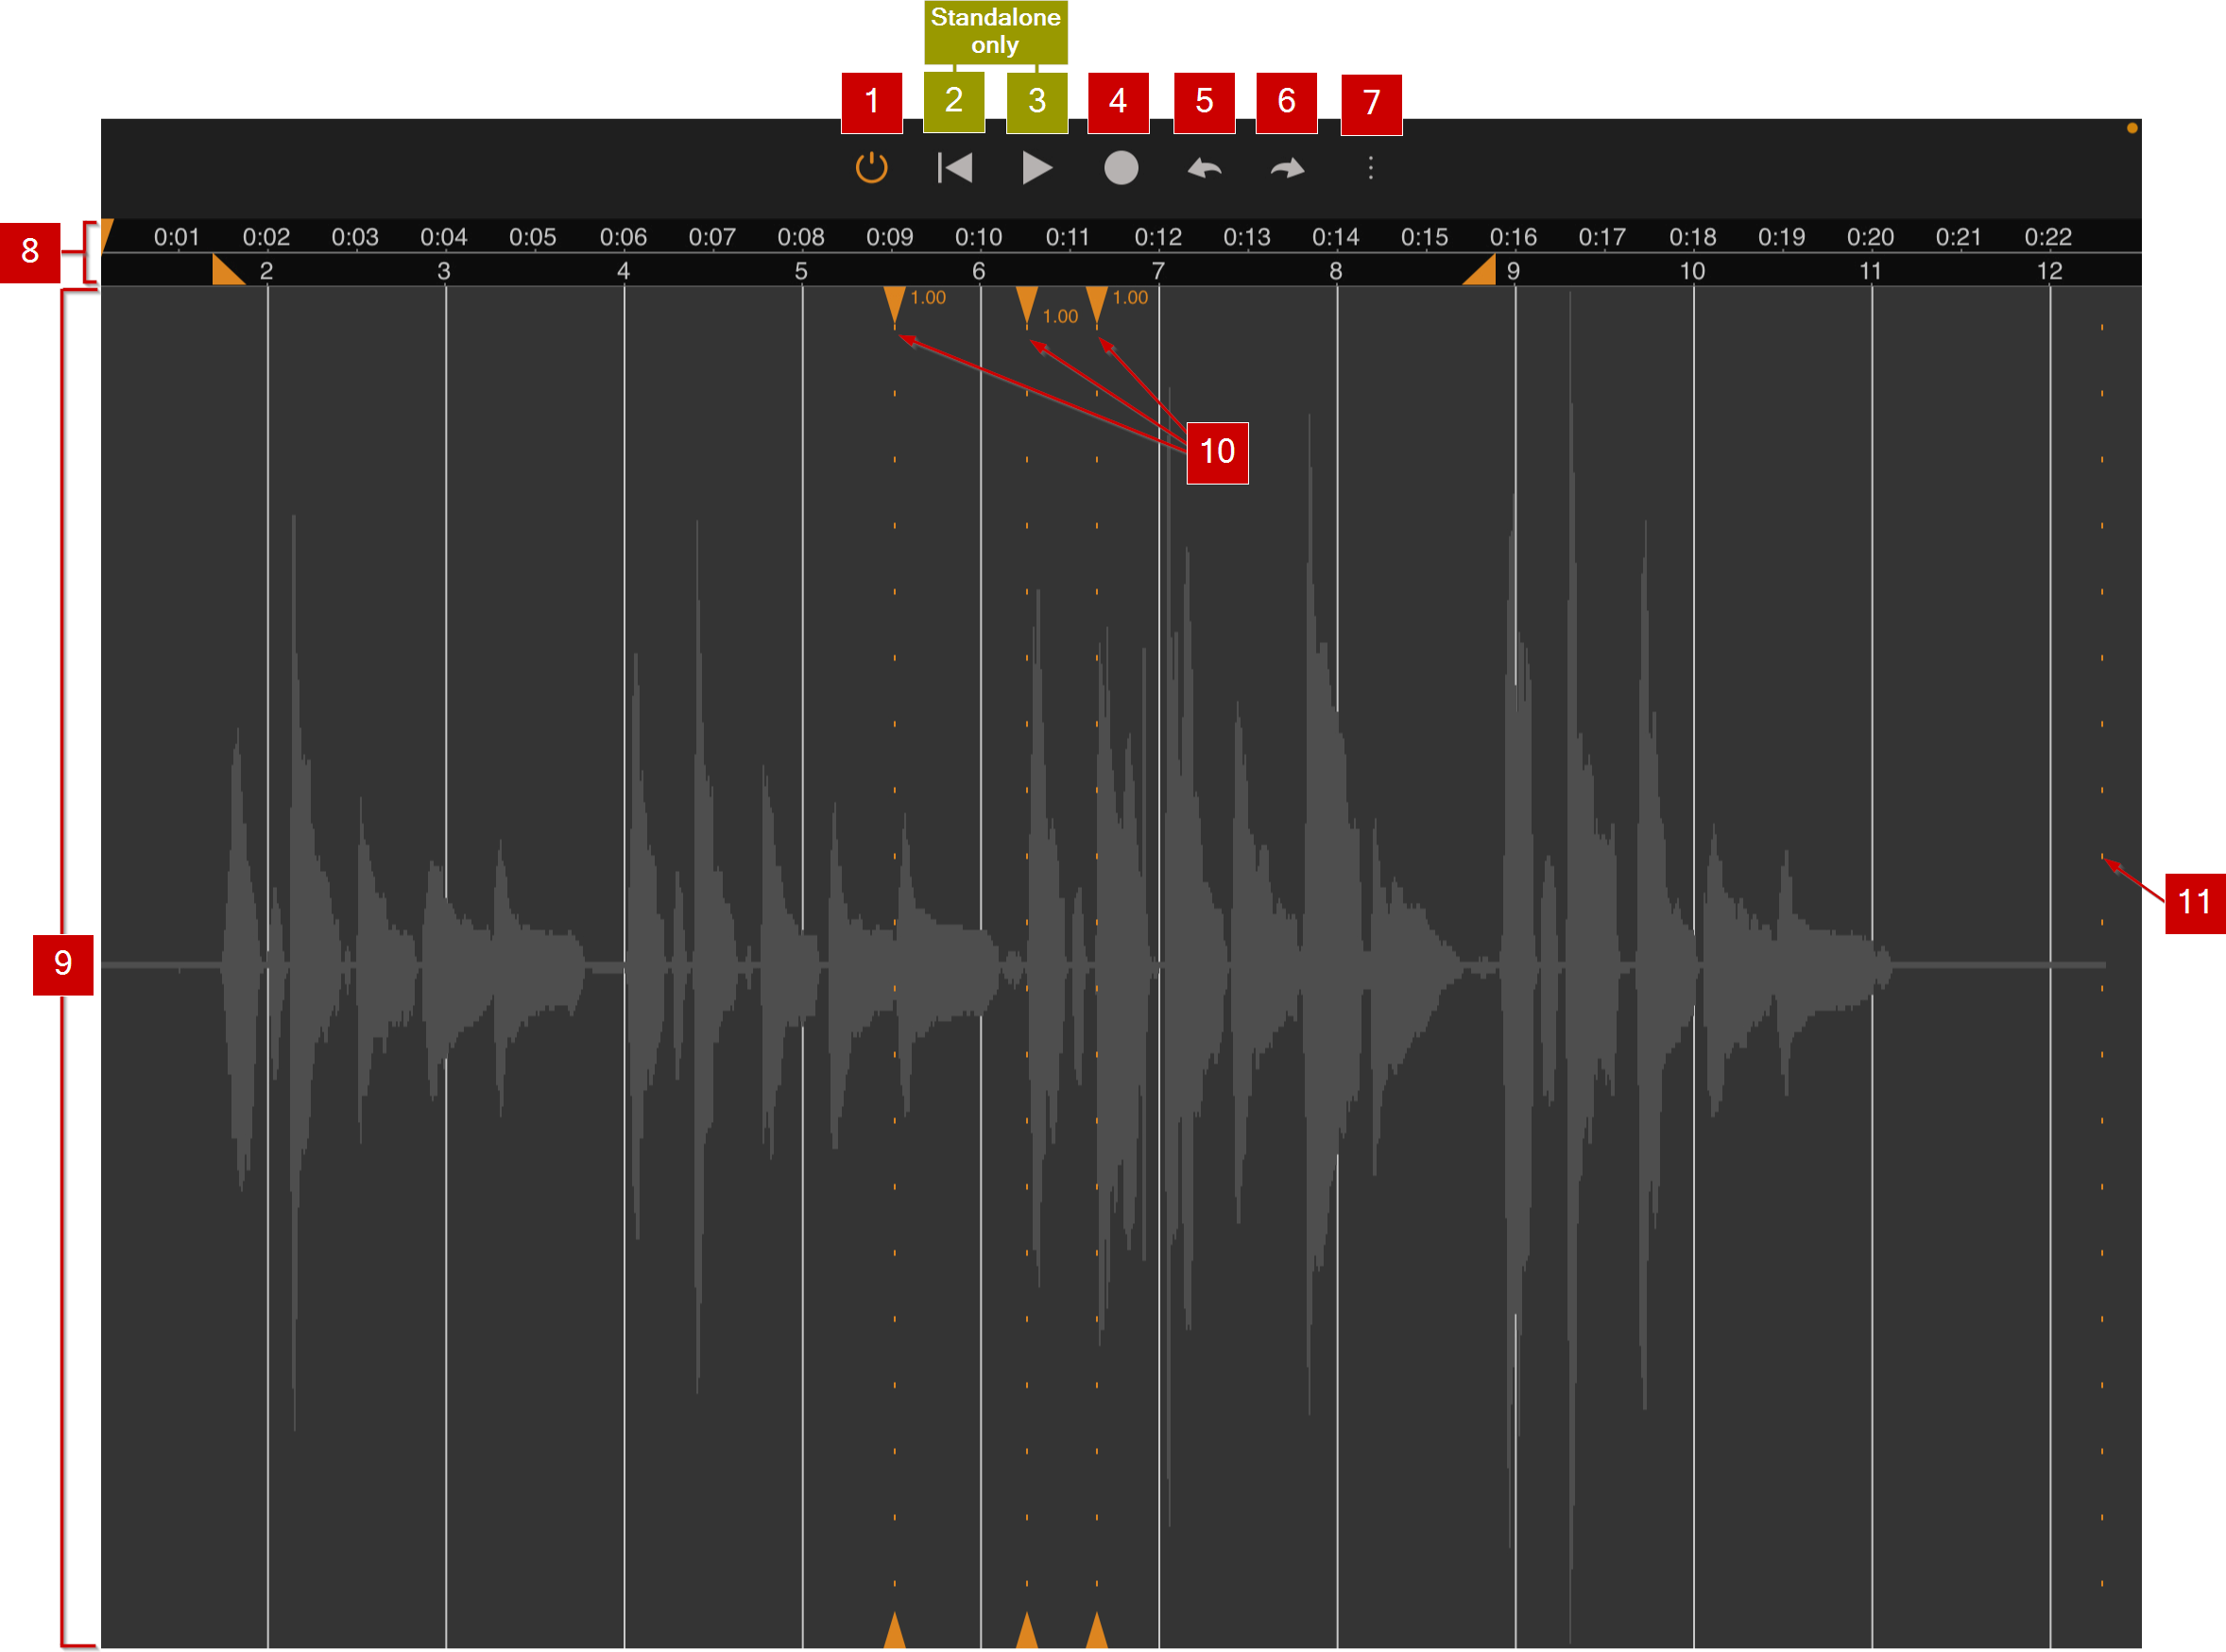
1 On/Off or Active/Bypass button ![]() .
.
2 Return Time Marker to beginning button ![]() (standalone version only). You can manually place the Time Marker (the orange marker
(standalone version only). You can manually place the Time Marker (the orange marker ![]() in the Timeline) at any place you would like to start playback from when you press Play in the standalone version. Pressing this button will return the Time Marker to the very beginning.
in the Timeline) at any place you would like to start playback from when you press Play in the standalone version. Pressing this button will return the Time Marker to the very beginning.
3 Play button ![]() (standalone version only). Pressing this will start playback from the position of the Time Marker in the standalone version. The Play button becomes a Stop button once playback has started. Stopping playback and pressing the Play button again will once more start playback from the position of the Time Marker.
(standalone version only). Pressing this will start playback from the position of the Time Marker in the standalone version. The Play button becomes a Stop button once playback has started. Stopping playback and pressing the Play button again will once more start playback from the position of the Time Marker.
NOTE. Buttons 2 and 3 are not present in the AUv3 plugin user interface as their functions are handled by the host application.
4 Record button ![]() .
.
Standalone mode. In standalone mode, pressing this button will start recording audio into Vocal Tune Studio from your device microphone (or connected USB microphone or audio interface). Please note that you can also import your previously recorded vocal performance into Vocal Tune Studio standalone via the Three Dot Button options. Please be aware that Vocal Tune Studio standalone version can only contain one audio file/recording at a time so pressing the Record ![]() button again once audio is present will open a pop-up dialog asking you to confirm that you want to continue given that the current audio would be lost. Further details about using the Vocal Tune Studio standalone version can be found here.
button again once audio is present will open a pop-up dialog asking you to confirm that you want to continue given that the current audio would be lost. Further details about using the Vocal Tune Studio standalone version can be found here.
AUv3 Plug-in. Vocal Tune Studio needs direct access to the audio in order to be able to carry out the processing it does. This is not possible within the usual framework for AUv3 effects, which cannot directly access the audio on a host's track. As such, the Vocal Tune Studio AUv3 plug-in requires you to first record the audio present on its host track into the plug-in so that it can have direct access to the audio. In the Vocal Tune Studio AUv3 plugin in, pressing this Record button arms Vocal Tune Studio's record function. It will start recording when you press Play (not Record) in your host application. Audio present on the track upon which Vocal Tune Studio is loaded as an AUv3 effect will be recorded into Vocal Tune Studio as long as the host playback continues. Stop recording by either stopping playback in the host or by pressing this Record button in the Vocal Tune Studio interface again. Once your audio is recorded into Vocal Tune Studio, it is analyzed and you can then fully utilize all of Vocal Tune Studio's many features. Further details about using the Vocal Tune Studio AUv3 version can be found here and specific details regarding its use within popular AUv3 host apps can be found here.
5 Undo button ![]() . Pressing this button undoes the last edit made within Vocal Tune Studio should you make a mistake. The undo stack is unlimited, so you can undo all the way back to when you started editing. Remove all stretch points, selectable from within Vocal Tune Studio's options available via the Three Dot Button
. Pressing this button undoes the last edit made within Vocal Tune Studio should you make a mistake. The undo stack is unlimited, so you can undo all the way back to when you started editing. Remove all stretch points, selectable from within Vocal Tune Studio's options available via the Three Dot Button ![]() , cannot be undone and will clear the Undo stack.
, cannot be undone and will clear the Undo stack.
6 Redo button ![]() . Pressing this button re-applies the last edit undone using the Undo button as long as no further edits have taken place since using the Undo function.
. Pressing this button re-applies the last edit undone using the Undo button as long as no further edits have taken place since using the Undo function.
7 Three Dot Button/Options ![]() . Pressing the Three Dot Button opens a drop-down list of options as follows.
. Pressing the Three Dot Button opens a drop-down list of options as follows.
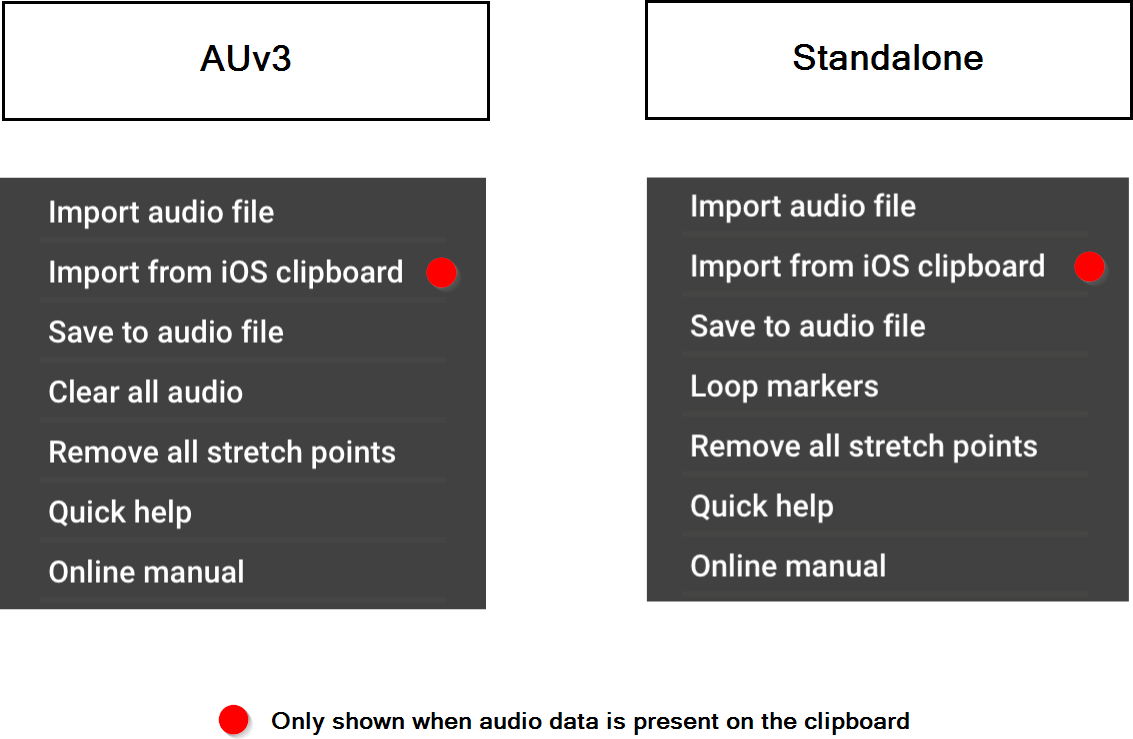
- Import audio file Selecting this option will allow you to import a previously recorded audio recording you'd like to time correct into Vocal Tune Studio. Remember that any type of audio can be used successfully in Vocal Tune Studio Time only mode. Though importing audio is possible in both the standalone and AUv3 plug-in versions it is strongly recommended that you do not use this option within the AUv3 plug-in but rather record/capture audio present on the host track into Vocal Tune Studio as this ensures there is a proper relationship between the host and Vocal Tune Studio AUv3 (for more details on this, please see here). Pressing this will open the Files app, allowing you to locate the file you'd like to import on your device. Once located, tap on the file to import it into Vocal Tune Studio. Please be aware that Vocal Tune Studio standalone version can only contain one audio file or recording at a time so pressing this option once a file is loaded, or pressing the Record
 button, will open a pop-up dialog asking you to confirm that you want to continue given that the current audio would be lost.
- Import from iOS clipboard Pressing this will import any audio file which is currently copied to the internal iOS clipboard into Vocal Tune Studio. Please be aware that, as stated above and here, though possible, this is not the recommended way to use the AUv3 Vocal Tune Studio plug-in. Please note that if no audio file is currently present on the clipboard, this option will not be shown in this list.
- Save to audio file Selecting this will render the audio within Vocal Tune Studio, including any corrections you've made to either pitch or time, to a FLAC audio file. Pressing this will open the system browser, allowing you to choose the location you'd like the resulting file to be saved to on your device. This option is available within the AUv3 plug-in as well as in the standalone version but obviously when using the AUv3 plug-in, you can also use the host application to export/mixdown the audio from the track upon which Vocal Tune Studio is loaded as an effect.
- Clear all audio (AUv3 plug-in only) This option will remove all audio currently held within the Vocal Tune Studio AUv3 plug-in. You will be shown a confirmation dialog before this action is carried out as it cannot be undone.
- Loop markers (Standalone version only) Selecting this will show/hide the Loop Markers
 and activate/deactivate looping mode in the standalone version. The loop markers can be freely positioned as required.
NOTE. Loop markers are not available in the AUv3 version of Vocal Tune Studio as this functionality is controlled by the host application.
- Remove all stretch points Selecting this option will remove all anchor/stretch points from your current audio clip and reset all of the timing back to its original state. This will not exit the Vocal Tune Studio Time only mode interface. This can be used when you want to start again completely fresh. This action cannot be undone so please use with caution. You will be shown a confirmation dialog before this is carried out.
- Quick help Selecting this will show you a brief help guide to the functionality of Vocal Tune Studio Time only mode.
- Online manual Selecting this option will open a link to this manual in both its online and downloadable PDF versions (internet connection required).
8 Timeline ![]() showing the Time Marker
showing the Time Marker ![]() and Loop Markers
and Loop Markers ![]() (both of which are shown/available in the standalone version only) at the beginning of the clip. Tap on the timeline to reposition the Time Marker to move it to the place you'd like playback to start from. Double tap on the Timeline or select Loop markers via theThree Dot Button
(both of which are shown/available in the standalone version only) at the beginning of the clip. Tap on the timeline to reposition the Time Marker to move it to the place you'd like playback to start from. Double tap on the Timeline or select Loop markers via theThree Dot Button ![]() options to show/hide the Loop Markers
options to show/hide the Loop Markers ![]() and activate looped playback. The loop markers can be freely positioned to select the section of audio to be looped.
and activate looped playback. The loop markers can be freely positioned to select the section of audio to be looped.
NOTE. There are no Time Marker or Loop Markers available in the timeline of Vocal Tune Studio AUv3 plug-in version as this functionality is controlled within the host app.
9 Waveform Display Area. This is the main work area for Vocal Tune Studio Time only mode. This is where you place anchor/stretch points and time stretch your audio. As can be seen, the audio waveform is represented in light gray across the display. You can freely zoom in and out of the waveform using pinch/pull with two fingers and scroll left or right to reposition your view by sliding with one finger to increase your accuracy when placing anchor/stretch points and time stretching your audio. Please note that, in the screenshot above, the Happy Birthday To You vocal clip, used for the tutorial in this manual, is loaded. This is a monophonic (single channel) audio file. If a stereo audio file were loaded, the waveforms of both channels, left and right, would be represented in this area.
10 Anchor/stretch points ![]() . Anchor/stretch points are placed by the user and define which part of the audio is to be time stretched and from what position that stretching is initiated. They are represented as triangular orange markers at the top and bottom of the Waveform Display Area and have a dotted orange line running between these markers indicating their position throughout that area. When an anchor/stretch point is long pressed upon, the dotted line turns solid orange, indicating that the user can continue to hold and slide that point left or right to time stretch the affected audio. The number to the right of each anchor/stretch point at the top indicates the time stretch factor used for that area of audio within the number sits (between 0.33x and 3.0x the original duration). Anchors/stretch points can be placed by double tapping in the Waveform Display Area at the desired place. If incorrectly placed, the Undo button can be used or existing anchor/stretch points can be removed by double tapping on them again. For full details about placing and using anchor/stretch points in Vocal Tune Studio Time only mode, please see the previous section here.
. Anchor/stretch points are placed by the user and define which part of the audio is to be time stretched and from what position that stretching is initiated. They are represented as triangular orange markers at the top and bottom of the Waveform Display Area and have a dotted orange line running between these markers indicating their position throughout that area. When an anchor/stretch point is long pressed upon, the dotted line turns solid orange, indicating that the user can continue to hold and slide that point left or right to time stretch the affected audio. The number to the right of each anchor/stretch point at the top indicates the time stretch factor used for that area of audio within the number sits (between 0.33x and 3.0x the original duration). Anchors/stretch points can be placed by double tapping in the Waveform Display Area at the desired place. If incorrectly placed, the Undo button can be used or existing anchor/stretch points can be removed by double tapping on them again. For full details about placing and using anchor/stretch points in Vocal Tune Studio Time only mode, please see the previous section here.
11 End of audio clip ![]() . This dotted orange line indicates the end of the loaded audio clip. Please note that the beginning and end of the audio clip will automatically be used as anchor points if no others are placed after or before them by the user to restrict the time stretching initiated with an anchor/stretch point.
. This dotted orange line indicates the end of the loaded audio clip. Please note that the beginning and end of the audio clip will automatically be used as anchor points if no others are placed after or before them by the user to restrict the time stretching initiated with an anchor/stretch point.