Example Tutorial
This tutorial will guide you through an example of pitch and time correction within Vocal Tune Studio loaded as an AUv3 plug-in, using Audio Evolution Mobile Studio as its host. Please be aware though that there is also a version of Vocal Tune Studio fully integrated into Audio Evolution Mobile Studio, available as an in-app purchase. This version offers greater ease of use with significant workflow benefits and is covered in its own manual which can be found here and as a PDF here. The following tutorial does not show that version and instead shows Vocal Tune Studio loaded as an AUv3 plug-in in Audio Evolution Mobile Studio. Details on loading Vocal Tune Studio AUv3 in other popular AUv3 hosts can be found earlier in this manual, here.
For this example, the song Happy Birthday To You has been chosen. This song is now in the public domain but is generally accepted to have been originally derived from Good Morning To All, written by Patty and Mildred J. Hill in 1893. Most importantly, it was chosen because it is hopefully a tune which is familiar to almost everyone who reads this.
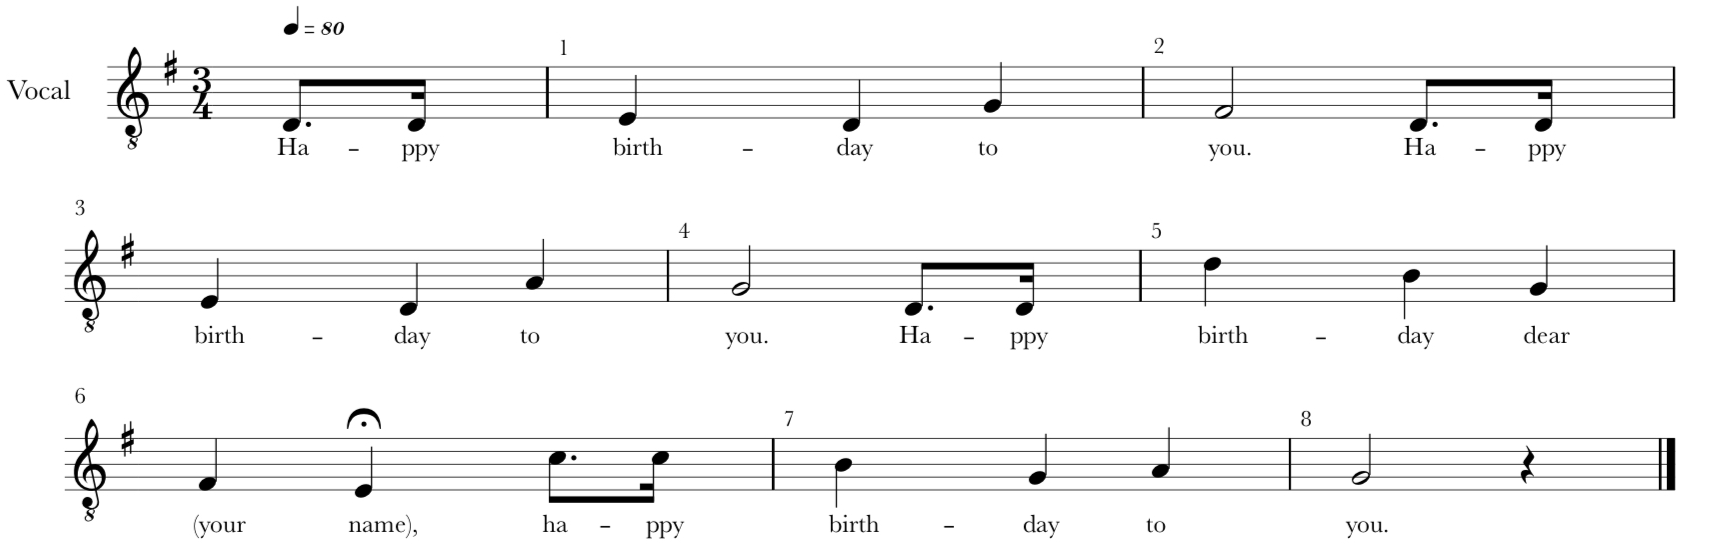
Here is the musical notation for the vocal melody of Happy Birthday To You. This is what was sung in the recorded audio clip which was opened within Vocal Tune Studio. Those of you familiar with musical notation will see that it is in the key of G major and in 3/4 time with a quarter note/crochet value of 80 beats per minute. It begins with an anacrusis/pick up/lead in before the first downbeat of the first measure (please note that MIDI and Vocal Tune Studio do not deal with an anacrusis as written notation does: for them the piece starts on the third beat of the first bar. This is why the notation considers the first measure to be the one after the anacrusis but MIDI and Vocal Tune Studio consider that bar to be the second measure). The ![]() symbol above the 6th measure is called a fermata and indicates that the note should be held longer than it’s notated value according to the performer’s discretion. If you sing through Happy Birthday, you’ll realize that this note is indeed extended in performance.
symbol above the 6th measure is called a fermata and indicates that the note should be held longer than it’s notated value according to the performer’s discretion. If you sing through Happy Birthday, you’ll realize that this note is indeed extended in performance.
For those of you who do not read musical notation, here is the same musical information represented as MIDI events on Audio Evolution Mobile’s piano roll editor. This shows the musical notes as written in the notation and therefore does not translate the fermata which is a user defined performance note not a specific value which can be automatically translated into MIDI. The Audio Evolution Mobile project has been set to a 3/4 time signature at 80 beats per minute.
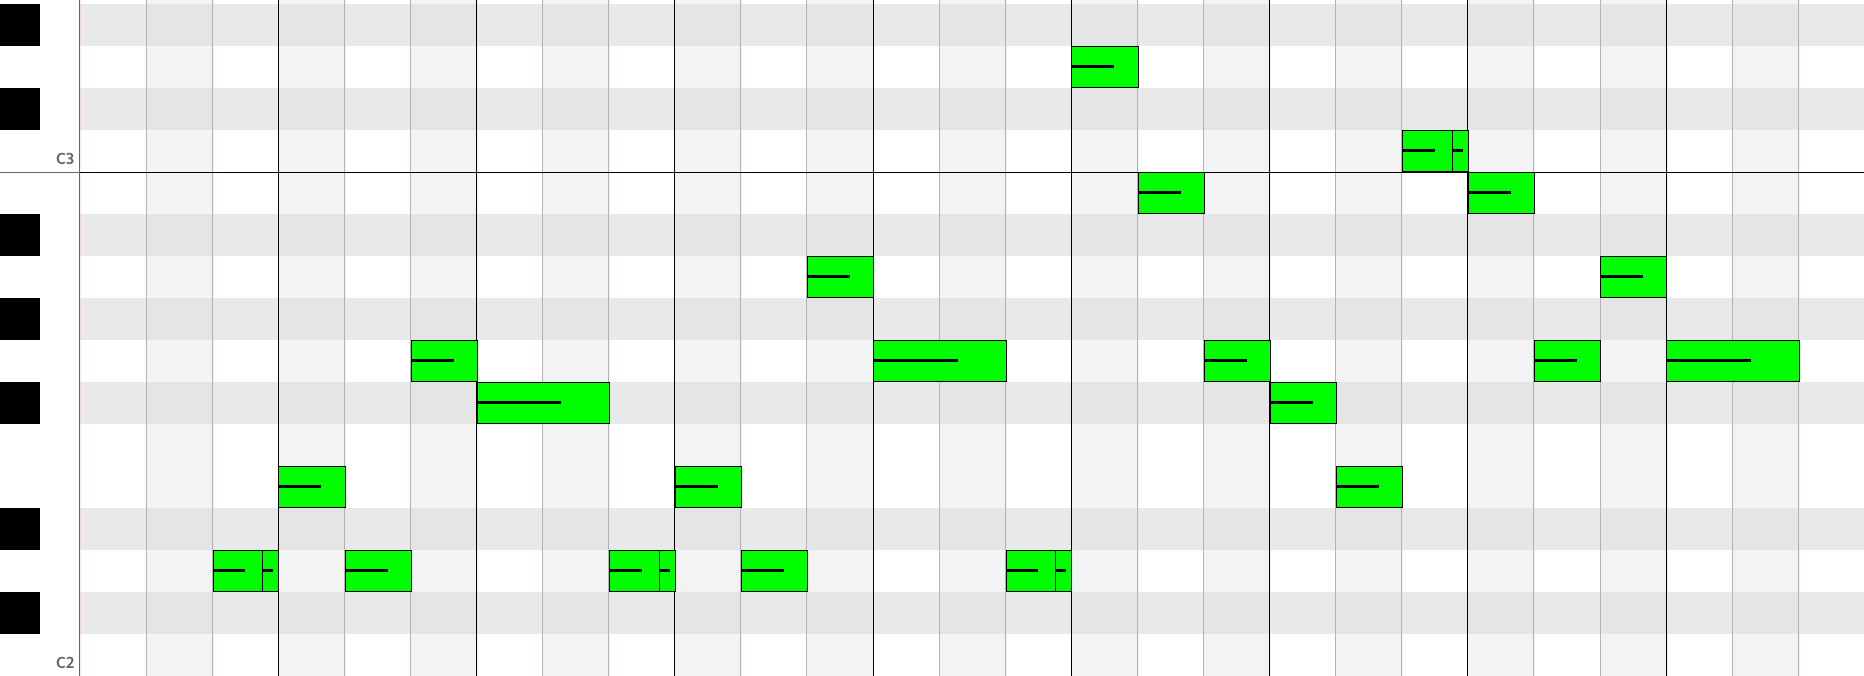
This, then, is what is being aimed for in the recorded vocal performance.
At this point, it is worth remembering the advice given earlier in the manual, here, regarding ensuring that your vocal recording is as good as possible to allow Vocal Tune Studio to give you the very best results. Ideally, you want a good, clear, monophonic recording of your solo vocal performance without any additional sounds present.
Here is our example vocal recording on the Arranger Screen within Audio Evolution Mobile. The project tempo has been set to 3/4 time with a BPM (beats per minute) of 80.
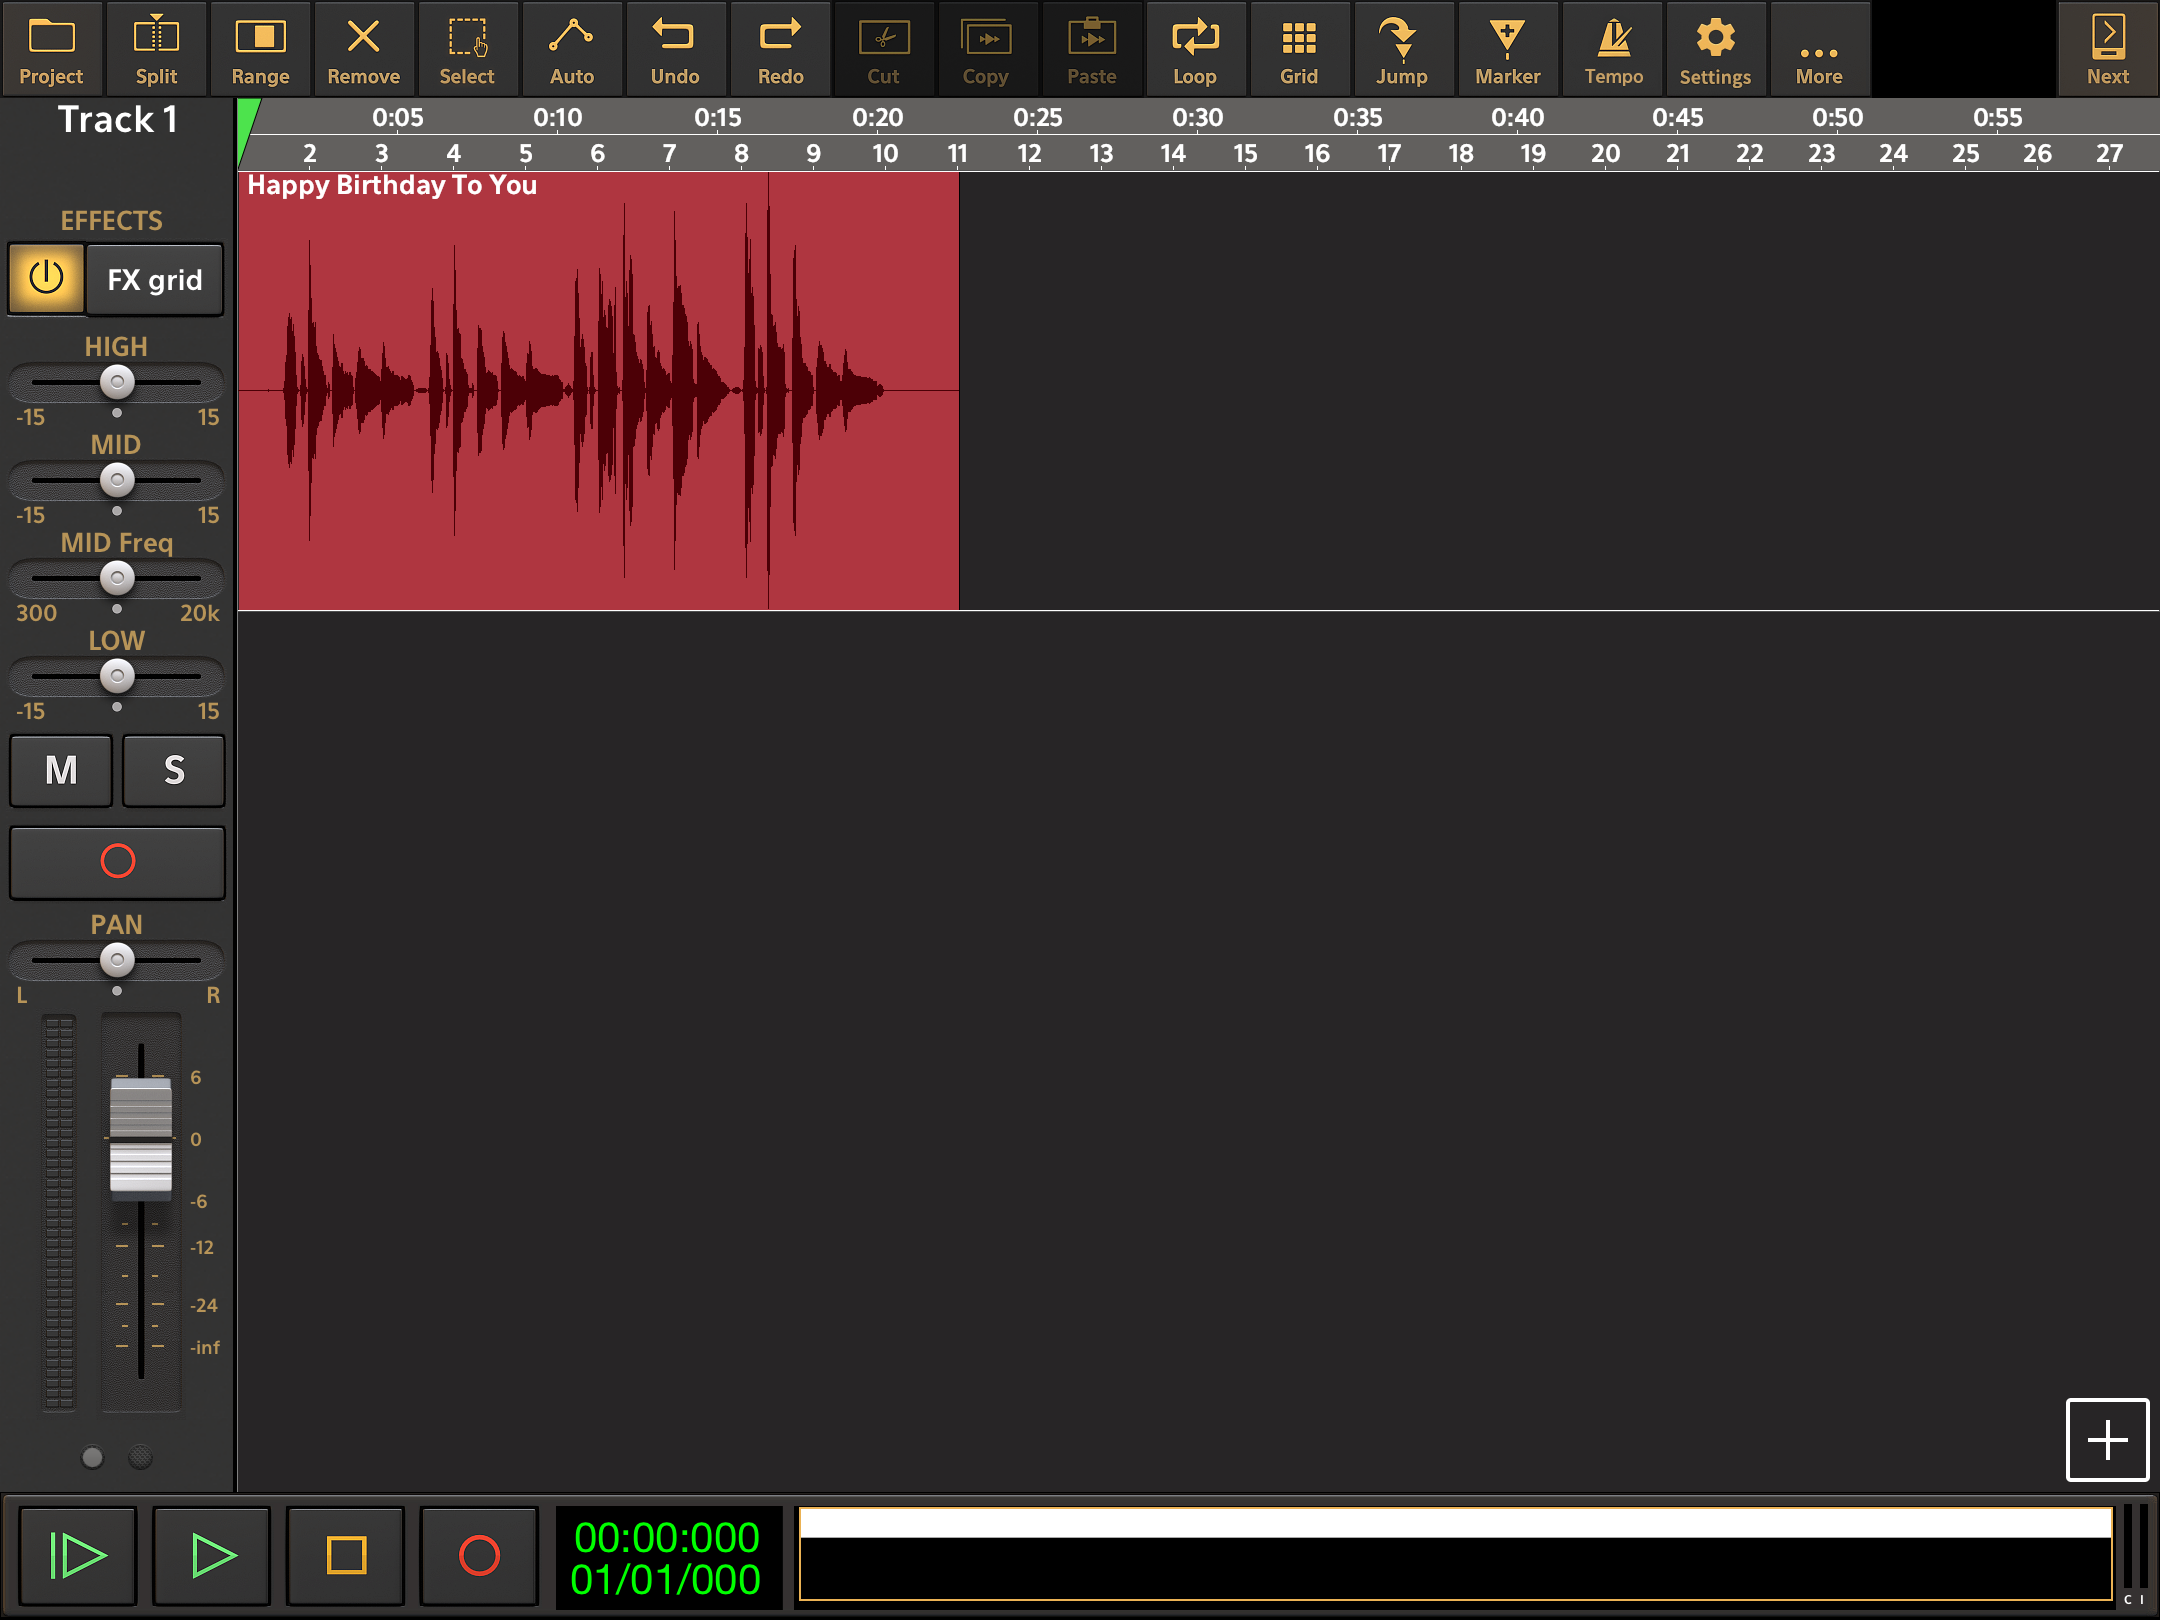
As you can see, this is a monophonic recording, meaning only one audio channel is present. The clip has also been normalized within Audio Evolution Mobile to ensure that its peak volume is maximized without clipping and distorting.
In order to use the Vocal Tune Studio AUv3 plug-in, you next want to press the FX grid ![]() button which will open the Effects Screen, seen below, allowing you to load the plug-in as an insert effect.
button which will open the Effects Screen, seen below, allowing you to load the plug-in as an insert effect.
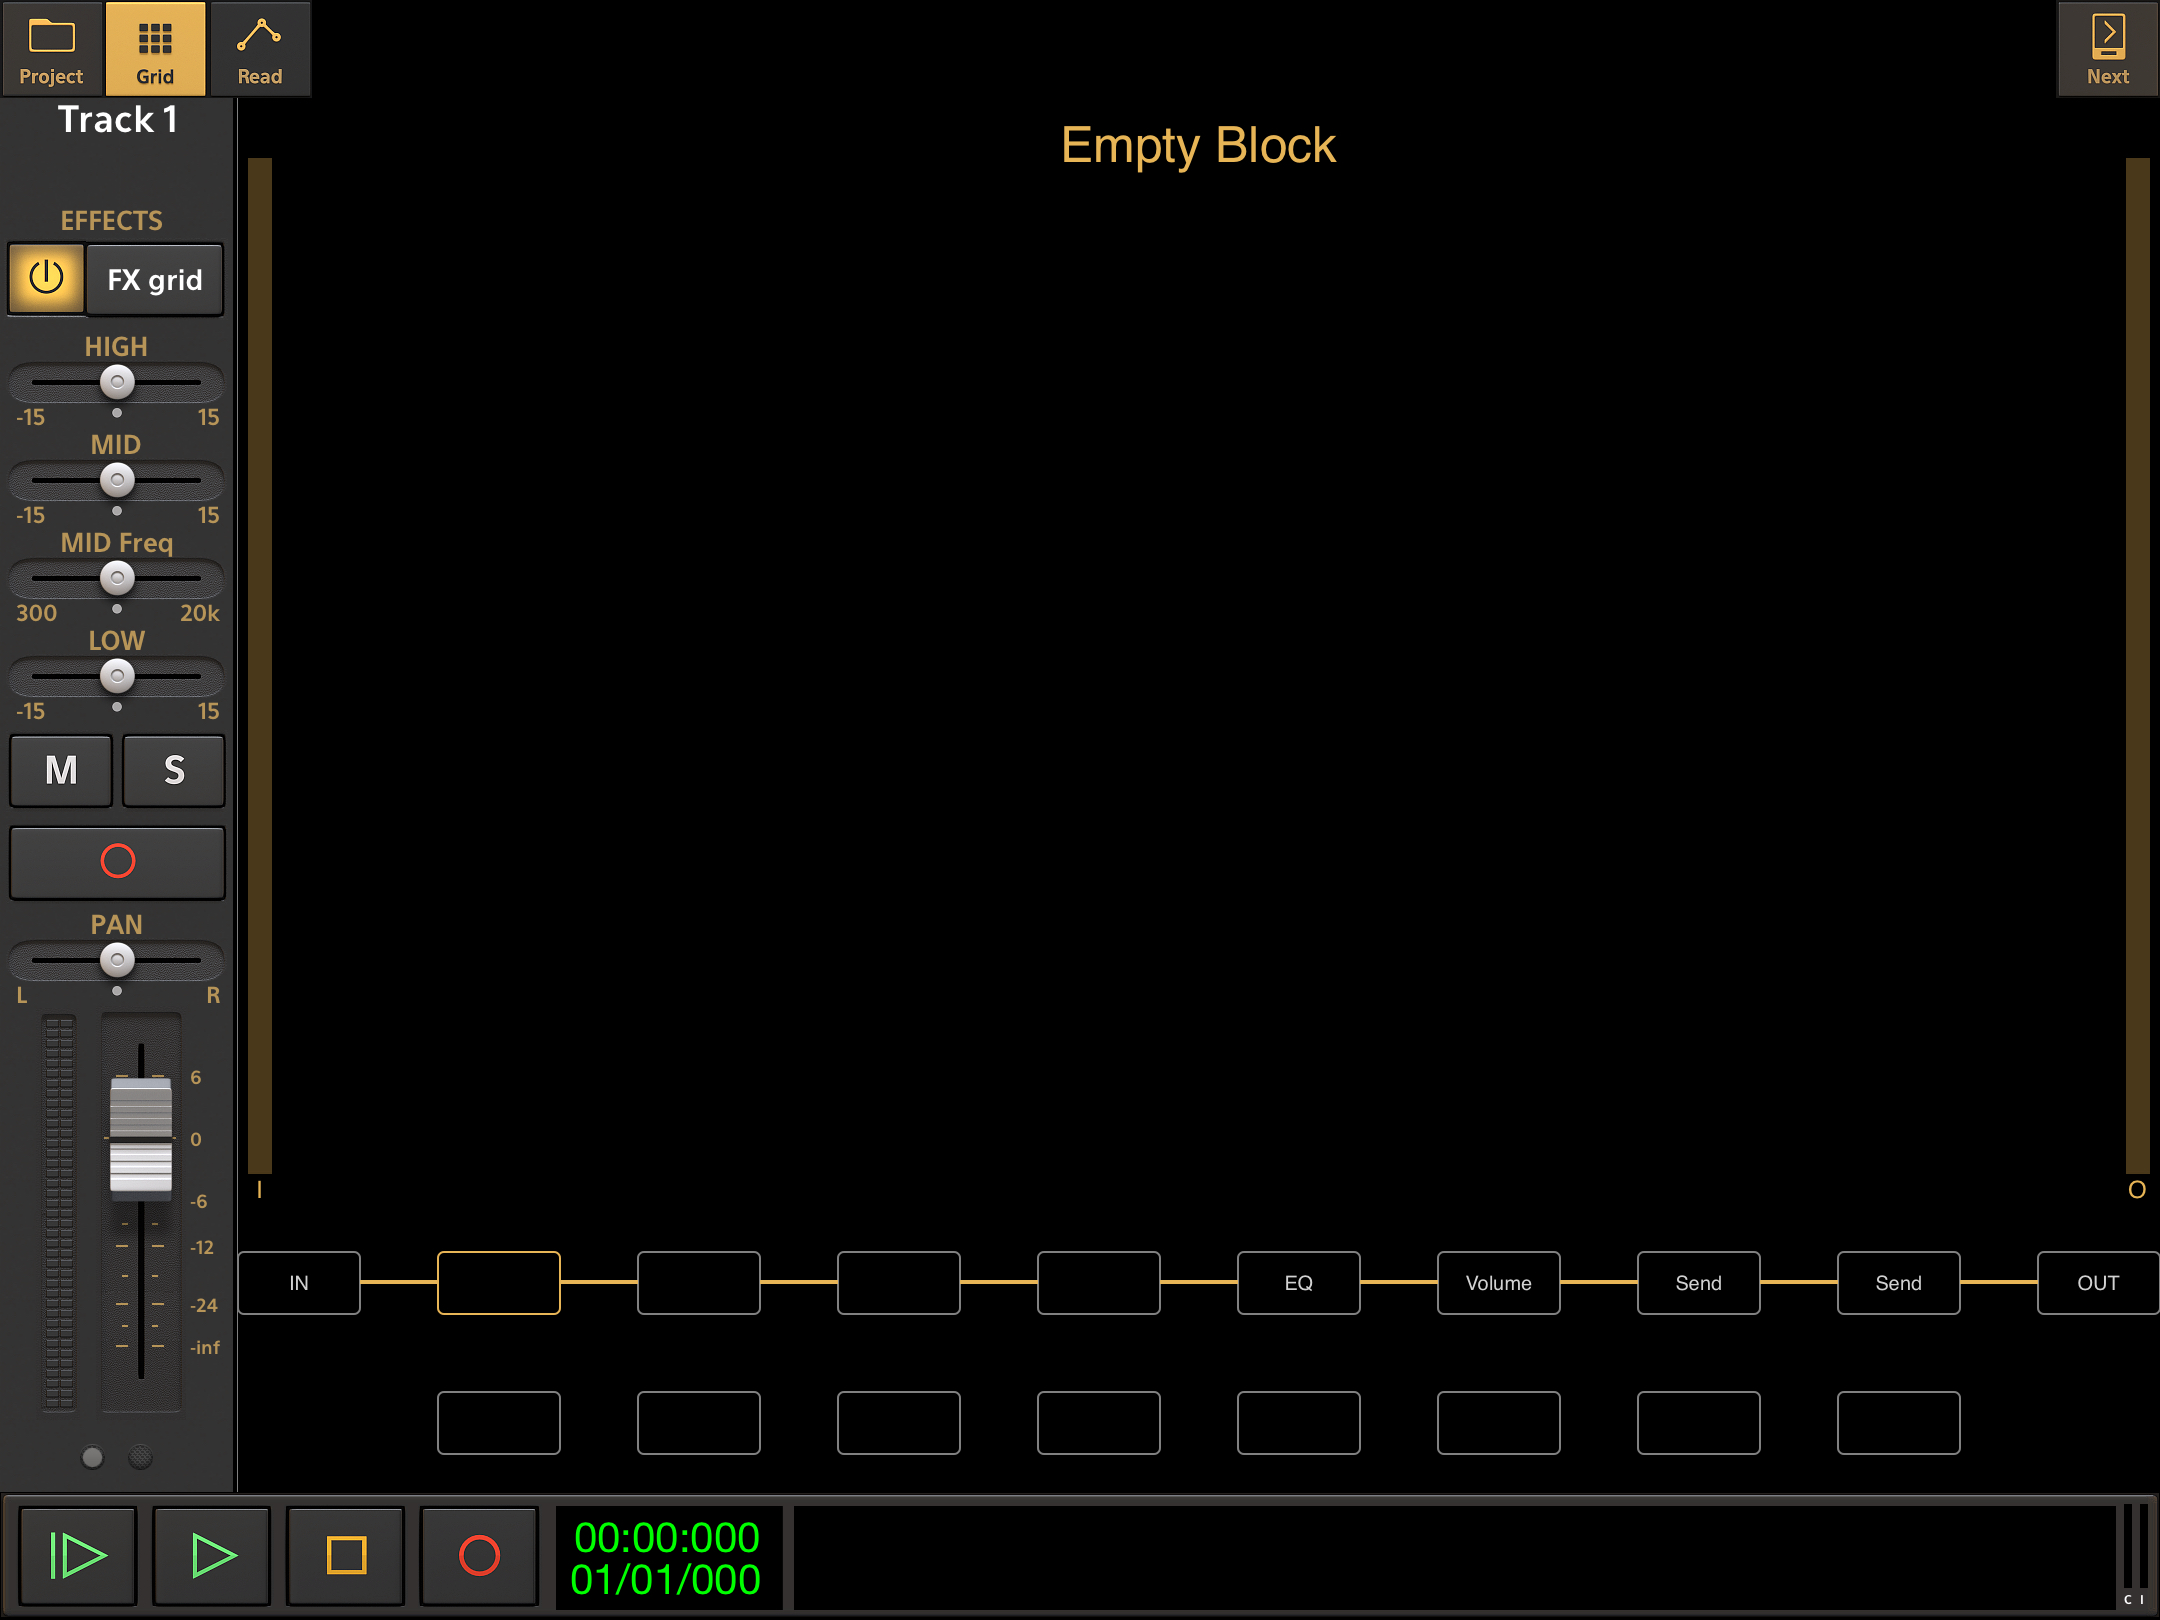
Next, tap on an empty block on the FX grid such as the one highlighted in yellow above, which will open the effects selection dialog. On the left of this dialog, select Audio Units which will then list all of your installed AUv3 plug-ins to the right of the dialog. Scroll down the list until you find Vocal Tune Studio and tap on it to select and load it into the effects chain for the track.
If this is your very first use of Vocal Tune Studio you'll be guided through a setup process and shown some useful introduction information. Full details about this can be found in this manual here.
Assuming you haven't got Always start in Pitch and Time mode selected in the Settings available via the Three Dot Button ![]() , the first thing you'll be shown after loading it is the following dialog asking you to choose which mode you would like to use Vocal Tune Studio in, Pitch and time correction or Time correction only mode? If you have yet to purchase Vocal Tune Studio, you will be shown a dialog asking you whether you would like to continue your trial (if you're still within the three day trial period), purchase Vocal Tune Studio or restore a previous purchase before seeing this dialog.
, the first thing you'll be shown after loading it is the following dialog asking you to choose which mode you would like to use Vocal Tune Studio in, Pitch and time correction or Time correction only mode? If you have yet to purchase Vocal Tune Studio, you will be shown a dialog asking you whether you would like to continue your trial (if you're still within the three day trial period), purchase Vocal Tune Studio or restore a previous purchase before seeing this dialog.
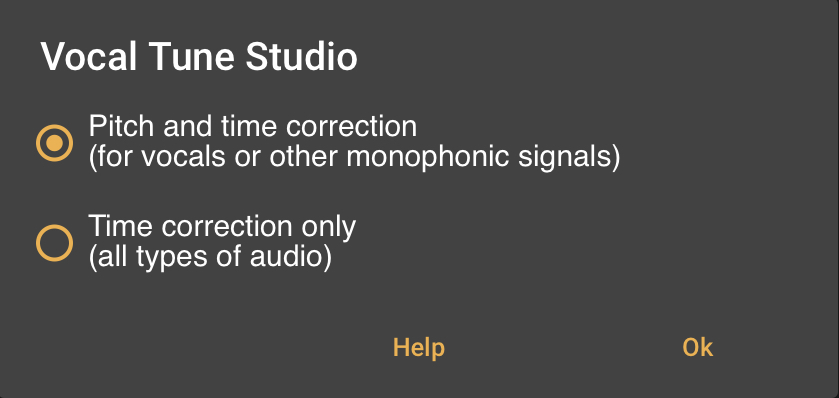
Select your desired mode and press Ok. In this case we shall select Pitch and time correction which will then open Vocal Tune Studio AUv3 in that mode as seen here.
NOTE. The rest of the screenshots in this tutorial focus in on the Vocal Tune Studio interface (which has been maximized by pressing the Grid ![]() button to hide the FX Grid), cropping away the surrounding host interface for clarity.
button to hide the FX Grid), cropping away the surrounding host interface for clarity.
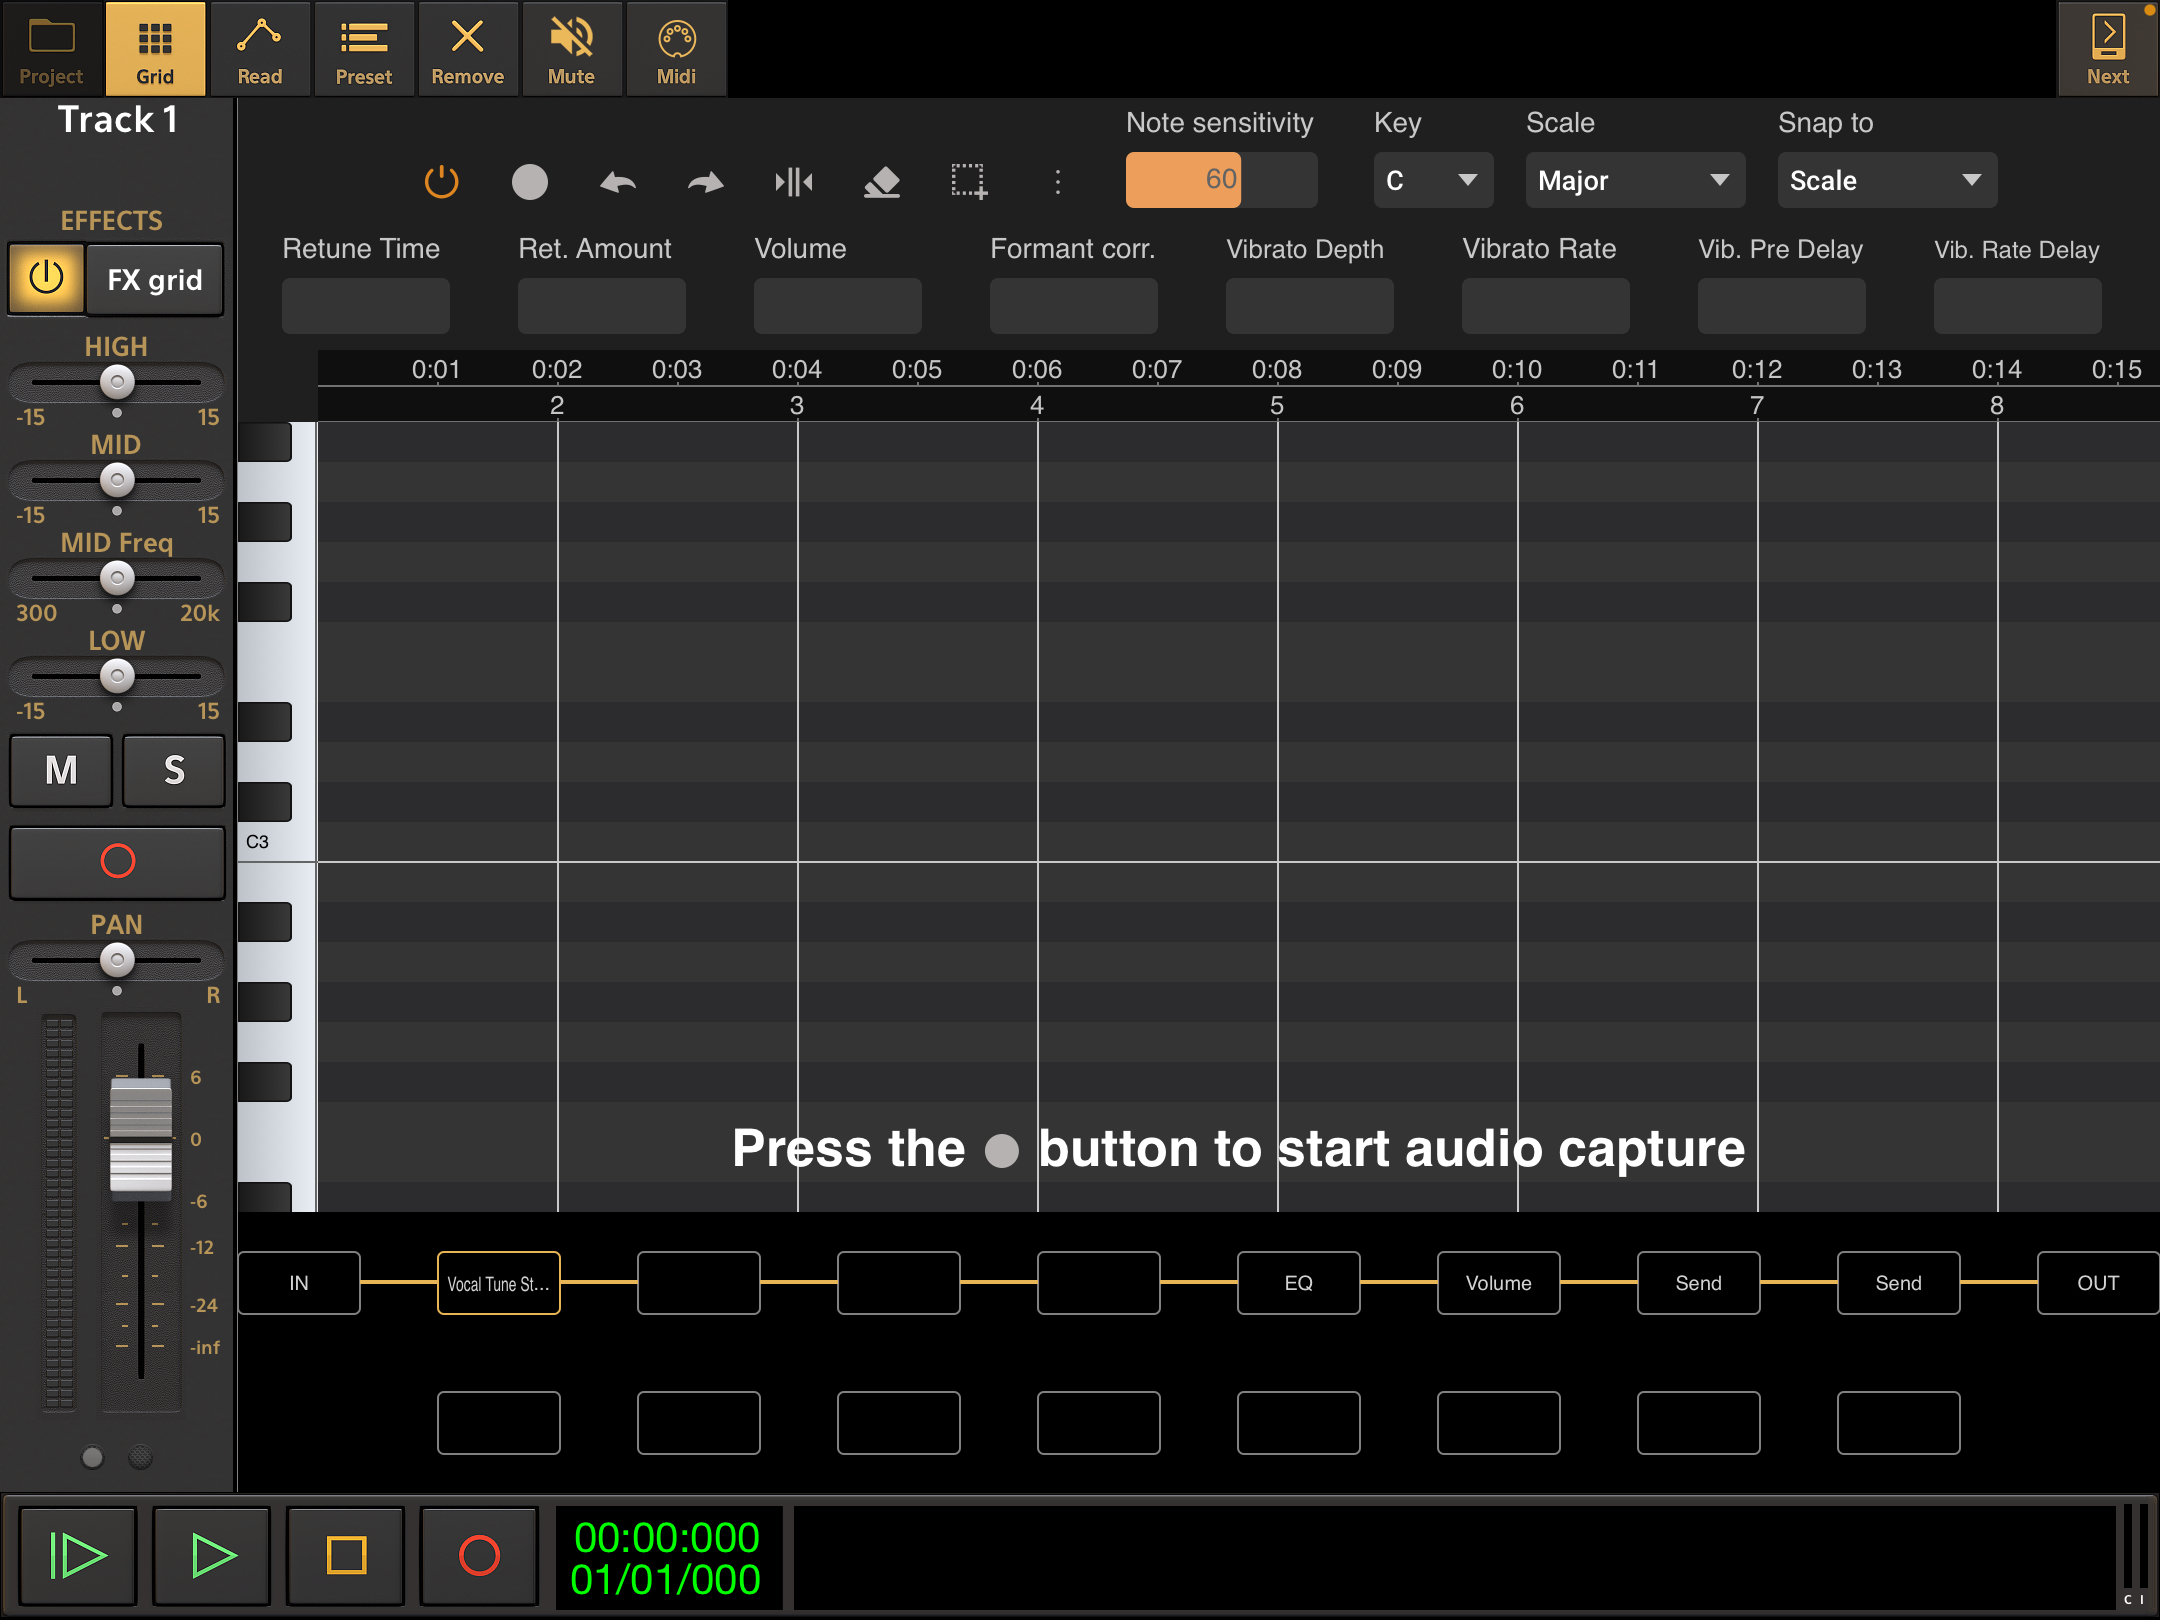
Next, as indicated within the Vocal Tune Studio AUv3 interface, you need to capture the audio from the track in the host (onto which Vocal Tune Studio AUv3 is loaded as an insert effect) into the plug-in itself. To do this, first press the Record ![]() button within the Vocal Tune Studio AUv3 interface and then press Play (not Record)
button within the Vocal Tune Studio AUv3 interface and then press Play (not Record) ![]() in the host application. Vocal Tune Studio AUv3 will then internally (without any loss in quality) record the audio from the track into its own storage space on the device as it is played back which will allow it to have direct access to the audio for processing. For more information on why this needs to happen, please see here.
in the host application. Vocal Tune Studio AUv3 will then internally (without any loss in quality) record the audio from the track into its own storage space on the device as it is played back which will allow it to have direct access to the audio for processing. For more information on why this needs to happen, please see here.
Press the Record button in the AUv3 plug-in again or the Stop ![]() button in the host to stop audio capture.
button in the host to stop audio capture.
NOTE. Audio capture can be done multiple times at different points within the duration on the original audio on the host track and there can be gaps between these recordings. During any gaps where no audio is present within the Vocal Tune Studio AUv3 plug-in, the original, unprocessed audio from the track will be seamlessly heard instead. As such, if you only want to pitch and time correct specific parts of your vocal performance, this can be easily done. Simply position the playback marker in your host application at the desired location to start playback from before starting the audio capture process in Vocal Tune Studio AUv3. Vocal Tune Studio AUv3 will follow the time code information from the host so the audio captured will be at the correct position in relation to any other audio captured from the host track within Vocal Tune Studio AUv3.
After you've stopped audio capture, Vocal Tune Studio will analyze the audio to identify the pitches within it.
As long as you have chosen for it to be displayed, you will then be shown the Identified key and scale estimation as seen below.
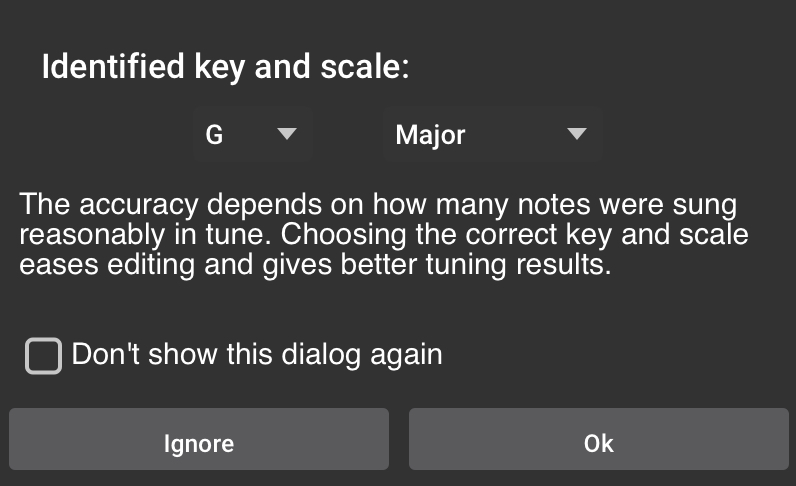
Sometimes, this dialog will not be shown. This is either because Vocal Tune Studio hasn't been able to estimate a key and scale - maybe, for example, there weren't enough notes present to make a reasonable judgment - or because you have chosen for it not to be displayed as you can see is an option. If Vocal Tune Studio has not been able to identify a key and scale, or you have chosen for it to not estimate the key and scale (either by selecting the Don't show this dialog again checkbox or by deselecting Estimate key/scale in Vocal Tune Studio's Settings via its Three Dot Button ![]() ) it will open in Chromatic (all notes) mode.
) it will open in Chromatic (all notes) mode.
The Identified key and scale dialog also allows you to immediately change the key and scale, using the drop-down options, if the wrong estimation has been made (this can also be done later within Vocal Tune Studio) and allows you to Ignore the identified setting, which will, again, open Vocal Tune Studio in Chromatic mode.
As you can see, here Vocal Tune Studio has correctly identified that the Happy Birthday clip was sung in G Major, so we click Ok.
NOTE. It is worth noting at this point that the bar lines in these tutorial screenshots are at a slightly different position than those seen in some of the other screenshots in this manual which show the same example audio loaded in Vocal Tune Studio. This is because the other screenshots in this manual are generally showing the clip opened in standalone mode and standalone mode doesn't allow you to enter a time signature and tempo. This tutorial recording is of a piece in 3/4 time but in standalone mode it is shown on a grid with bar lines representing 4/4 time (though ,functionally, this makes no difference to the end result). The screenshots for the tutorial, however, show the Vocal Tune Studio AUv3 plug-in interface, where the plug-in displays the time signature and tempo as set in the host application and therefore the bar lines are in the correct position for the piece's 3/4 time at 80 beats per minute (bpm). This is worth being aware of: should you require bar lines to be at the correct position for the audio as sung (particularly useful when time stretching), you are better off using the AUv3 version and remember to correctly set the time signature and tempo in your host application.
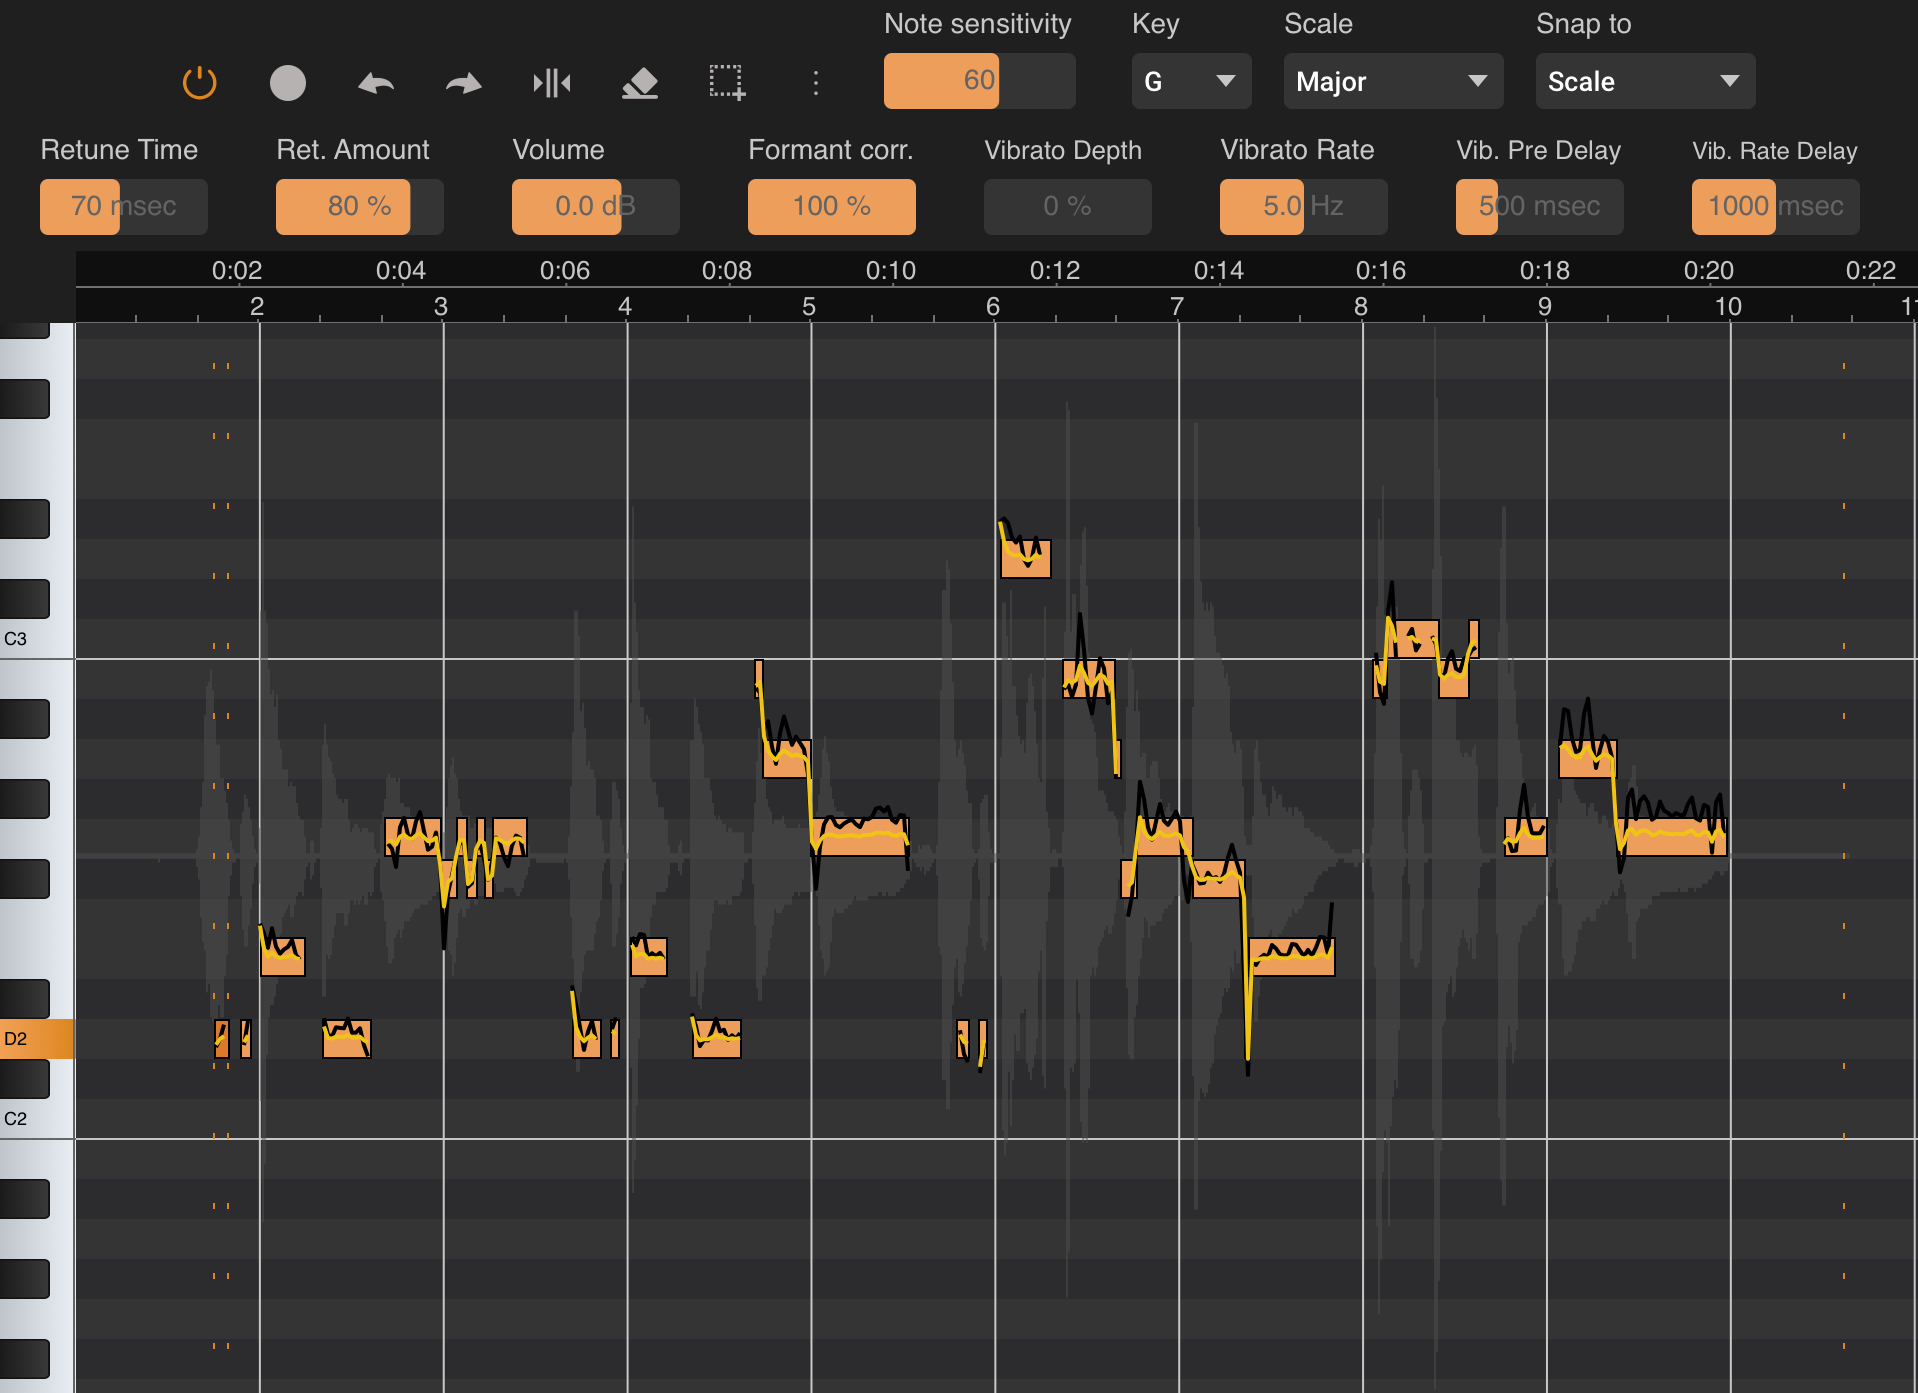
Here, then, is the Happy Birthday vocal recording in Vocal Tune Studio. Vocal Tune Studio has identified pitches and grouped them together as notes (according to the Note sensitivity setting). It has then applied its default retuning settings (as long as Start with last used preset hasn't been selected in the Settings) to all of the notes and snapped them to their closest correct pitches within the key of G Major. In the background, in gray, can be seen a representation of the original audio waveform.
From this point, we can make any adjustments required to fine tune the pitch and timing, as well as how any retuning is applied.
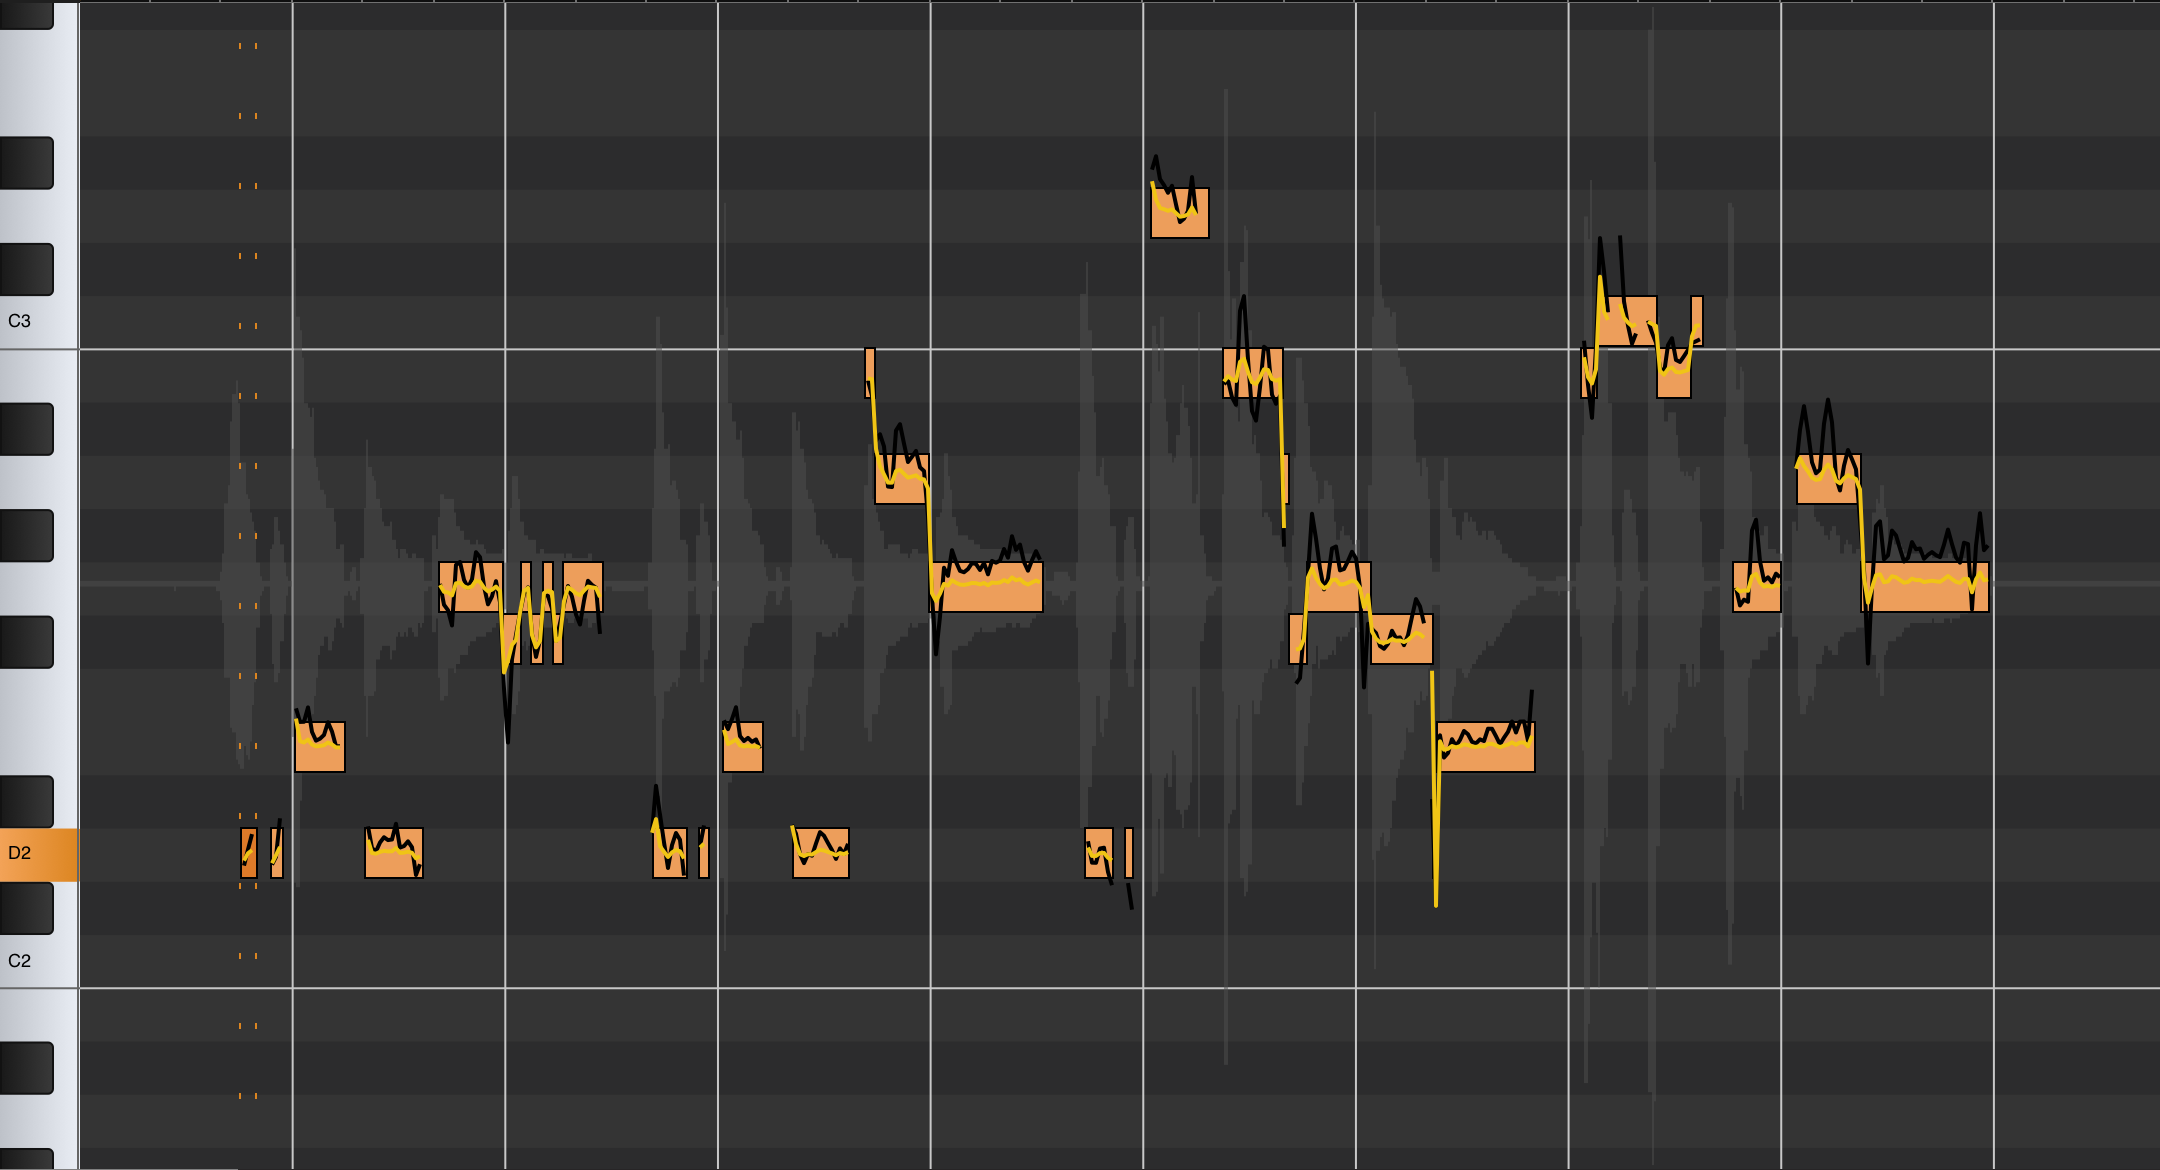
If we compare the MIDI clip from earlier with the representation of the Happy Birthday vocal clip in Vocal Tune Studio, we can see it has already done a pretty good job using its default settings. There are clearly places though where the original vocal pitch has wavered enough that extra notes have been identified, assigned their own place on the piano roll grid and have been snapped to an undesired note within the G Major scale. For example, look at the note at the beginning of the third measure and how it is comprised of many smaller notes in the Vocal Tune Studio display compared to the single MIDI note on the left.
Let's zoom right in and have a closer look at this area.
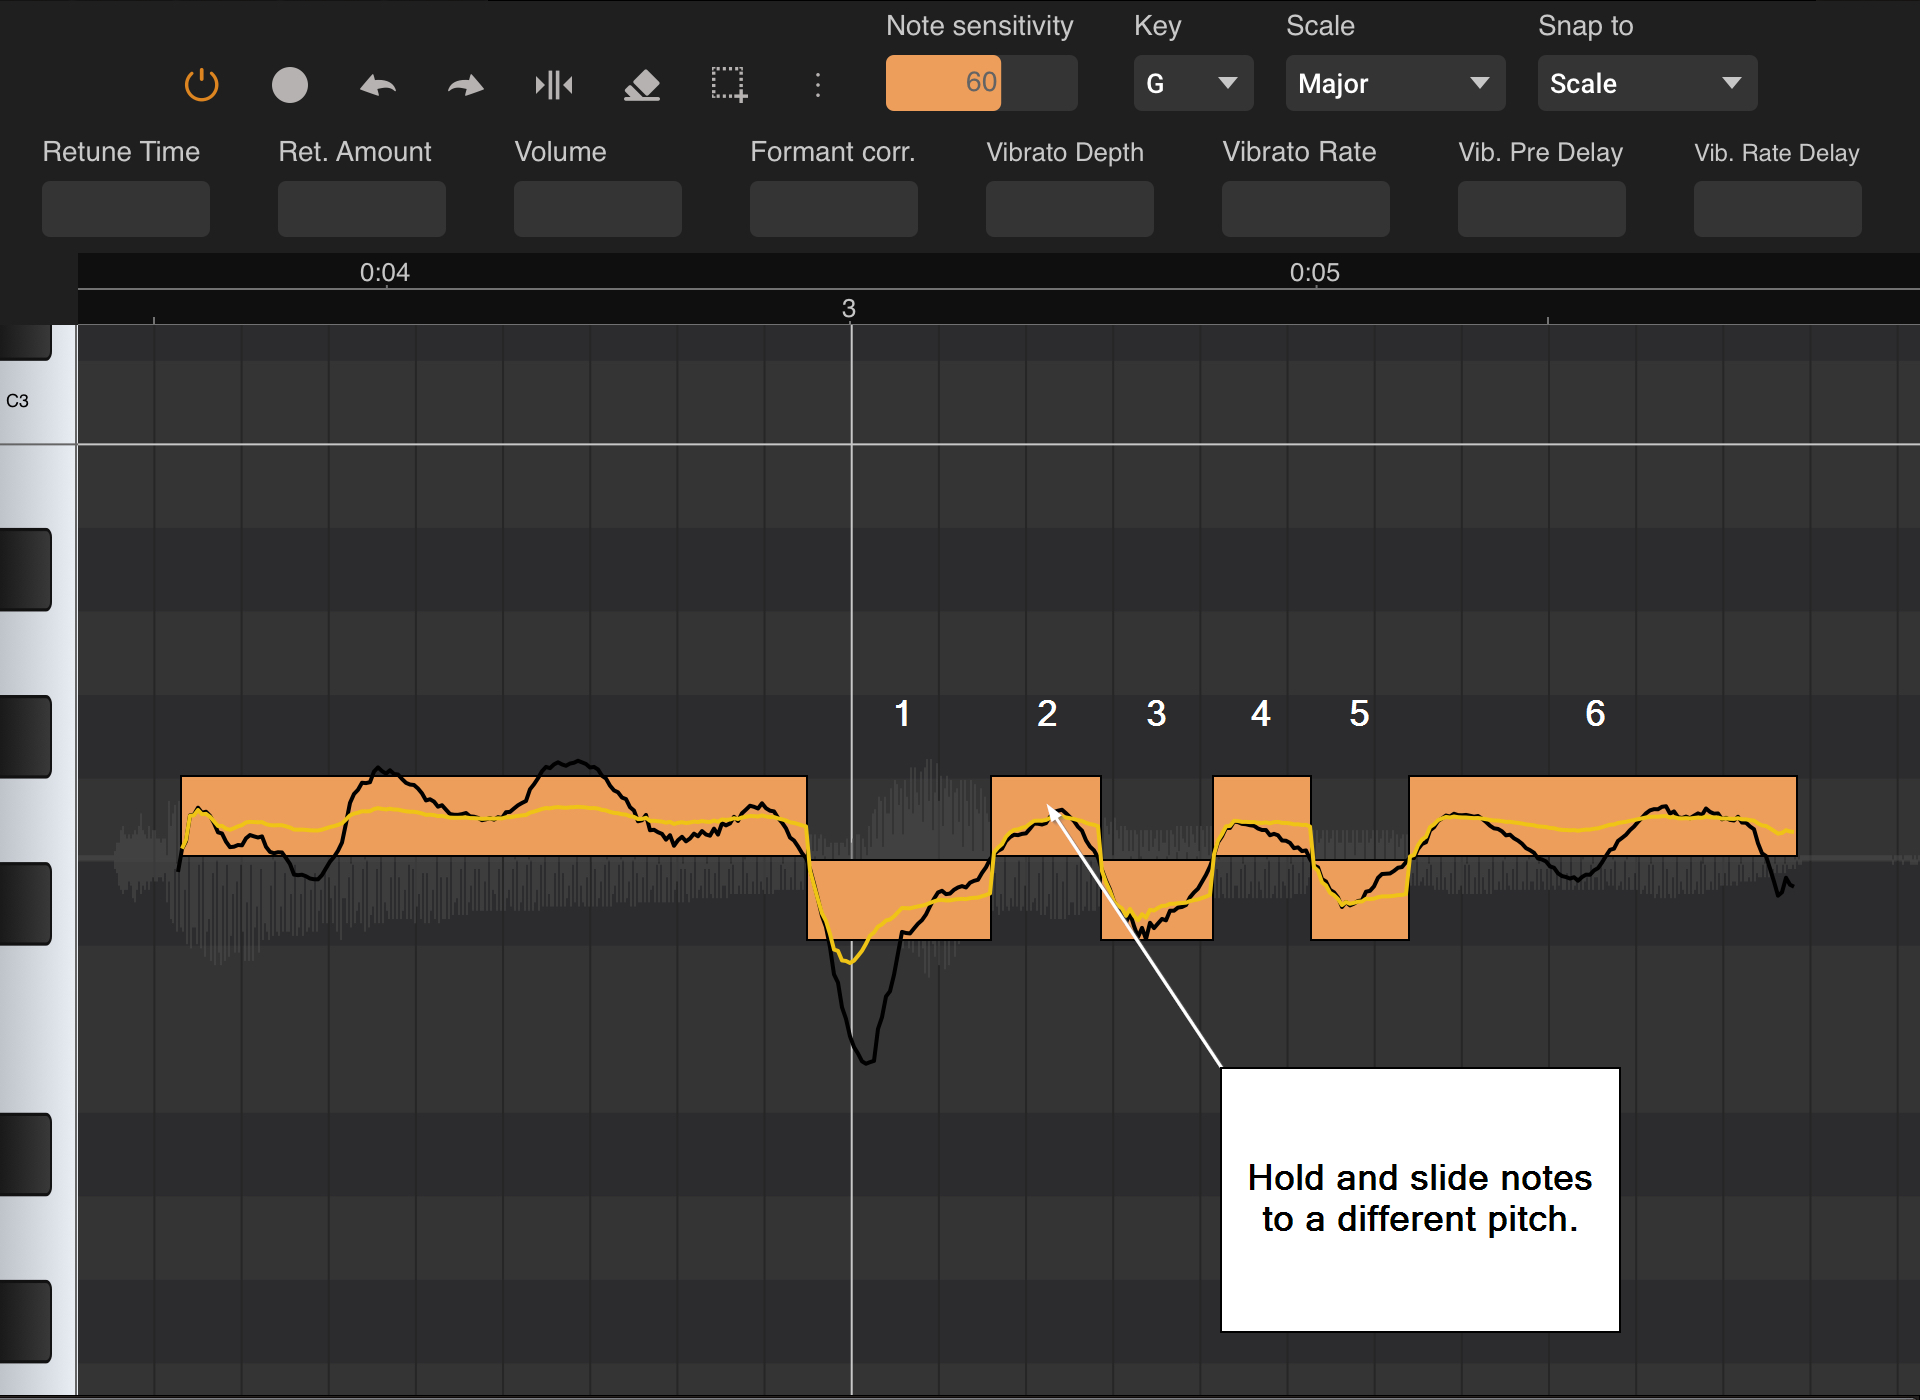
So, instead of one note representing the sung word, starting at the third measure, we have six notes alternating between F#2 and G2 indicated here by the white numbers above them. Now, it is possible that this pitch fluctuation was deliberate on the part of the performer in which case obviously you would not want to remove it but that wasn't the case here so we need to make some corrections ourselves.
The first thing to do, then, is to hold and slide the notes currently at the wrong pitch to the correct pitch of F#2 as has been done in the next screenshot. Note that the final note is orange rather than yellow as it selected after being touched and moved into the correct position. Having a note selected means that its retuning parameters become available at the top of the screen where previously they were grayed out as no notes were selected. These parameters can be set per note by tapping on it once, per group of notes by long pressing in an empty area of the piano roll and sliding right or left to select a group of notes, or set for all notes by first selecting them using the Select all ![]() button.
button.

All six notes now sit on the correct pitch of F#2 but during playback, things still don't sound quite right and, looking at the screenshot above its easy to see why. As explained fully here, Vocal Tune Studio represents pitch in three ways. First, the black line represents the actual detected pitch from the original audio. This is the pitch as sung and will remain the same whatever pitch correction settings are used.
Secondly, there's the note on the piano roll which indicates places where enough similar frequencies have occurred next to each other to be grouped together and considered a note event. The sensitivity for this procedure will be governed by the Note sensitivity setting at the top of the user interface. A lower Note sensitivity setting will allow a greater variance in adjacent pitches to be considered part of the same note event resulting in fewer and longer notes on the piano roll. In our example here, if the Note sensitivity is turned down to 40 from the default 60, two longer notes are created, one on F#2 and the other on G2, instead of the six fluctuating notes seen here. Increasing the Note sensitivity will result in more and shorter notes on the piano roll as Vocal Tune Studio becomes more sensitive to how similar adjacent frequencies need to be considered a note event. Once again, in our example here, if the Note sensitivity is turned all the way up to 100, our six notes here become eleven smaller notes, fluctuating between F#2 and G2 with the second note in that group of eleven being placed on E2, which makes sense when you look at the black line representing the original pitch.
Thirdly, Vocal Tune Studio gives us the yellow line which represents the retuned pitch. As you can see, it is a much more precise indication of whats happening than the notes on the piano roll and it changes accordingly when changes are made to most of the retuning parameters which become available when a note or notes are selected. It is from this yellow line that we can see why simply moving all of the notes to the correct pitch hasn't given us the result we're after. As you can see, there are troughs or peaks in the yellow line at the beginning of every note after the first one so we need to fine tune the retuning parameters for these notes.
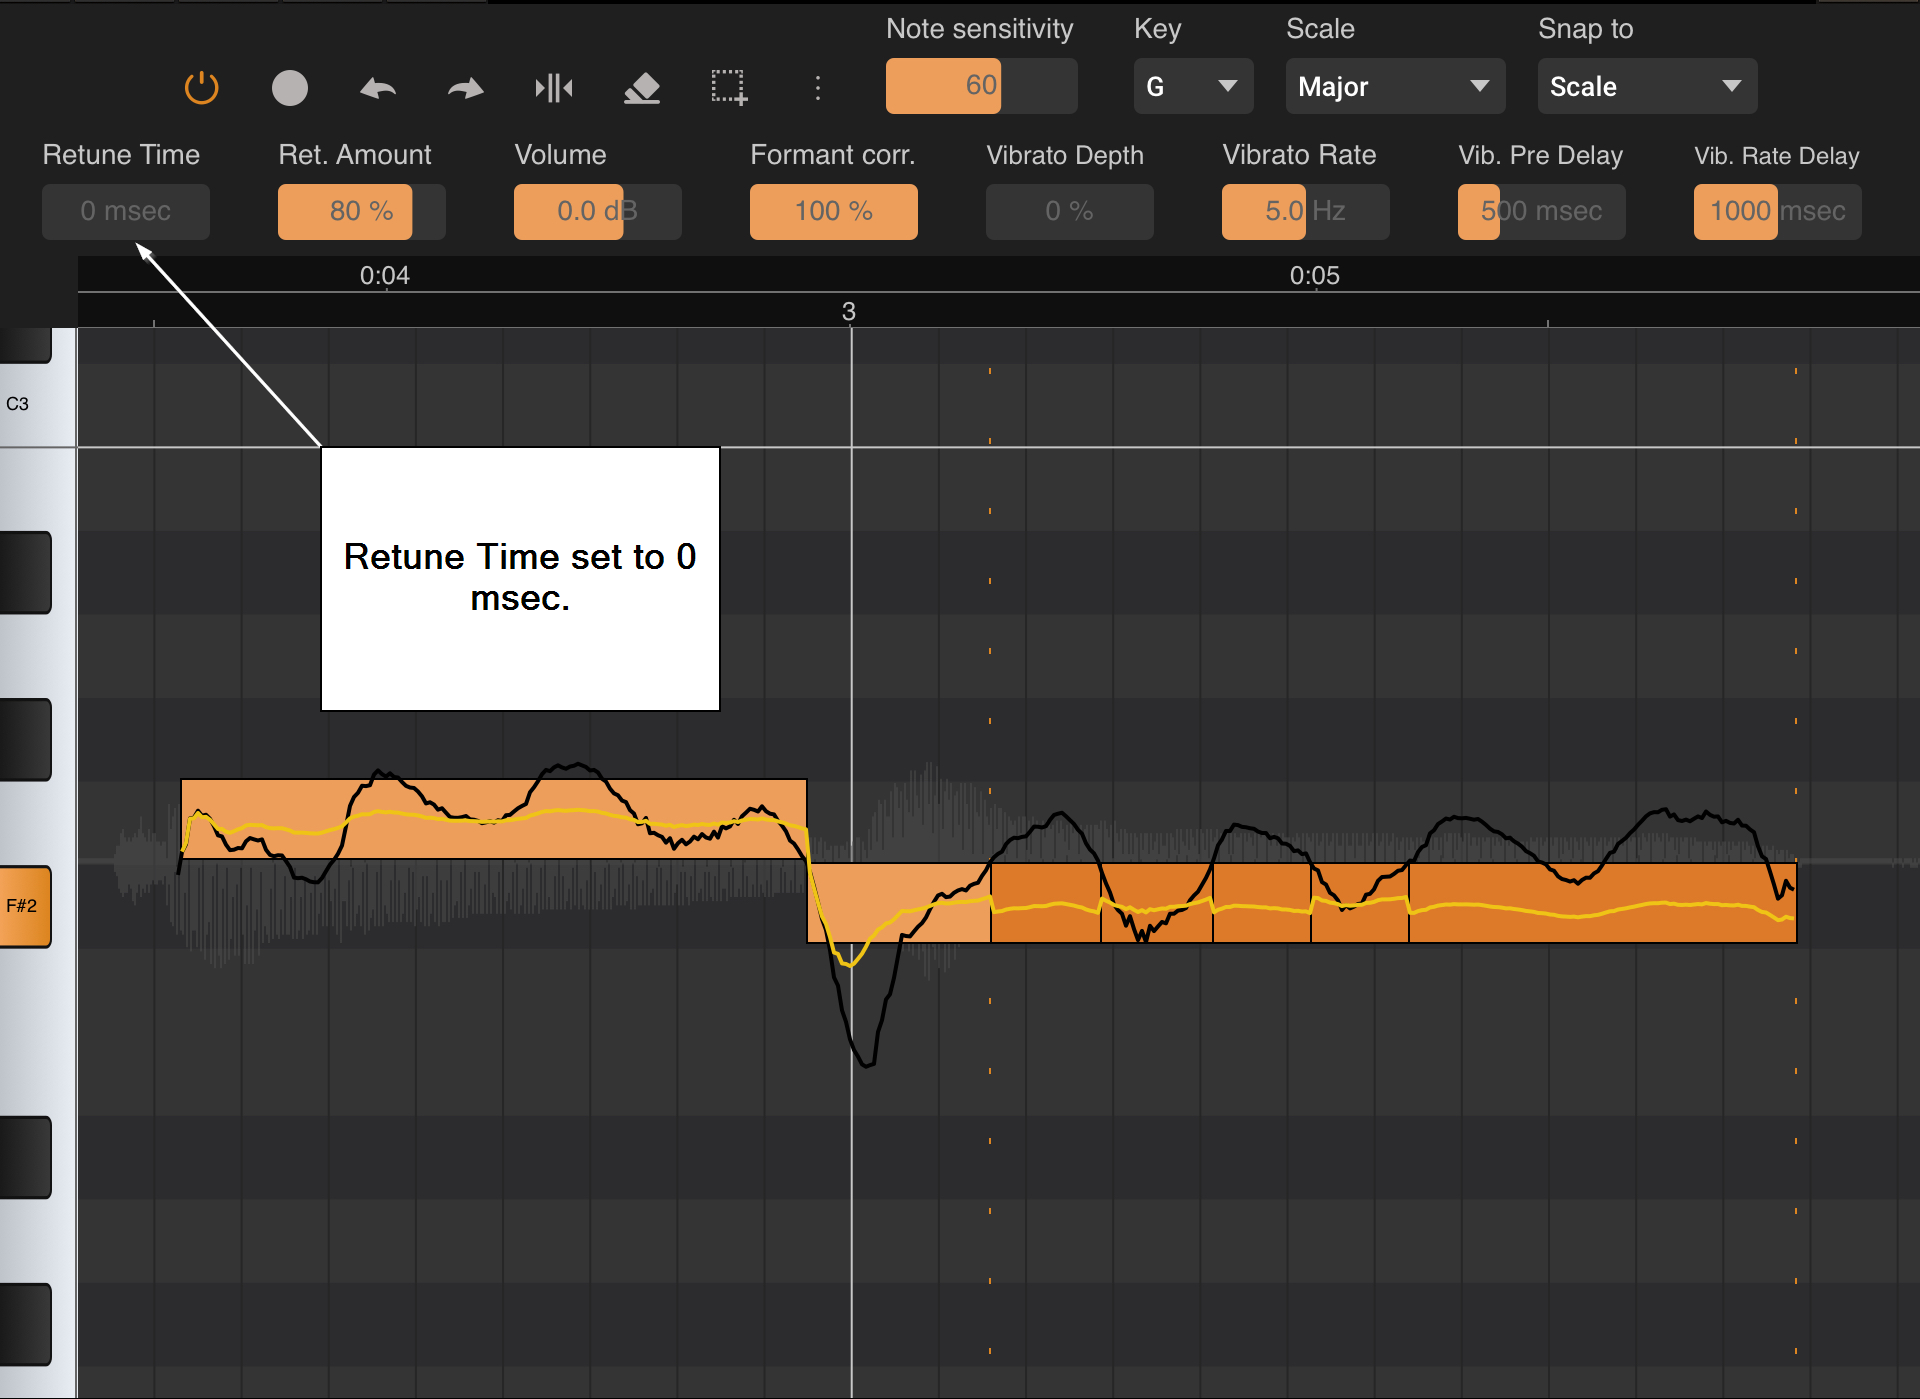
Here, the second to the sixth of our six notes have been selected by long pressing on an empty area and sliding left or right until they're all highlighted. This makes the retuning parameters for all of these five notes active. To get rid of the troughs and peaks, the Retune Time has been reduced to 0 msec from the default 70 msec. This greatly smooths out the yellow retuned pitch line as the time taken before the original pitch is retuned to the selected pitch is reduced to zero. The same has not been applied to the first note of the six to keep the retuning sounding more natural for it as that note represents the start of a word in the sung audio. These changes may, on their own, give you the result you are after, but for the sake of this tutorial we shall go further. As you can see, there are still tiny fluctuations in the yellow line at the beginning of each of the notes after the first of the six.
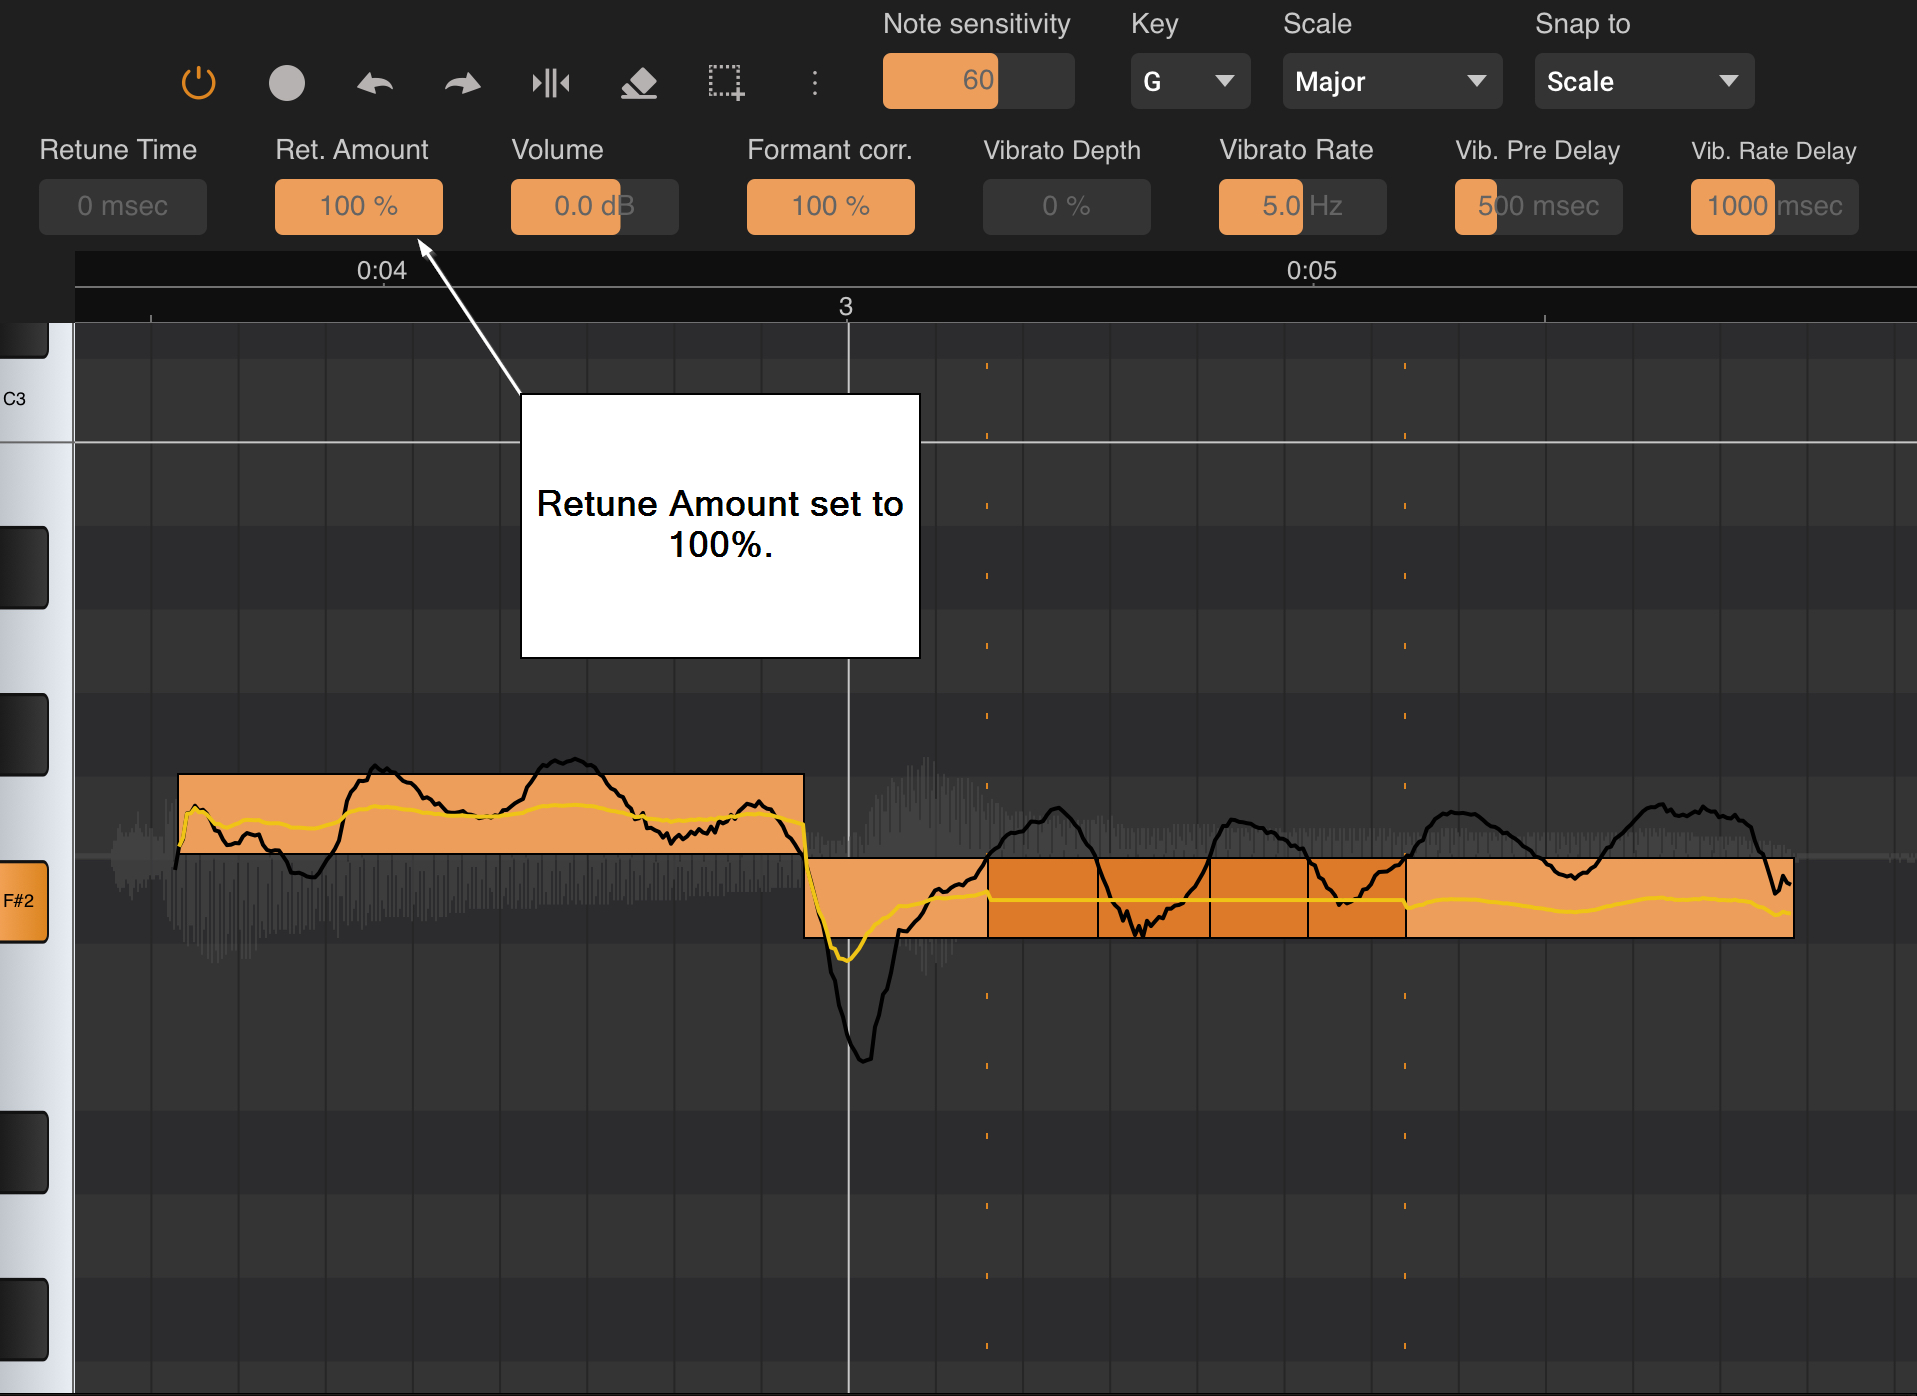
In the screenshot above, notes two to five of our six have been selected and their Retune Amount has been set to 100% from the default 80%. Notes one and six have been left as they were to keep the beginning and end of the sung word sounding natural. As you can see, though, the notes in the center of the word (notes two to five) are completely retuned to exactly the target pitch of F#2, the yellow retuned pitch line is a straight line running through them all. This is an extreme setting for the purposes of illustration in this tutorial; in reality, a setting of 100% for Retune Amount, removing all of the pitch fluctuations present in the original performance would not necessarily be chosen for this type of performance. Remember though, the important thing is for you to achieve your desired results and that may involve the use of exaggerated settings for the available parameters to create something out of the ordinary.
So far, we've not made any changes to the first note of our six but the default settings for its retuning parameters haven't pulled all of the yellow line/retuned pitch within the target pitch of F#2.

To correct this, the first note has been selected on its own by tapping on it once. This makes its individual retuning parameters available above. In this instance, to pull the retuned pitch closer to the exact pitch of F#2, the Retune Time has been reduced to 40 msec. This means the retuning is applied more quickly, pulling the yellow line within the overall F#2 note on the grid. The Retuning Amount has been left at its default level to retain some of the natural pitch fluctuation present in the original performance, the same as the final note of the six, to preserve the naturalness of the sung word.
There is one thing still wrong with this first note though: it should, strictly speaking, start at the beginning of the third measure, but as we can see, it starts just before.
It is important to carefully listen to your audio and the performance as a whole as you use Vocal Tune Studio to ensure that you are making the right judgment calls on what needs to be corrected, in what way and by how much. It may be, for example, that altering the timing disrupts the natural flow of the performance and it is certainly not always the case that having everything perfectly in time will give the desired result.
In this case though, we are going to correct the timing so that the first note starts exactly at the beginning of the third measure. This involves first creating two anchors and a stretch point so that the right parts are changed. Vocal Tune Studio's default anchor creation setting helps us in this by partly automating the process.

Time stretching within Vocal Tune Studio's Pitch and Time mode is fully explained in the section here. That section also explains the different settings available for the creation of time stretching anchor points and stretch points. In this example we are using the default mode. In this mode, automatic anchor points and a stretch point can be created by double tapping anywhere in the gray grid space directly underneath or above the start or the end of a note. Ordinarily, double tapping under/over the beginning of a note will create an anchor point at the end of the chosen note, place another anchor at the end of the note preceding it on the grid and place a stretch point between them at the beginning of the chosen note. Double tapping under/over the end of a note will place an anchor point at the beginning of the chosen note, another at the beginning of the note which follows it on the grid and place a stretch point at the end of the chosen note.
This example varies slightly from that ordinary behavior as the note preceding the chosen note is contiguous to it, there is no gap between them. In a case such as this, then, we double tap under/above the beginning of the first note of our six and an anchor point is created at the end of that chosen note but the second anchor point is placed at the beginning of the note preceding it so that the stretch point can be placed at the beginning of the chosen note as can be seen in the screenshot above.
NOTE. If you double tap in the gray grid area within the horizontal duration of a note, rather than directly under or above the start or end of a note, a single anchor/stretch point will be created. This, in combination with auto placed anchor/stretch points, will allow you to time stretch within notes if required. Please remember the Undo ![]() function to remove misplaced anchor/stretch points and be aware of the other anchor placement modes available as detailed here.
function to remove misplaced anchor/stretch points and be aware of the other anchor placement modes available as detailed here.
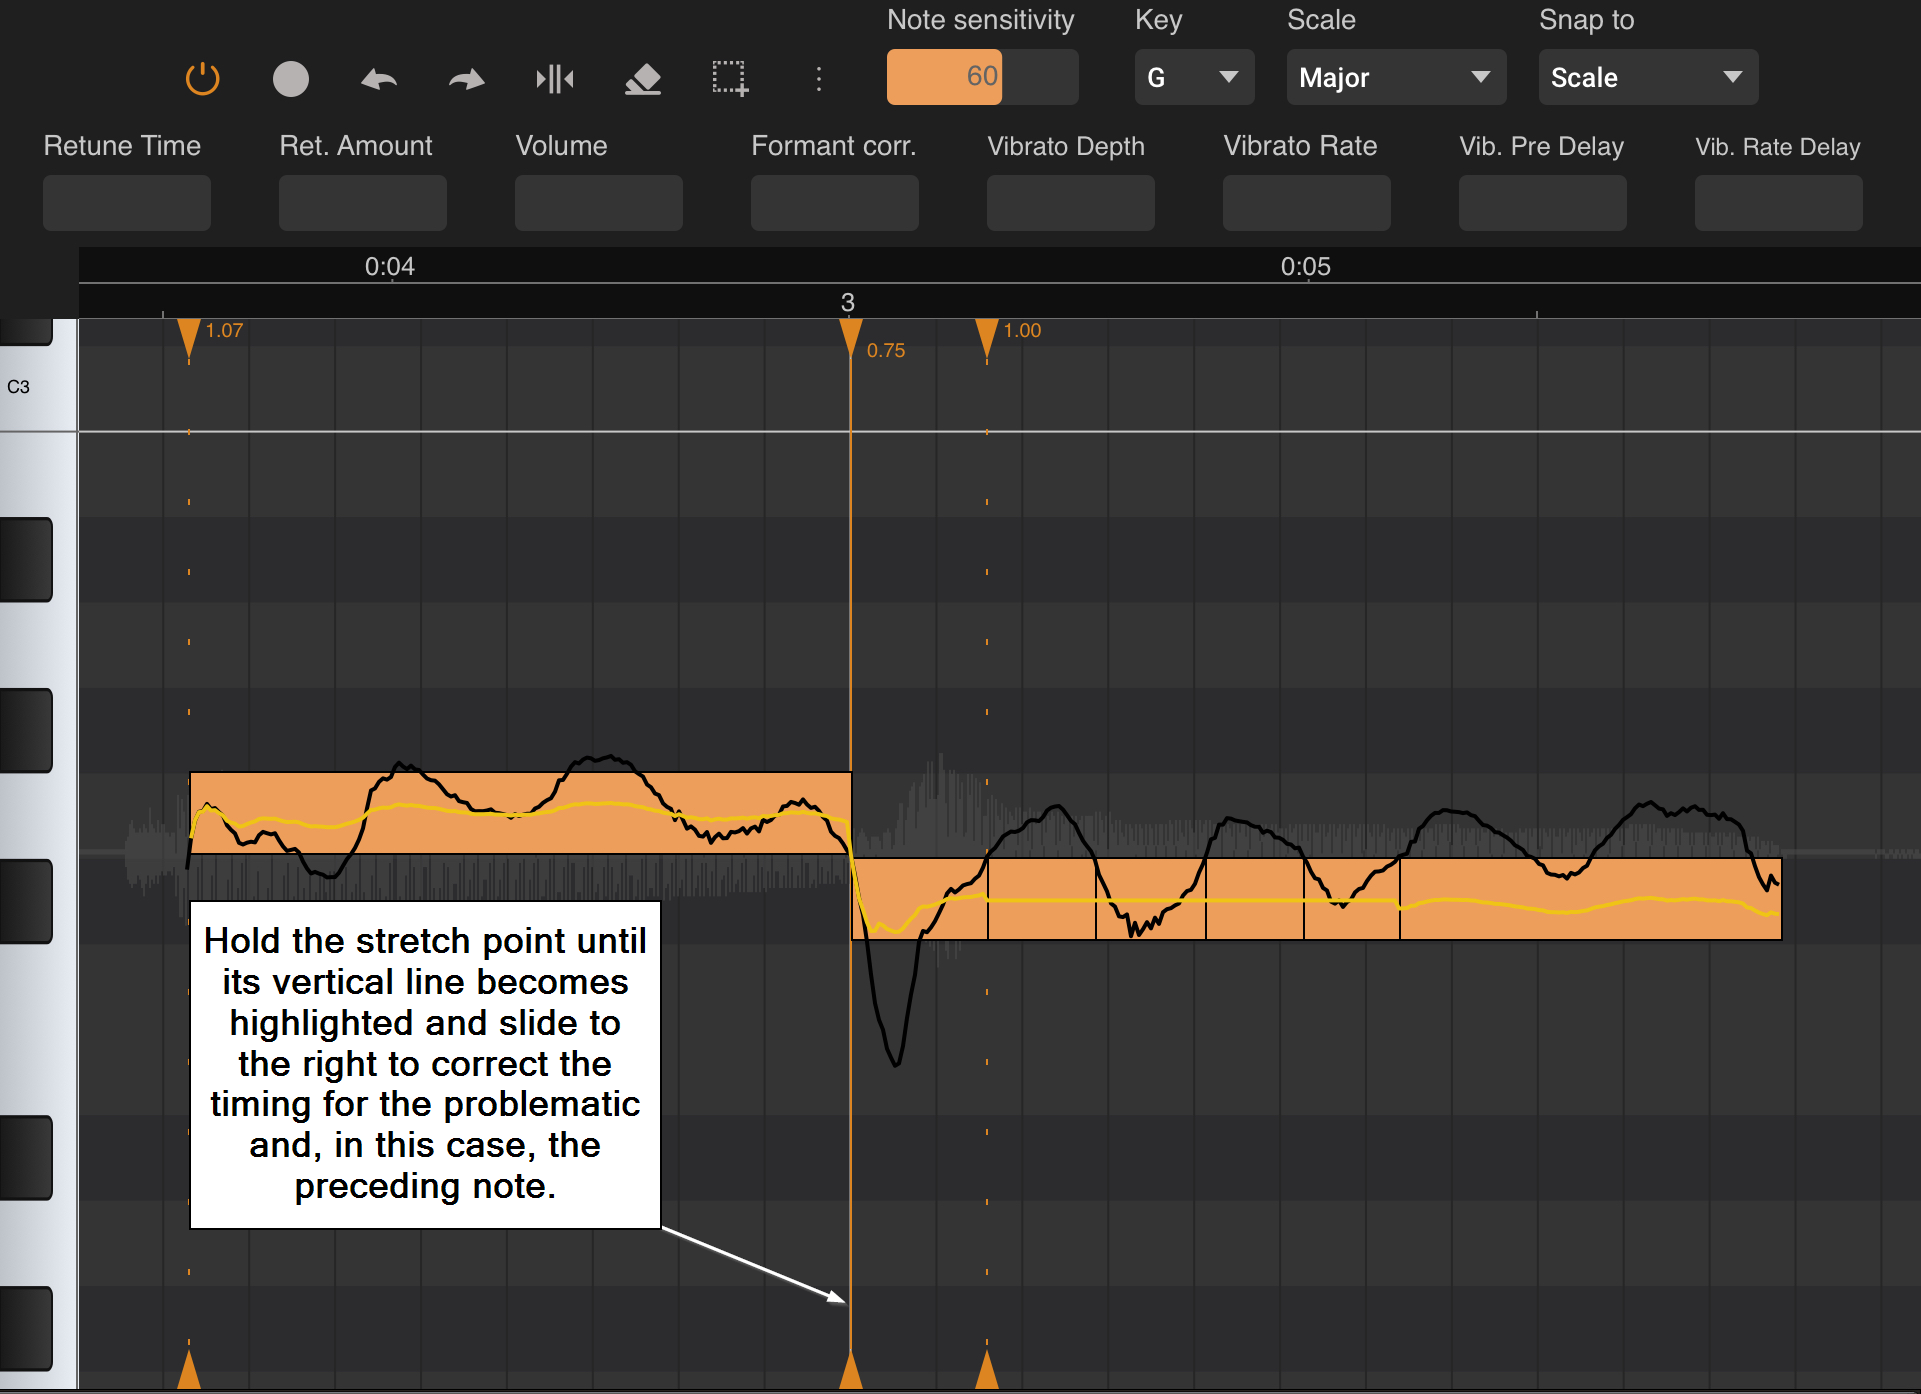
Once you have your anchor points and stretch point in place, all you have to do is press and hold on the stretch point until its vertical dotted line becomes a solid orange line and then, while continuing to hold, slide left or right to correct the timing as necessary. As can be seen above, in this case we slide the stretch point to the right so that our note number one is slightly squashed to start at the beginning of the third measure and the preceding note is slightly stretched in accordance so no gap is left and the vocal retains its original character. Notice though that notes two to six are left completely unaffected as they are outside the anchor points.
Similar adjustments to those above could be applied to the rest of the Happy Birthday performance where errors have not been corrected satisfactorily using the default settings but the last thing to illustrate here for the sake of this tutorial will be the adding of some gentle artificial vibrato to the final note. Here it is, zoomed in on the piano roll grid.
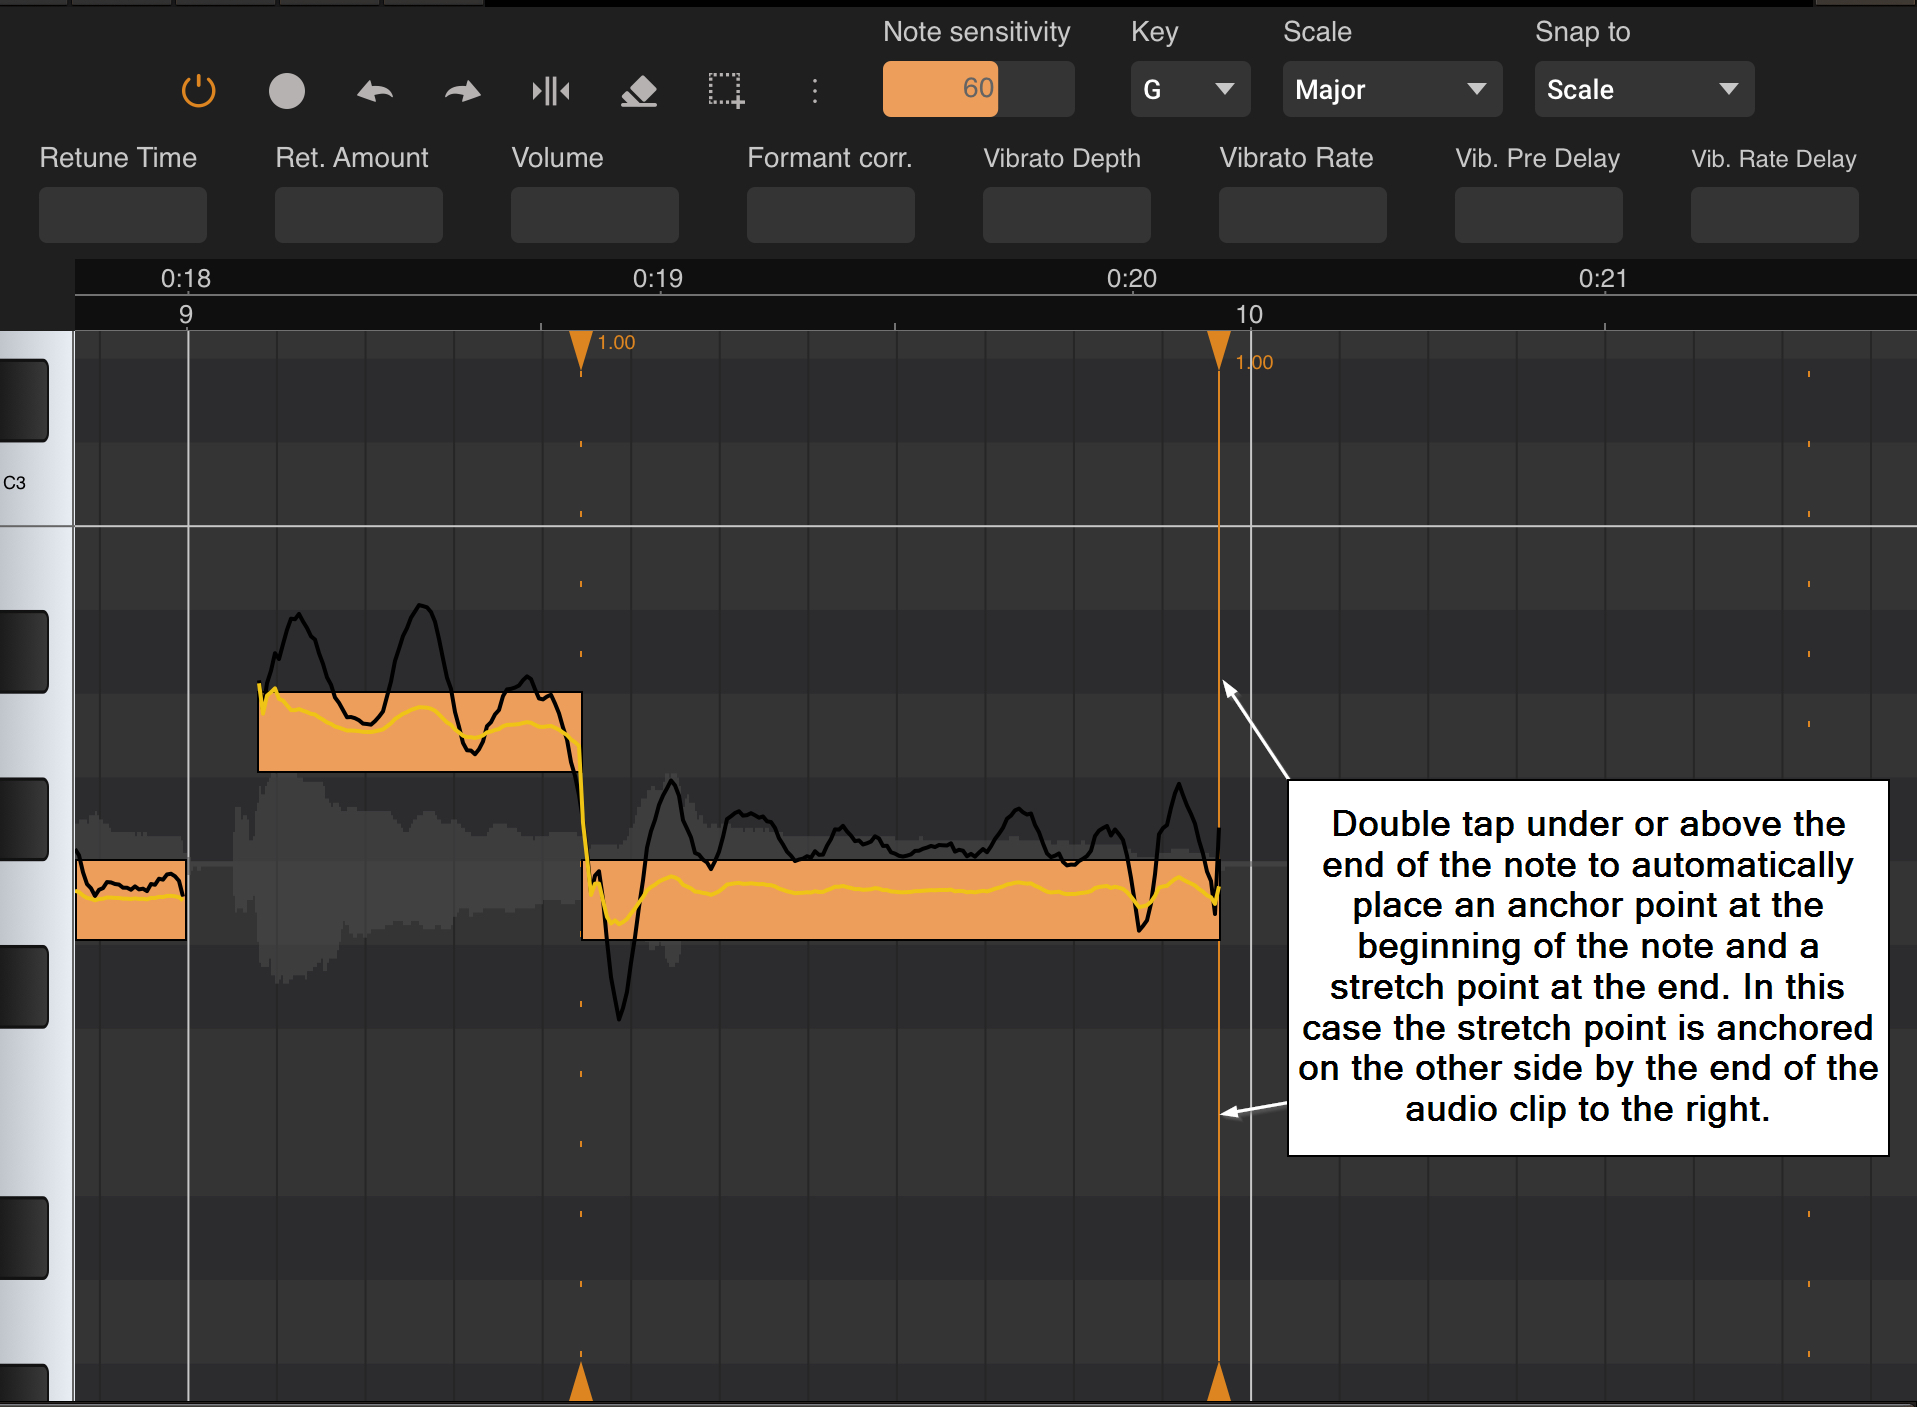
Before we apply the artificial vibrato, we want to check that everything else looks okay with the note. In this case, the default retuning settings have done a great job placing the quantized note at its correct G2 position and have subtly applied the retuning so that no further adjustment is required to the Retune Time or Amount. We can see, though, that the note stops just before the end of the ninth measure, so let's time stretch it a little so it ends perfectly on time. This time we want to double tap under or above the end of the final note so that the stretch point is placed at its end. As can be seen above, this automatically (using the default anchor placement setting) places an anchor point at the beginning of the final note, places a stretch point at the end of it and, in this case, because there is no note after this one, the end of the clip automatically serves as the anchor point on the right hand side. (If there were another note after this one, an anchor point would be automatically place at its start point).
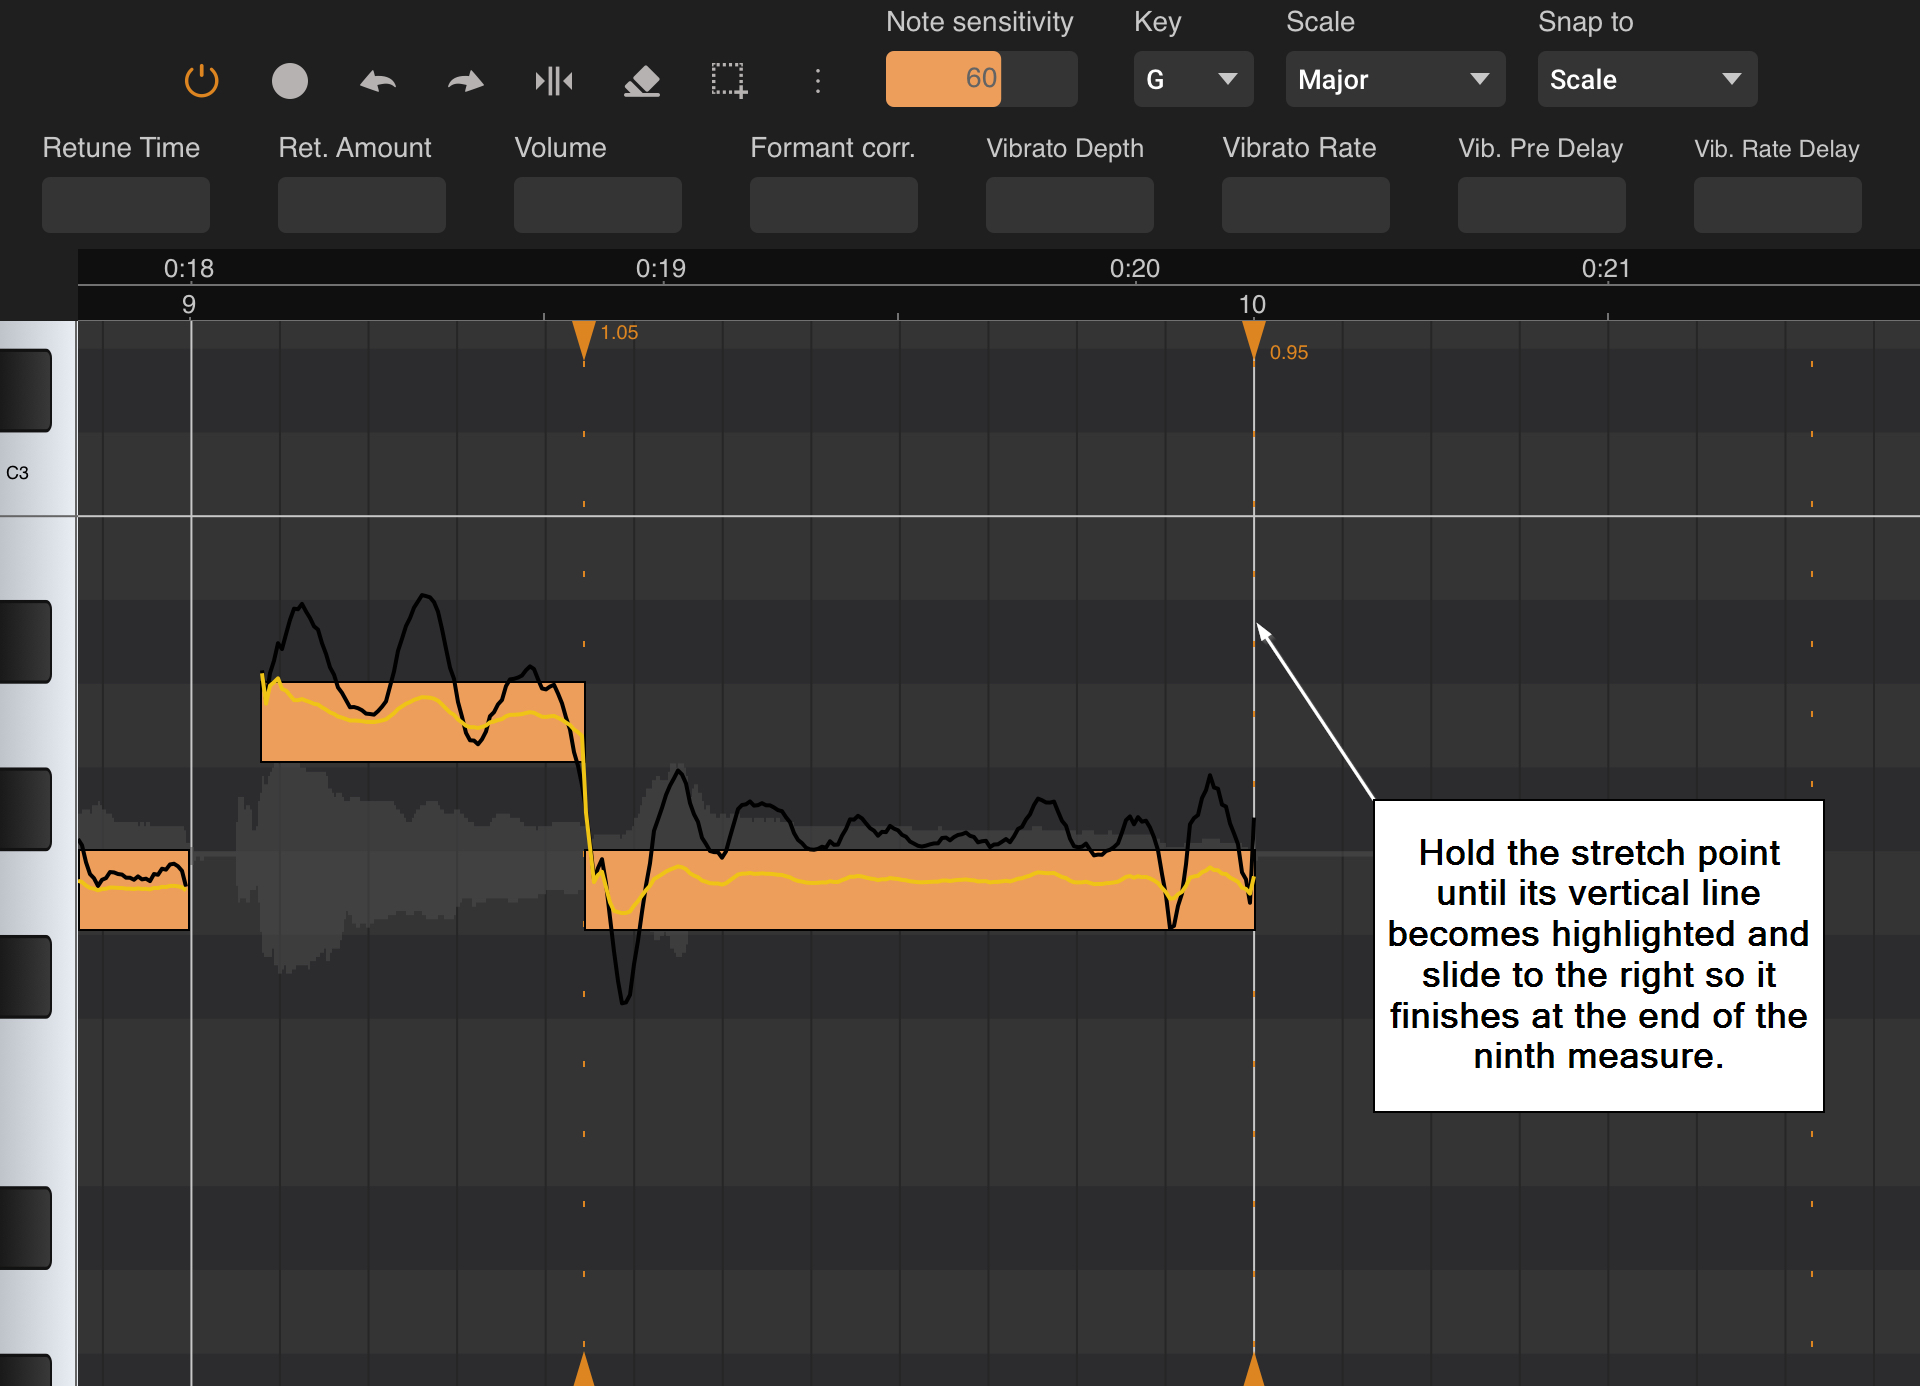
With the anchors in place, press and hold the stretch point until it becomes highlighted orange and continue to hold as you slide, to stretch the note to the right until it finishes at exactly the end of the ninth measure as can be seen above.
Finally, let's apply some gentle artificial vibrato to the note.
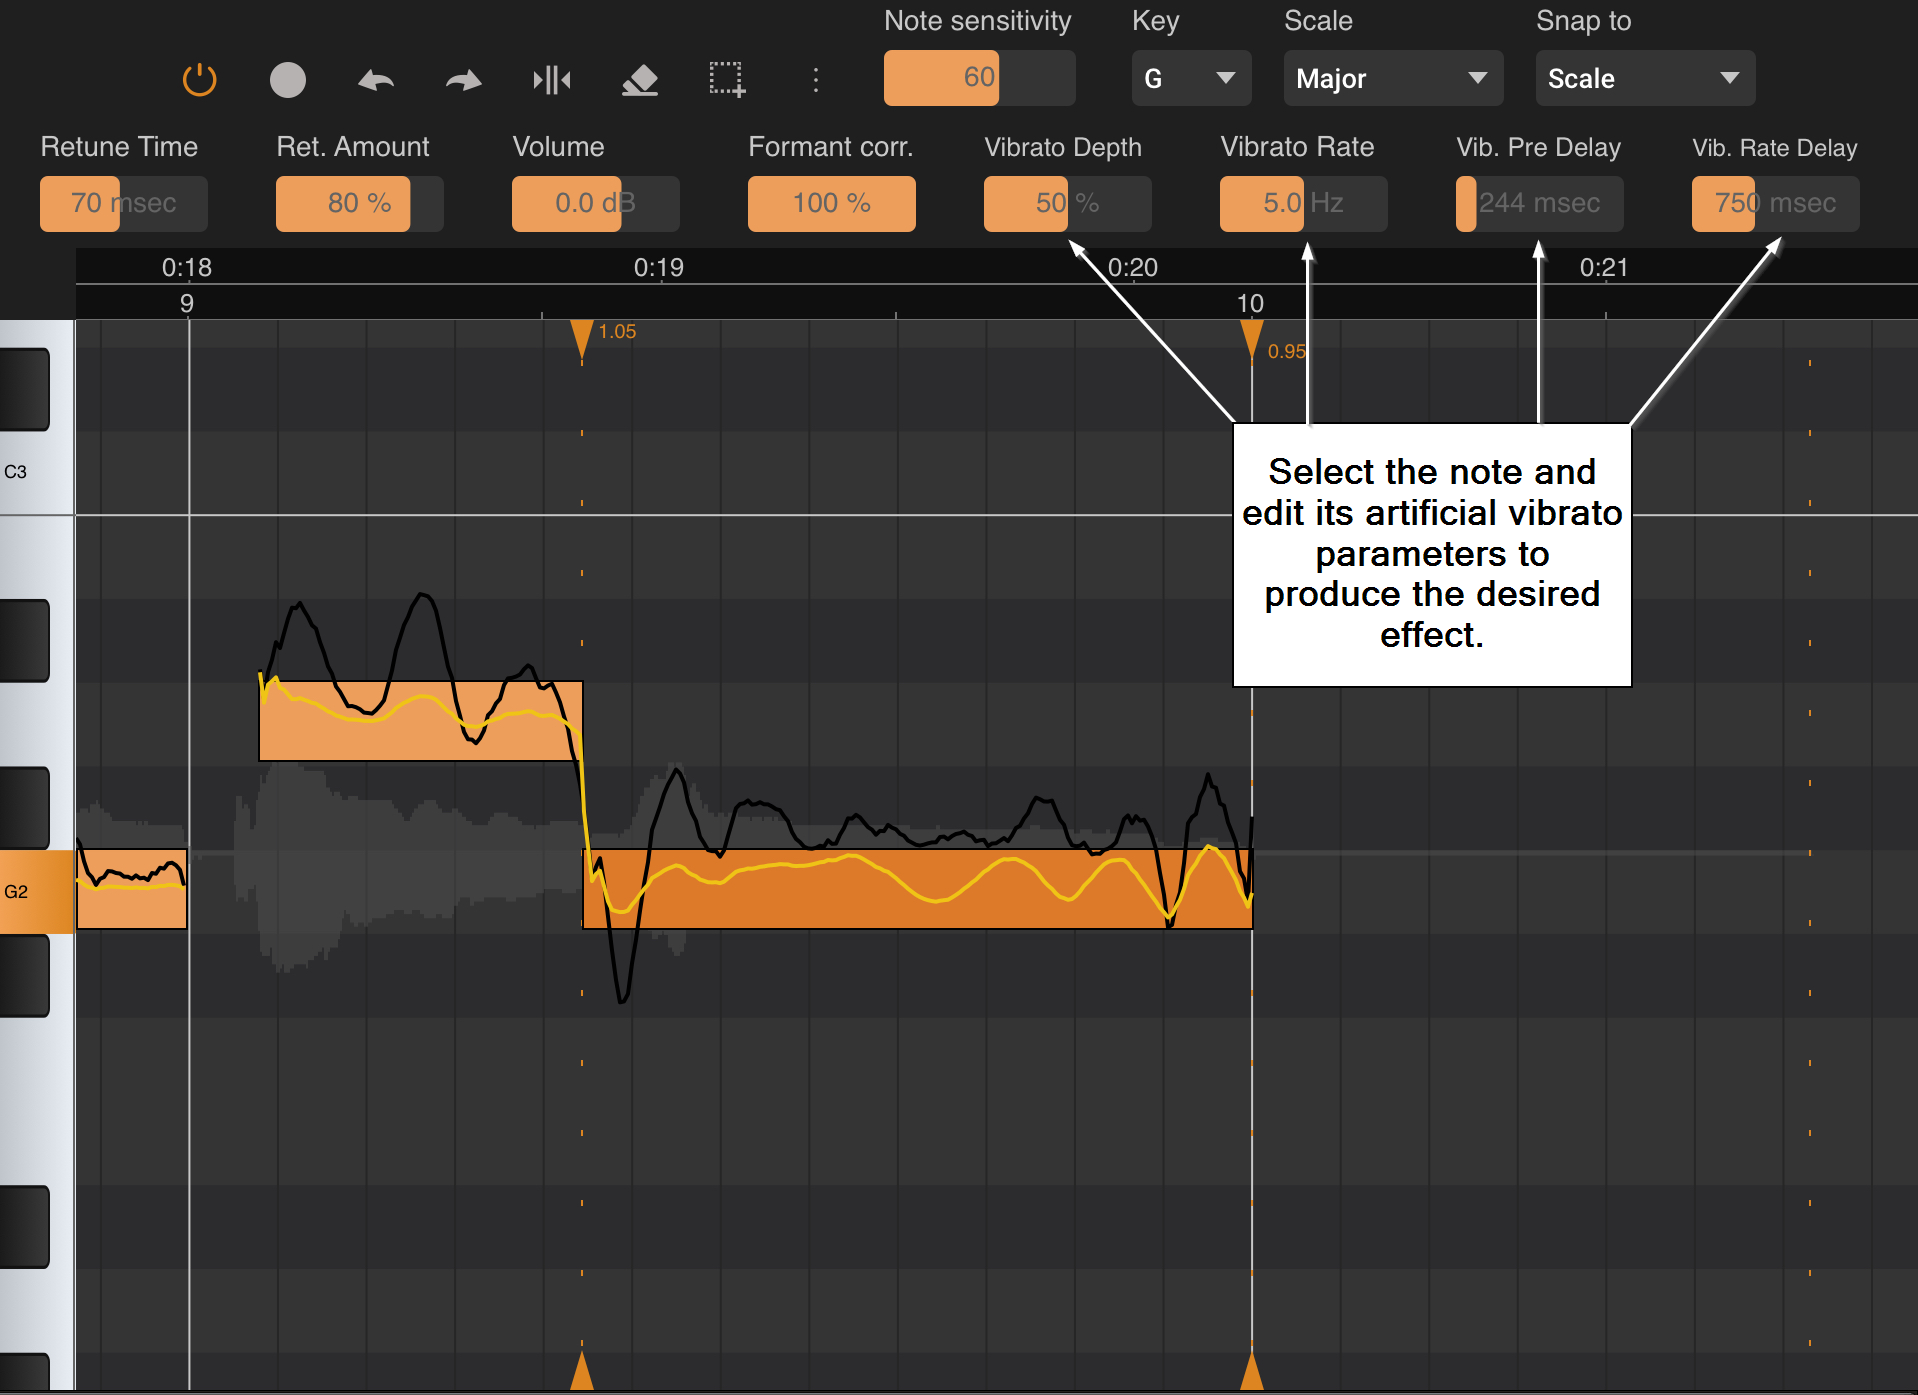
To do this, the first thing we need to do is select the note by tapping once on it. This will turn it from yellow to orange as can be seen above and will open up the retuning options for this particular note on its own. The four parameters to the top right hand side control the application of artificial vibrato to the selected note (or notes if multiple notes are selected). By default, the Vibrato Depth is set to 0%, it is turned off, for all notes. Full details about the artificial vibrato parameters can be found here, but, briefly, Vibrato Depth sets the amount of artificial vibrato applied to the selected note, how large the difference in pitch is on either side of the starting pitch during the vibrato; Vibrato Rate sets the speed at which the vibrato fluctuates between the two pitches defined by the Vibrato Depth; Vibrato Pre Delay defines how much of the note is heard without artificial vibrato before it starts to be applied and Vibrato Rate Delay defines how long it takes for the artificial vibrato to reach its full speed and depth after it has started to be applied.
Simply alter the artificial vibrato settings to achieve the effect you are after. Don't forget that you can easily double tap on any of the retuning parameter sliders along the top to get the option to either enter a precise value using the onscreen keyboard or return the parameter to its default value. In the example above, you can see that Vibrato Depth has been set to 50%, Vibrato Depth is at 5.0 Hz, Vibrato Pre Delay is set to 244 msec and Vibrato Rate Delay is set at 750 msec. As you can see, the artificial vibrato can be seen taking effect on the yellow retuned pitch line within the selected final note; nothing at first because of the pre delay and then, because of the rate delay, it slowly comes in before reaching its full speed and depth.
Hopefully this brief tutorial has successfully introduced you to some of the functions of Vocal Tune Studio and how to use them. There is plenty more you can do with Vocal Tune Studio not mentioned in this tutorial: for example, you can alter the dynamics by changing the volume of any note or notes in relation to the others; you can create deliberately artificial sounding pitch shifting by lowering the Formant Correction; you can create harmonies for your original vocal using the same audio file/performance by having the same clip on multiple tracks in Audio Evolution Mobile, opening each of them in their own instance of Vocal Tune Studio, then selecting all of the notes and transposing them up or down or, alternatively, move individual notes to create more intricate harmonies; and you can export the notes seen on the piano roll in Vocal Tune Studio as actual MIDI notes, conveniently placed on a MIDI instrument track for you in Audio Evolution Mobile, ready to use with your MIDI instrument of choice. There's also the separate Time only mode which can be used to time stretch any audio at all without changing its pitch and is not limited to monophonic sound sources as the Pitch and Time mode is.
Some of the adjustments here have been extreme for the sake of demonstration but the more you do, the more you will learn how to carefully tweak the various settings to harness the full power of Vocal Tune Studio and achieve your goals.