Introduction and instructions
Vocal Tune Studio Time only mode allows you to set anchor/stretch points and then time stretch those specific parts of your audio without changing their pitch.
Unlike Pitch and Time mode which can only be used for monophonic (one note at a time) sound sources and preferably a monophonic audio recording (one audio channel only), Time only mode can be used with any audio file (please note, though, that the screenshots below show a monophonic audio clip loaded - if a stereo clip were loaded, the waveforms of both the left and right channels would be represented in the display).
NOTE. Real time time stretching like this is a very CPU intensive task and, for that reason and because of the enormous number of varied devices Vocal Tune Studio needs to be able to run on, the time stretching factor in Vocal Tune Studio has been limited to between 0.33x and 3.0x of the original duration. This should be adequate for most needs but, if not, a possible workaround could be to apply the maximum/minimum stretching limit, render the clip to audio file and then reload that rendered audio to open in Vocal Tune Studio again where the required part could be stretched within the limits again. The current stretch factor used for each section to the right of an anchor/stretch point is displayed next to the anchor/stretch points at the top of the display.
Open your audio clip in Vocal Tune Studio Time only mode by either double tapping on it on the Audio Evolution Mobile timeline (unless you've deselected this option in the Audio Evolution Mobile's Settings ![]() ) or by tapping once on it to select it, tapping the selected clip's Three Dot Button to open the Clip Options and selecting Vocal Tune Studio at the top of those options. Both of those actions will open the following dialog.
) or by tapping once on it to select it, tapping the selected clip's Three Dot Button to open the Clip Options and selecting Vocal Tune Studio at the top of those options. Both of those actions will open the following dialog.
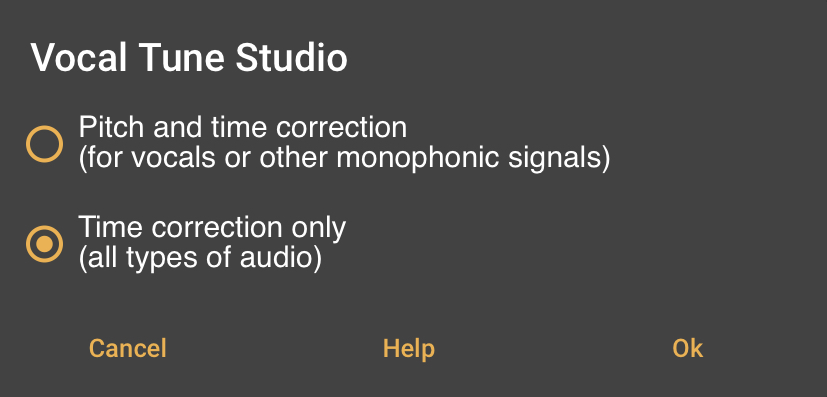
This allows you to select which mode Vocal Tune Studio will open your audio in. Select Time correction only and tap Ok.
Your audio will now be opened in Vocal Tune Studio's Time only mode. If you have yet to purchase Vocal Tune Studio as an in-app purchase you will first be shown a Try/Purchase dialog. When in trial mode, two seconds of silence will be played now and then during playback and all forms of export involving Vocal Tune Studio will be blocked.
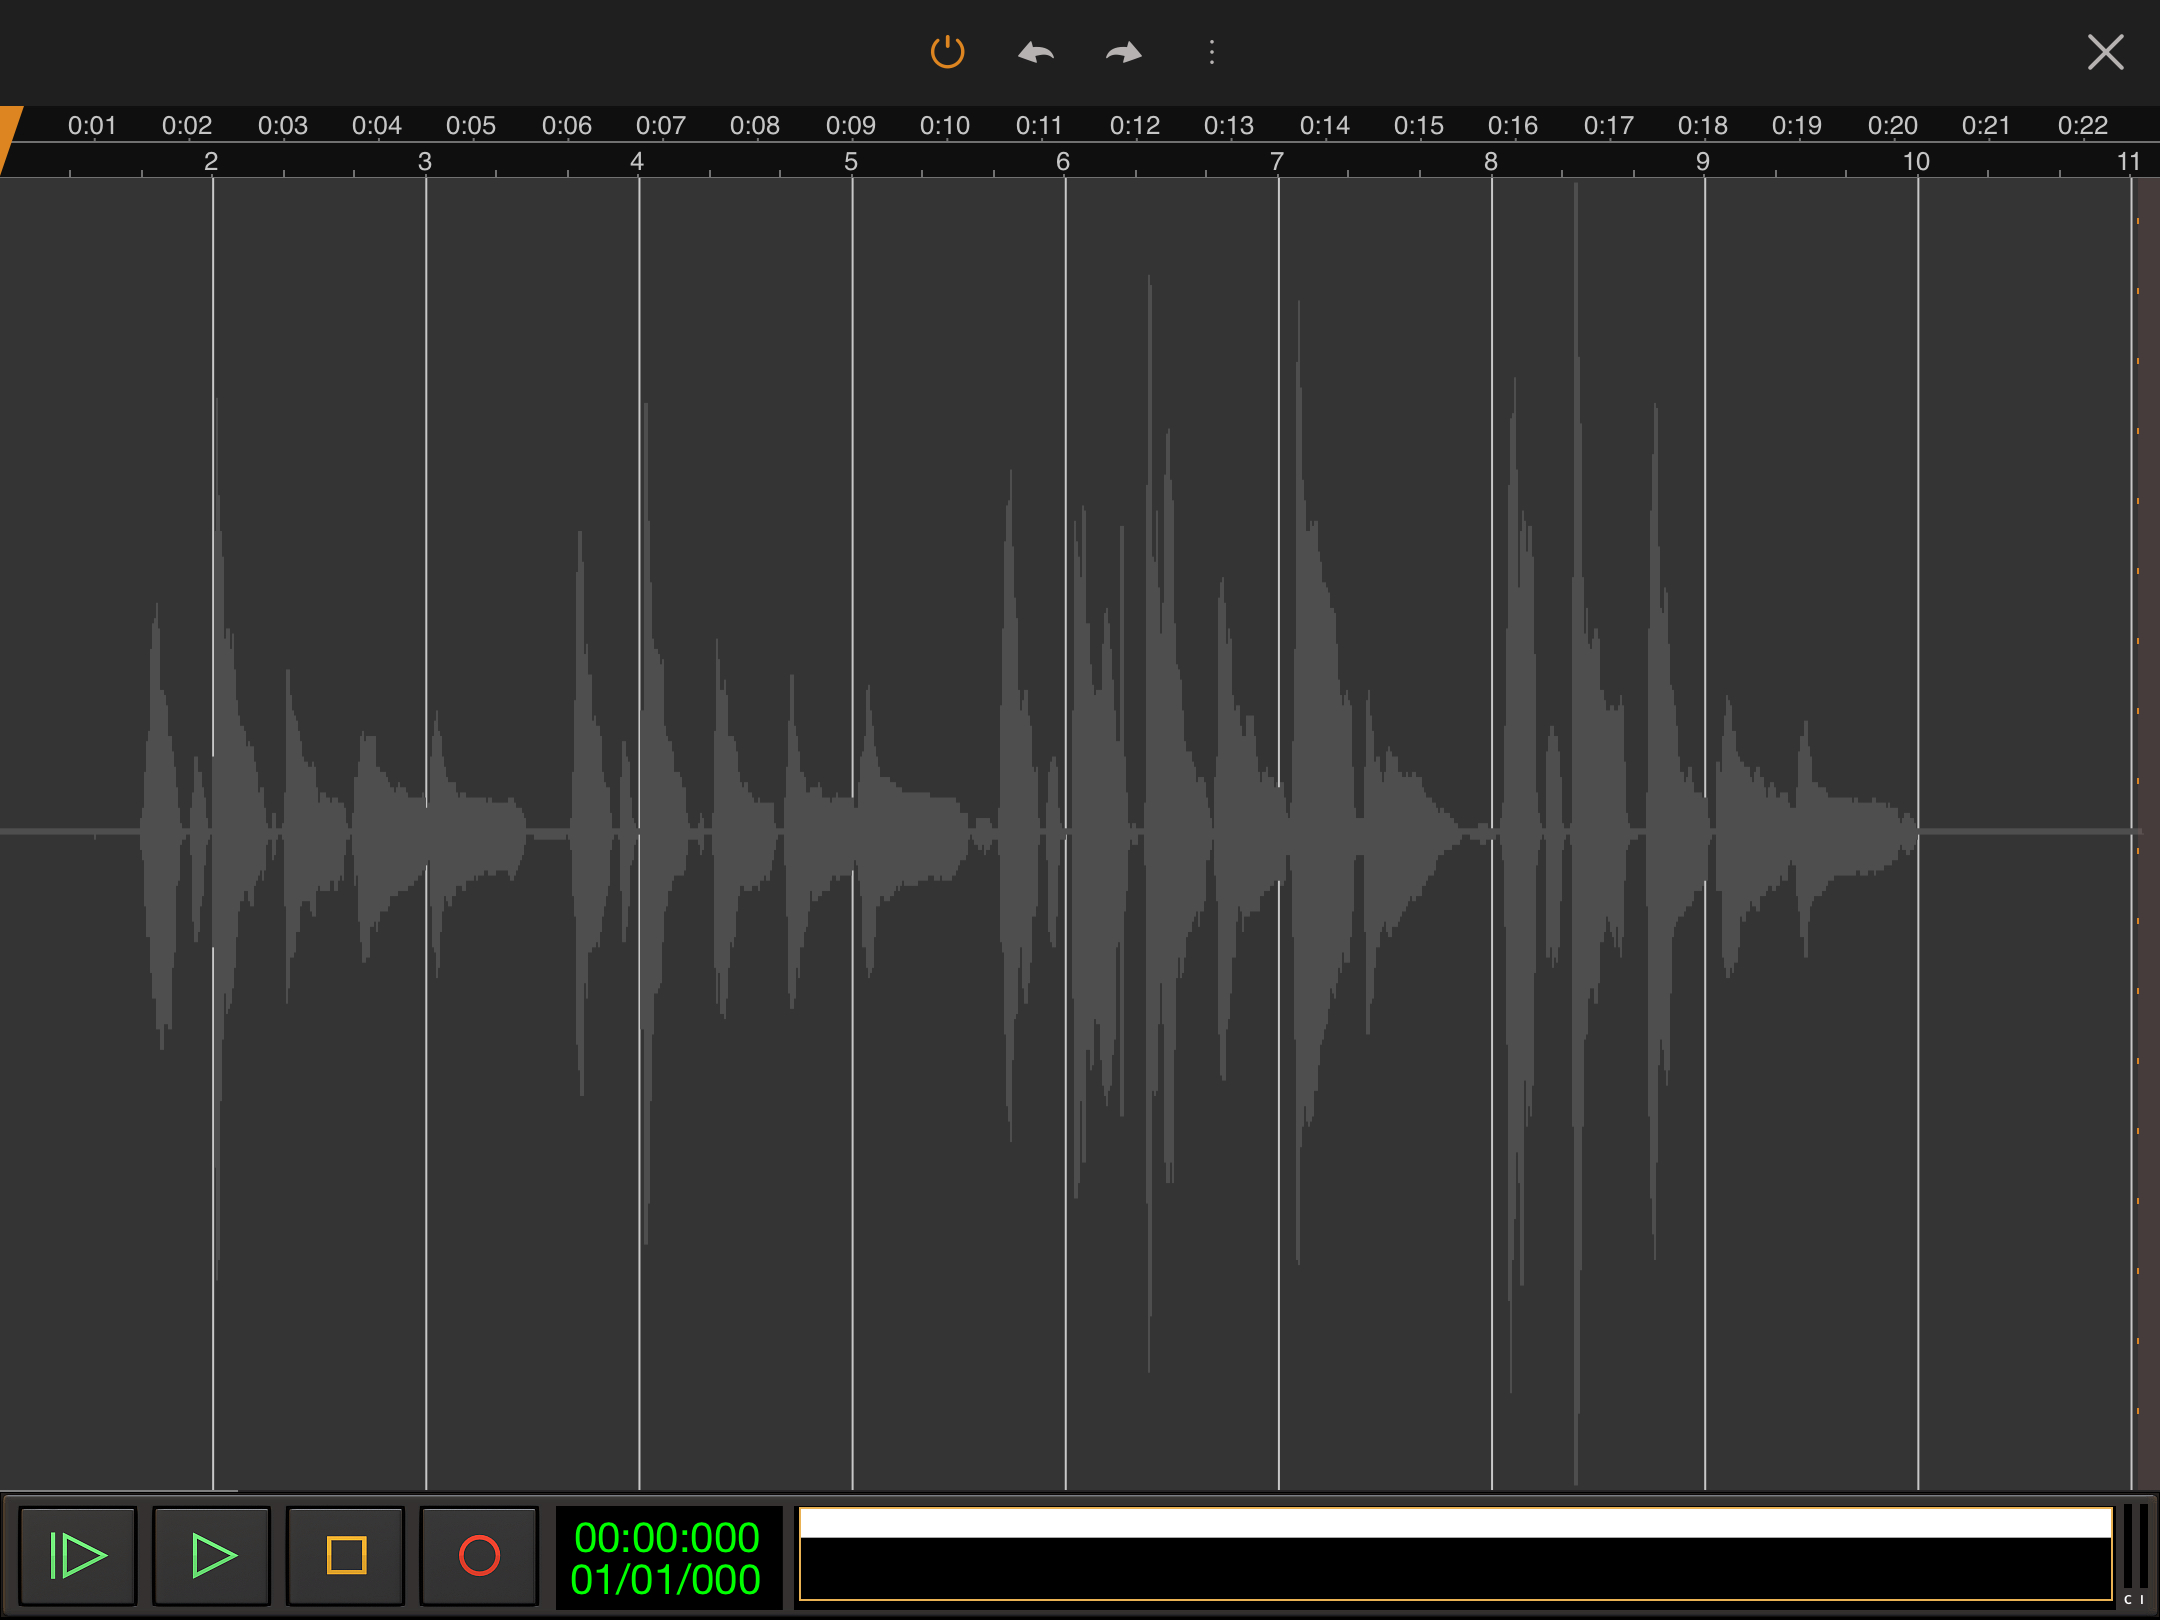
The screenshot below shows the clip used in the tutorial opened in Time only mode. As you can see, the audio waveform is shown in light gray across the center of the timeline display. A full guide to the user interface can be found here.
The key to using Vocal Tune Studio's Time only mode is the placement of anchor/stretch points. Anchors and stretch points are essentially the same thing, the difference being that the stretch point is between two anchor points and can therefore be used to initiate a stretch from that point whilst the overall stretching is constrained between the anchor points. Add another anchor beyond one of the two existing anchors and the original anchor point closest to it can then be used as a stretch point itself, using the original stretch point as its anchor on the other side. As such, these markers can be simultaneously anchors and stretch points depending on whether they exist between two other anchors/stretch points or not and how they are then interacted with.
Anchor placement in Time only mode is the same as the Pitch and Time mode's 'None' option for auto placement (except there are no notes to be snapped to). As such, all anchor/stretch points must be manually created by the user by double tapping at the desired position within the waveform display area. This being the case, it is especially important to remember to place anchors on either side of your desired stretch point to ensure that you only time stretch the part of your audio you want to rather than stretching everything using the start and end of the clip as de facto anchor points (unless that's what you want to do). Remember that the Undo ![]() option is always there if you place an anchor/stretch point in the wrong place, that you can double tap on existing anchor/stretch points to remove them and there is also the Remove all stretch points option available via the Three Dot Button
option is always there if you place an anchor/stretch point in the wrong place, that you can double tap on existing anchor/stretch points to remove them and there is also the Remove all stretch points option available via the Three Dot Button ![]() should you want to reset and start again. The Remove time correction option, also available via the Three Dot Button, will remove all effects of Vocal Tune Studio Time only mode from your audio, unload it and return you to Audio Evolution Mobile's Arranger Screen.
should you want to reset and start again. The Remove time correction option, also available via the Three Dot Button, will remove all effects of Vocal Tune Studio Time only mode from your audio, unload it and return you to Audio Evolution Mobile's Arranger Screen.
The screenshot above shows the audio clip opened in Time only mode but has yet to have any anchor/stretch points placed to be used for time stretching. Let's resize the display by pinch/pulling with two fingers to zoom into part of the audio present and place some anchor/stretch points.
Anchor/stretch points are placed by double tapping at the points at which you want them to be created. Zooming into your audio gives you much more control of this process. If you place one in the wrong place, simply use the Undo ![]() button immediately or double tap on it again at any time to remove it.
button immediately or double tap on it again at any time to remove it.
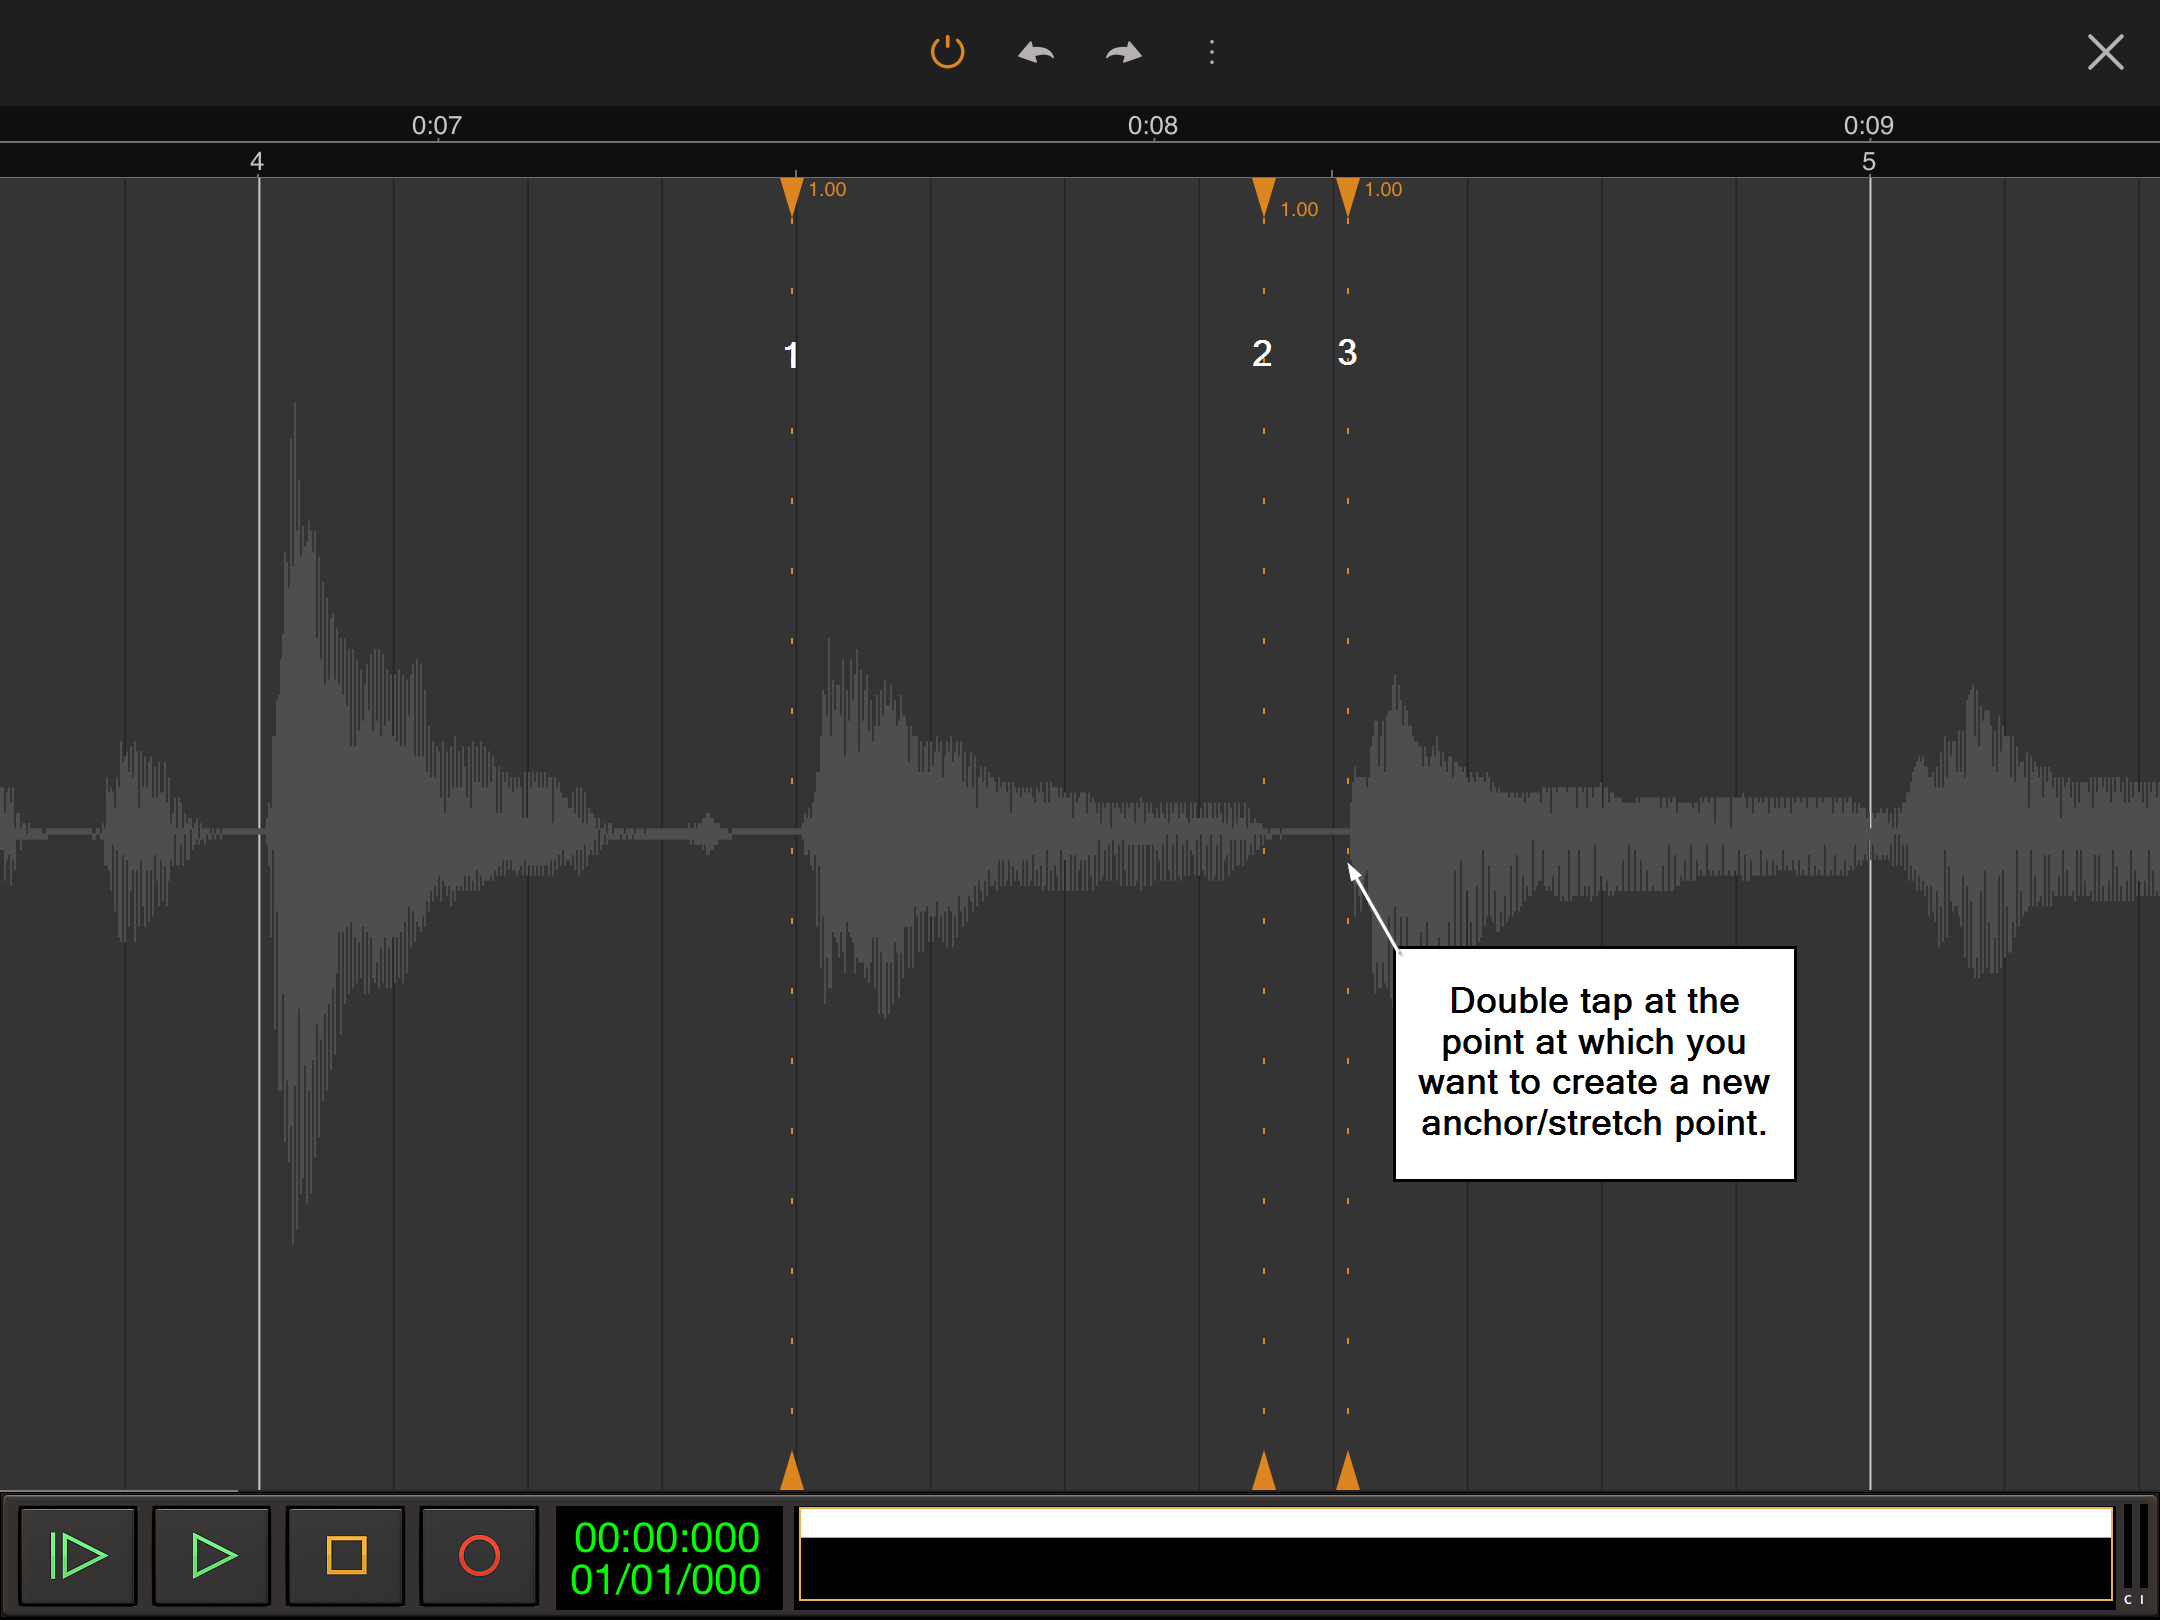
Anchor/stretch points are represented by triangular orange markers at the top and bottom of the waveform display area with a dotted yellow line running between them to indicate their position throughout the display.
In the screenshot above, three anchor/stretch points have been placed. Number 1 at the beginning of a section of audio represented in light gray; number 2 at the end of that section of audio and number 3 at the beginning of the next peak in the audio waveform.
As mentioned above, anchors and stretch points are essentially the same thing, the difference being that the stretch point is between two anchor points and can therefore be used to initiate a stretch from that point whilst the overall stretching is constrained between the two anchor points. A such, in the screenshot above, you can see how -
Number 1 is an anchor for number 2.
Number 1 is a stretch point using the beginning of the audio clip and number 2 as anchors.
Number 2 is an anchor for numbers 1 and 3.
Number 2 is a stretch point using numbers 1 and 3 as anchors.
Number 3 is an anchor for number 2.
Number 3 is a stretch point using number 2 and the end of the audio clip as anchors.
After you have placed some anchor/stretch points you can begin to time stretch your audio as seen in the next screenshot.
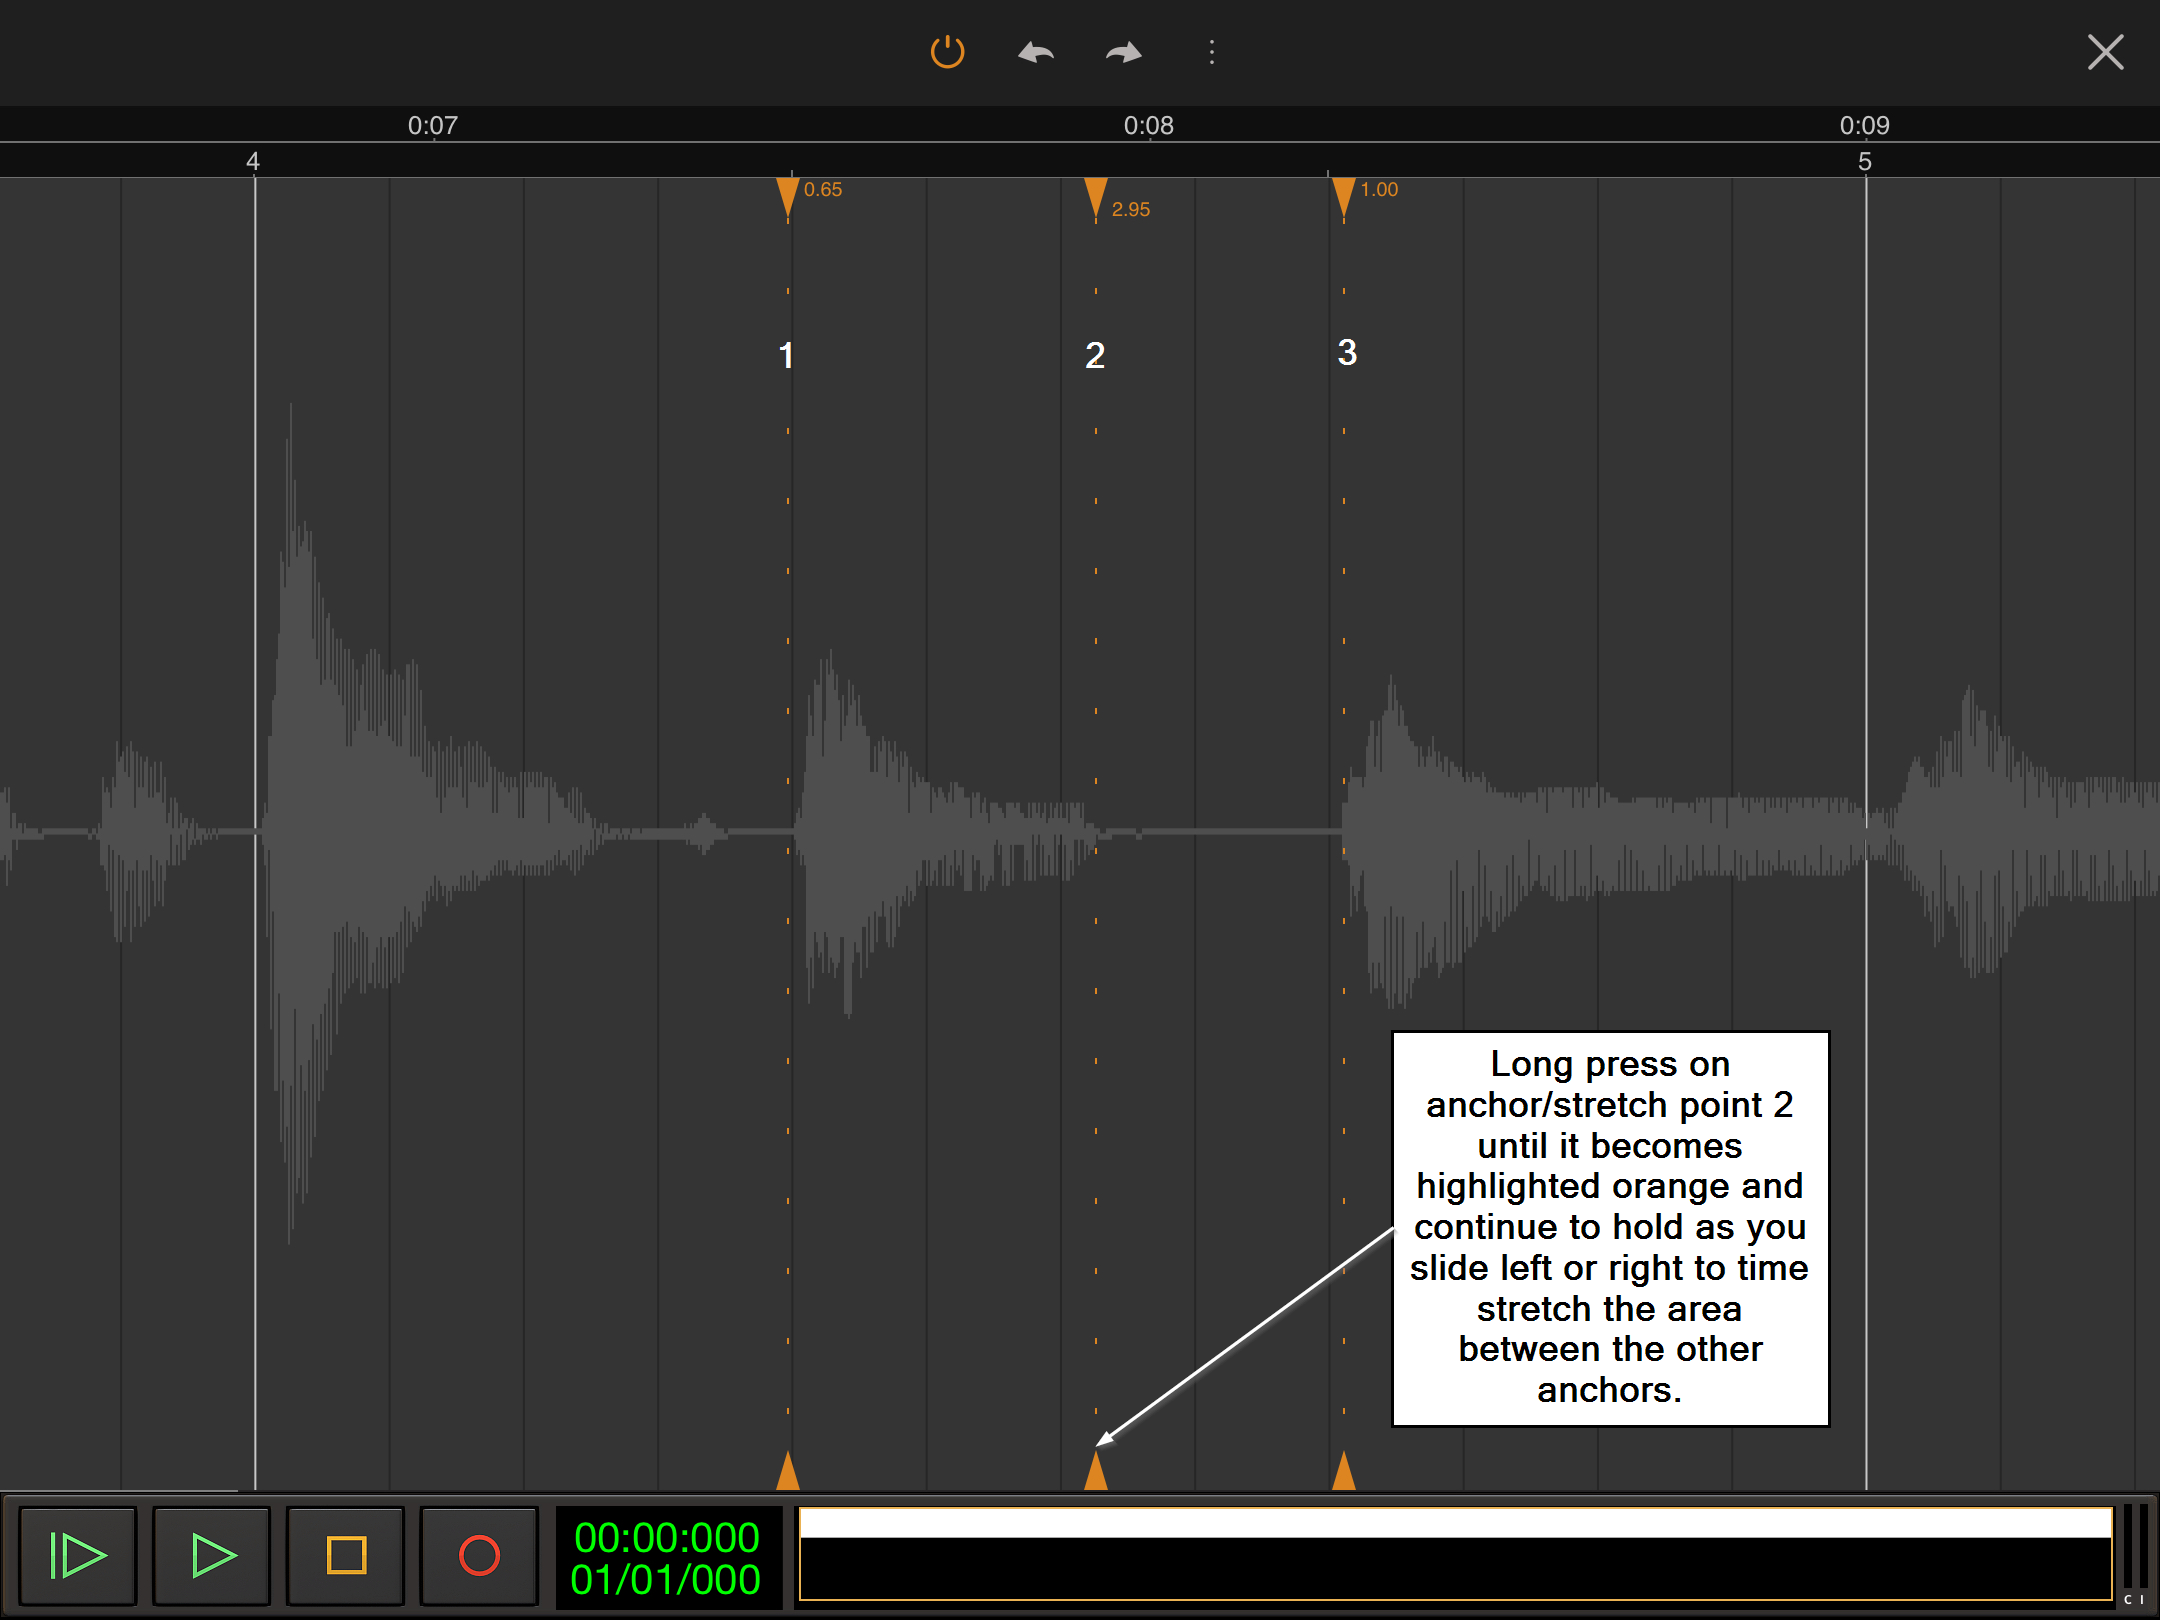
To use a stretch point, simply long press on it until its dotted vertical line becomes a solid orange line and continue to hold as you slide left or right to shrink/stretch the audio between the anchor points from the position of the stretch point.
In the screenshot above, anchor/stretch point number 2 has been slid to the shortening the duration of the audio between 1 and 2 and increasing the duration of the very quiet section of audio between 2 and 3.
At this point it is worth reiterating the note above. Real time time stretching is a very CPU intensive process so the stretch factor in Vocal Tune Studio is limited to between 0.33x and 3.0x the original duration. The current stretch factor used for each section to the right of an anchor/stretch point is displayed next to the anchor/stretch points at the top of the display.
The result of sliding anchor/stretch point number 2 to the right can be seen below.

In the screenshot above, anchor/stretch point number 2 has been long pressed until its vertical line has become a solid orange line and, whilst continuing to hold, slid to the right. This has increased the duration of the audio between anchor/stretch points 1 and 2 and shortened the duration of the very quiet audio between 2 and 3.
You can add as many anchor/stretch points and apply as many stretches as as you require to achieve your goals within your audio clip. Remember you can remove individual anchor/stretch points by immediately using the Undo ![]() function or by double tapping on them again. To move back to the Audio Evolution Mobile Arranger Screen, tap the Close
function or by double tapping on them again. To move back to the Audio Evolution Mobile Arranger Screen, tap the Close ![]() button. This will not remove your edits within Vocal Tune Studio Time only mode and you can return to its interface by once again double tapping the audio clip on the Audio Evolution Mobile timeline or by using its Clip Options as described above. As also stated above, you can reset your audio and remove all anchors without leaving Vocal Tune Studio using the Remove all stretch points option available via the Three Dot Button
button. This will not remove your edits within Vocal Tune Studio Time only mode and you can return to its interface by once again double tapping the audio clip on the Audio Evolution Mobile timeline or by using its Clip Options as described above. As also stated above, you can reset your audio and remove all anchors without leaving Vocal Tune Studio using the Remove all stretch points option available via the Three Dot Button ![]() and you can completely remove the effects of Vocal Tune Studio and exit its interface using the Remove time correction option found in the same place. Both of those options cannot be undone so please use with caution.
and you can completely remove the effects of Vocal Tune Studio and exit its interface using the Remove time correction option found in the same place. Both of those options cannot be undone so please use with caution.