The Range Mode
The Range mode button ![]() on the Arranger screen allows you to turn the track edit Range mode on and off. When Range mode is on, you can use your finger to select a time range within one track or across multiple tracks. With Range mode on, touch and hold/slide to the right (or left) on the selected track to select the range, shown in blue. If you want to select a range across multiple tracks, also slide down (or up) to include those tracks in the range selection as you do so. Don't forget about the Grid
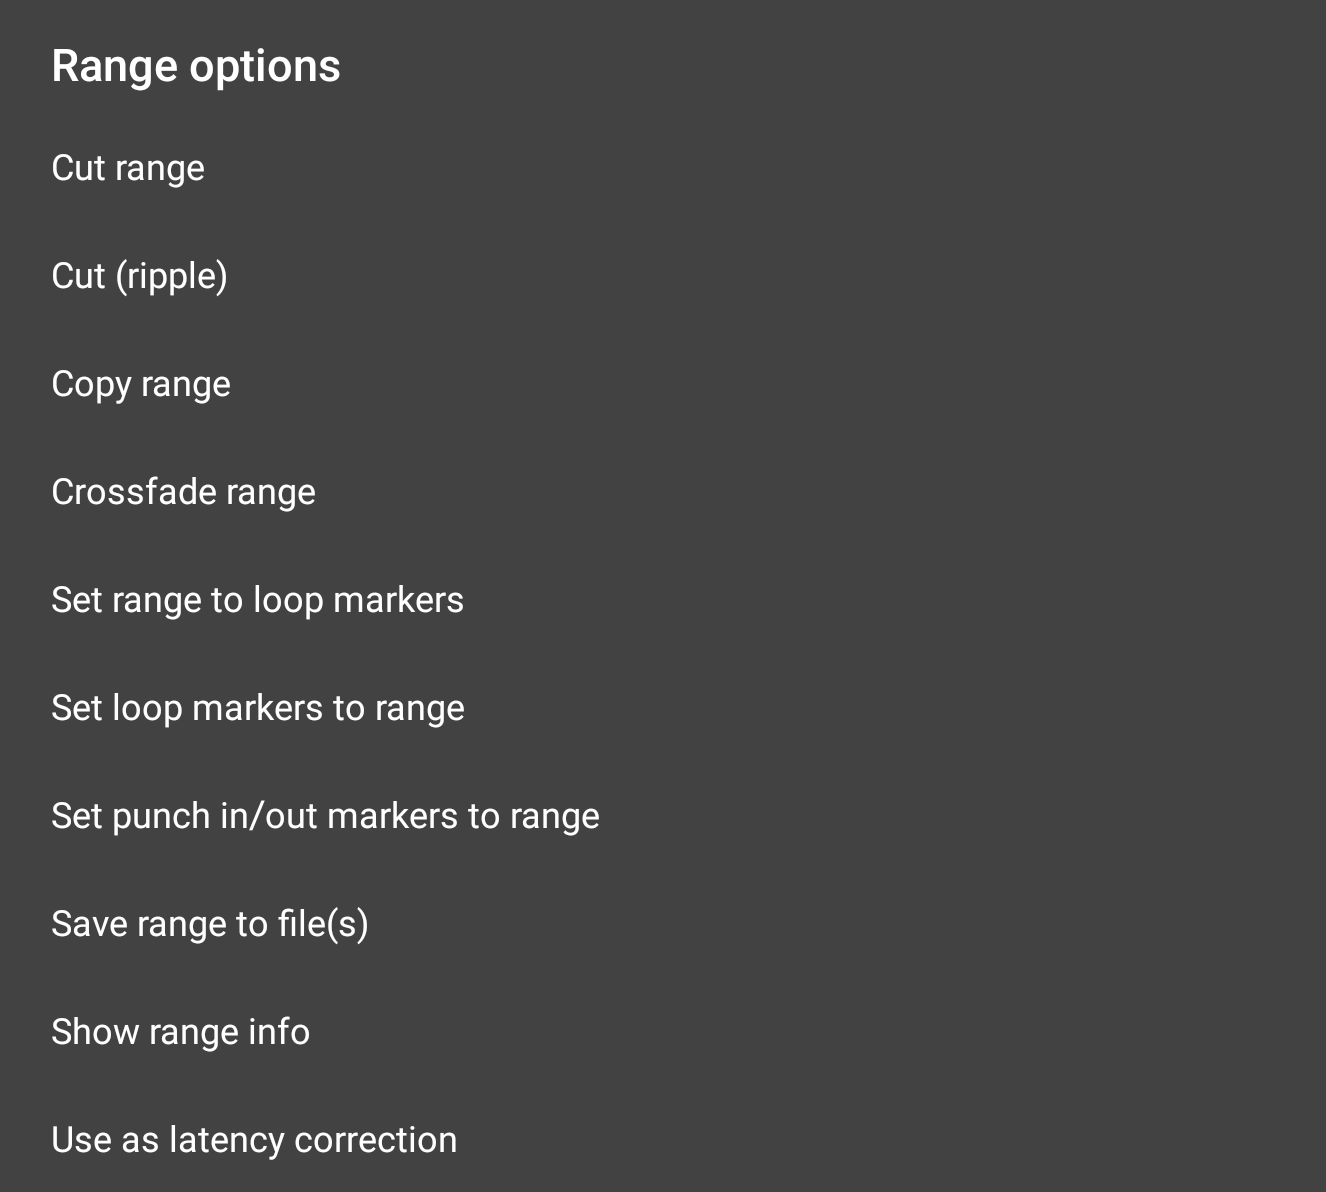
on the Arranger screen allows you to turn the track edit Range mode on and off. When Range mode is on, you can use your finger to select a time range within one track or across multiple tracks. With Range mode on, touch and hold/slide to the right (or left) on the selected track to select the range, shown in blue. If you want to select a range across multiple tracks, also slide down (or up) to include those tracks in the range selection as you do so. Don't forget about the Grid ![]() and its snap-to functionality if you want to set the Range to exact increments of the tempo. Once the selection is made, should you need to adjust it, press and hold near the edge of the blue range selection and slide to reposition that edge. As always, zoom in for greater accuracy. Tap once outside of the range selection to deselect it completely. Tap once within the selected blue Range to open the Range Options seen here (zoom in so that the Range is larger on your screen before you tap on it if this doesn't happen).
and its snap-to functionality if you want to set the Range to exact increments of the tempo. Once the selection is made, should you need to adjust it, press and hold near the edge of the blue range selection and slide to reposition that edge. As always, zoom in for greater accuracy. Tap once outside of the range selection to deselect it completely. Tap once within the selected blue Range to open the Range Options seen here (zoom in so that the Range is larger on your screen before you tap on it if this doesn't happen).
Cut range removes the selected range from the timeline AND copies it to the clipboard, allowing you to paste it elsewhere. There are basically two ways to paste the copied range: one is to long-tap on the track and location you wish to paste. A pop-up menu will be displayed with two paste options. The other way is to use the Paste ![]() button: to select the track to paste onto, if different from the currently selected track, select the track by tapping on it once. Then use the Time Marker
button: to select the track to paste onto, if different from the currently selected track, select the track by tapping on it once. Then use the Time Marker ![]() to define the point at which the copied range should be pasted and press the Paste button. If the location specified already contains content, you will be asked if you'd like to Paste or Paste (insert). Selecting Paste will 'remove' (the original content is still there if you use the Clip Trimming Handles to trim the original clips) the content underneath the content pasted. Selecting Paste (insert) will insert your copied content at the point specified and shift everything originally after that point to the right so it is now heard after the inserted content.
to define the point at which the copied range should be pasted and press the Paste button. If the location specified already contains content, you will be asked if you'd like to Paste or Paste (insert). Selecting Paste will 'remove' (the original content is still there if you use the Clip Trimming Handles to trim the original clips) the content underneath the content pasted. Selecting Paste (insert) will insert your copied content at the point specified and shift everything originally after that point to the right so it is now heard after the inserted content.
You can also cut the selected range and paste it to the clipboard without opening these Range options using the Cut ![]() button on the Arranger Screen, which will then give you the option to cut or cut (ripple), therefore including all of the functionality found through these options.
button on the Arranger Screen, which will then give you the option to cut or cut (ripple), therefore including all of the functionality found through these options.
NOTES. As the Range mode can select a range across many tracks, if multiple tracks are included in the range, and copied and pasted, the 'multiple track range' will be pasted starting at the selected point on the track selected and the rest of the tracks in the range pasted accordingly to the tracks below it. If not enough tracks exist to accommodate all of the tracks in the range, new tracks will automatically be created as required.
Audio cannot be pasted onto MIDI tracks and vice versa, therefore the process just described will be automatically canceled if such incompatibilities would occur.
Cut (ripple) removes the range from the timeline, copies it to the clipboard AND shifts everything to the right of the cut range to the left by an amount equal to the length of the cut range. Thus, the range will have been removed will and everything else on the track/s will have been shifted to perfectly fill the gap that would have otherwise been left.
Copy range copies the selected range to the clipboard, ready to be pasted elsewhere. You can also copy the selected range to the clipboard without opening these Range options using the Copy ![]() button on the Arranger Screen.
button on the Arranger Screen.
Crossfade range applies a crossfade to the selected range. A crossfade fades out the signal of the first source as it simultaneously fades in the signal from a second source as long as there's enough audio data present in both sources to do so. As has been mentioned throughout this manual, when clips are trimmed in Audio Evolution Mobile, the original content remains 'hidden' from view, ready to be revealed again by using the Clip Trimming Handles to trim the clip once more. Applying a crossfade to a selected range uses this hidden audio data - indeed, it requires it and cannot be performed without it. So, as an example of this and of when the function might be used, imagine you've made a Punch In/Out recording to replace a section of a recording you were unhappy with. Since Punch In/Out recordings are actually made from the point of the Time Marker ![]() when the Record
when the Record ![]() button is pressed, and then automatically trimmed to exactly match the Punch In and Out points
button is pressed, and then automatically trimmed to exactly match the Punch In and Out points ![]() , this means that there is hidden audio data outwith the confines of the visible clip. This means it will be possible to perform the crossfade range function. Since it is best practice to start playing along with the track before reaching the Punch In point, selecting a small range across the beginning of the Punch In/Out clip and the end of the original clip next to it, and then selecting Crossfade range from these Range Options can give you a smoother transition from the original recording into the Punch In/Out section if necessary. Likewise, if the Punch In/Out clip sits completely within the original recording, this could be performed again at the end of the Punch In/Out clip and the start of the original recording.
, this means that there is hidden audio data outwith the confines of the visible clip. This means it will be possible to perform the crossfade range function. Since it is best practice to start playing along with the track before reaching the Punch In point, selecting a small range across the beginning of the Punch In/Out clip and the end of the original clip next to it, and then selecting Crossfade range from these Range Options can give you a smoother transition from the original recording into the Punch In/Out section if necessary. Likewise, if the Punch In/Out clip sits completely within the original recording, this could be performed again at the end of the Punch In/Out clip and the start of the original recording.
Set range to loop markers allows you to easily set the start and end points of the range to the current position of the loop markers ![]() . The Loop
. The Loop ![]() mode doesn't need to be active for this function to be possible.
mode doesn't need to be active for this function to be possible.
Set loop markers to range allows you to easily set the loop markers to the beginning and end of the selected range and activate Loop mode if it's not already active.
Set punch in/out markers to range allows you to set the Punch In/Out markers ![]() to the beginning and end of the selected range and activate Punch In/Out recording mode if it's not already active. Don't forget to then turn the Range mode off if you want to select a different track from the currently selected one to Punch In/Out record onto.
to the beginning and end of the selected range and activate Punch In/Out recording mode if it's not already active. Don't forget to then turn the Range mode off if you want to select a different track from the currently selected one to Punch In/Out record onto.
Save range to file(s) allows you to save the audio in the selected range to its own separate audio file in the Project's Samples folder on your device. If your range covers more than one track, the audio covered by the range in each track will be individually saved to its own audio file. You will be given the chance to individually name the audio file(s) as they are saved to the Samples folder. The audio saved is not rendered but is the raw audio in the range meaning it does not contain any processing or effects other than those previously applied (and rendered) to the audio itself using the audio Clip/Track options. Because no rendering is taking place in this process, this function will not work with MIDI tracks.
Show range info shows you the precise start point, end point and duration of the selected range in both seconds and frames. This information is also displayed (in seconds) in the Playback Timer Display whenever a range is selected.
NOTE. You can also Paste when in Range mode by either positioning the Time Marker ![]() and pressing the Paste
and pressing the Paste ![]() button or by using the method described here.
button or by using the method described here.