The FX Grid Screen
You access a track's FX Grid by pressing the FX Grid button ![]() on its Channel Strip. This opens the FX Grid screen seen here.
on its Channel Strip. This opens the FX Grid screen seen here.
NOTES. Some effects will also display an Info ![]() button at the top of the display which, when pressed, will give you a brief description of the effect and its features.
button at the top of the display which, when pressed, will give you a brief description of the effect and its features.
The Compressor and the Toneboosters Compressor will also display a Sidechain ![]() button at the top of the display. For details about this, please see here.
button at the top of the display. For details about this, please see here.
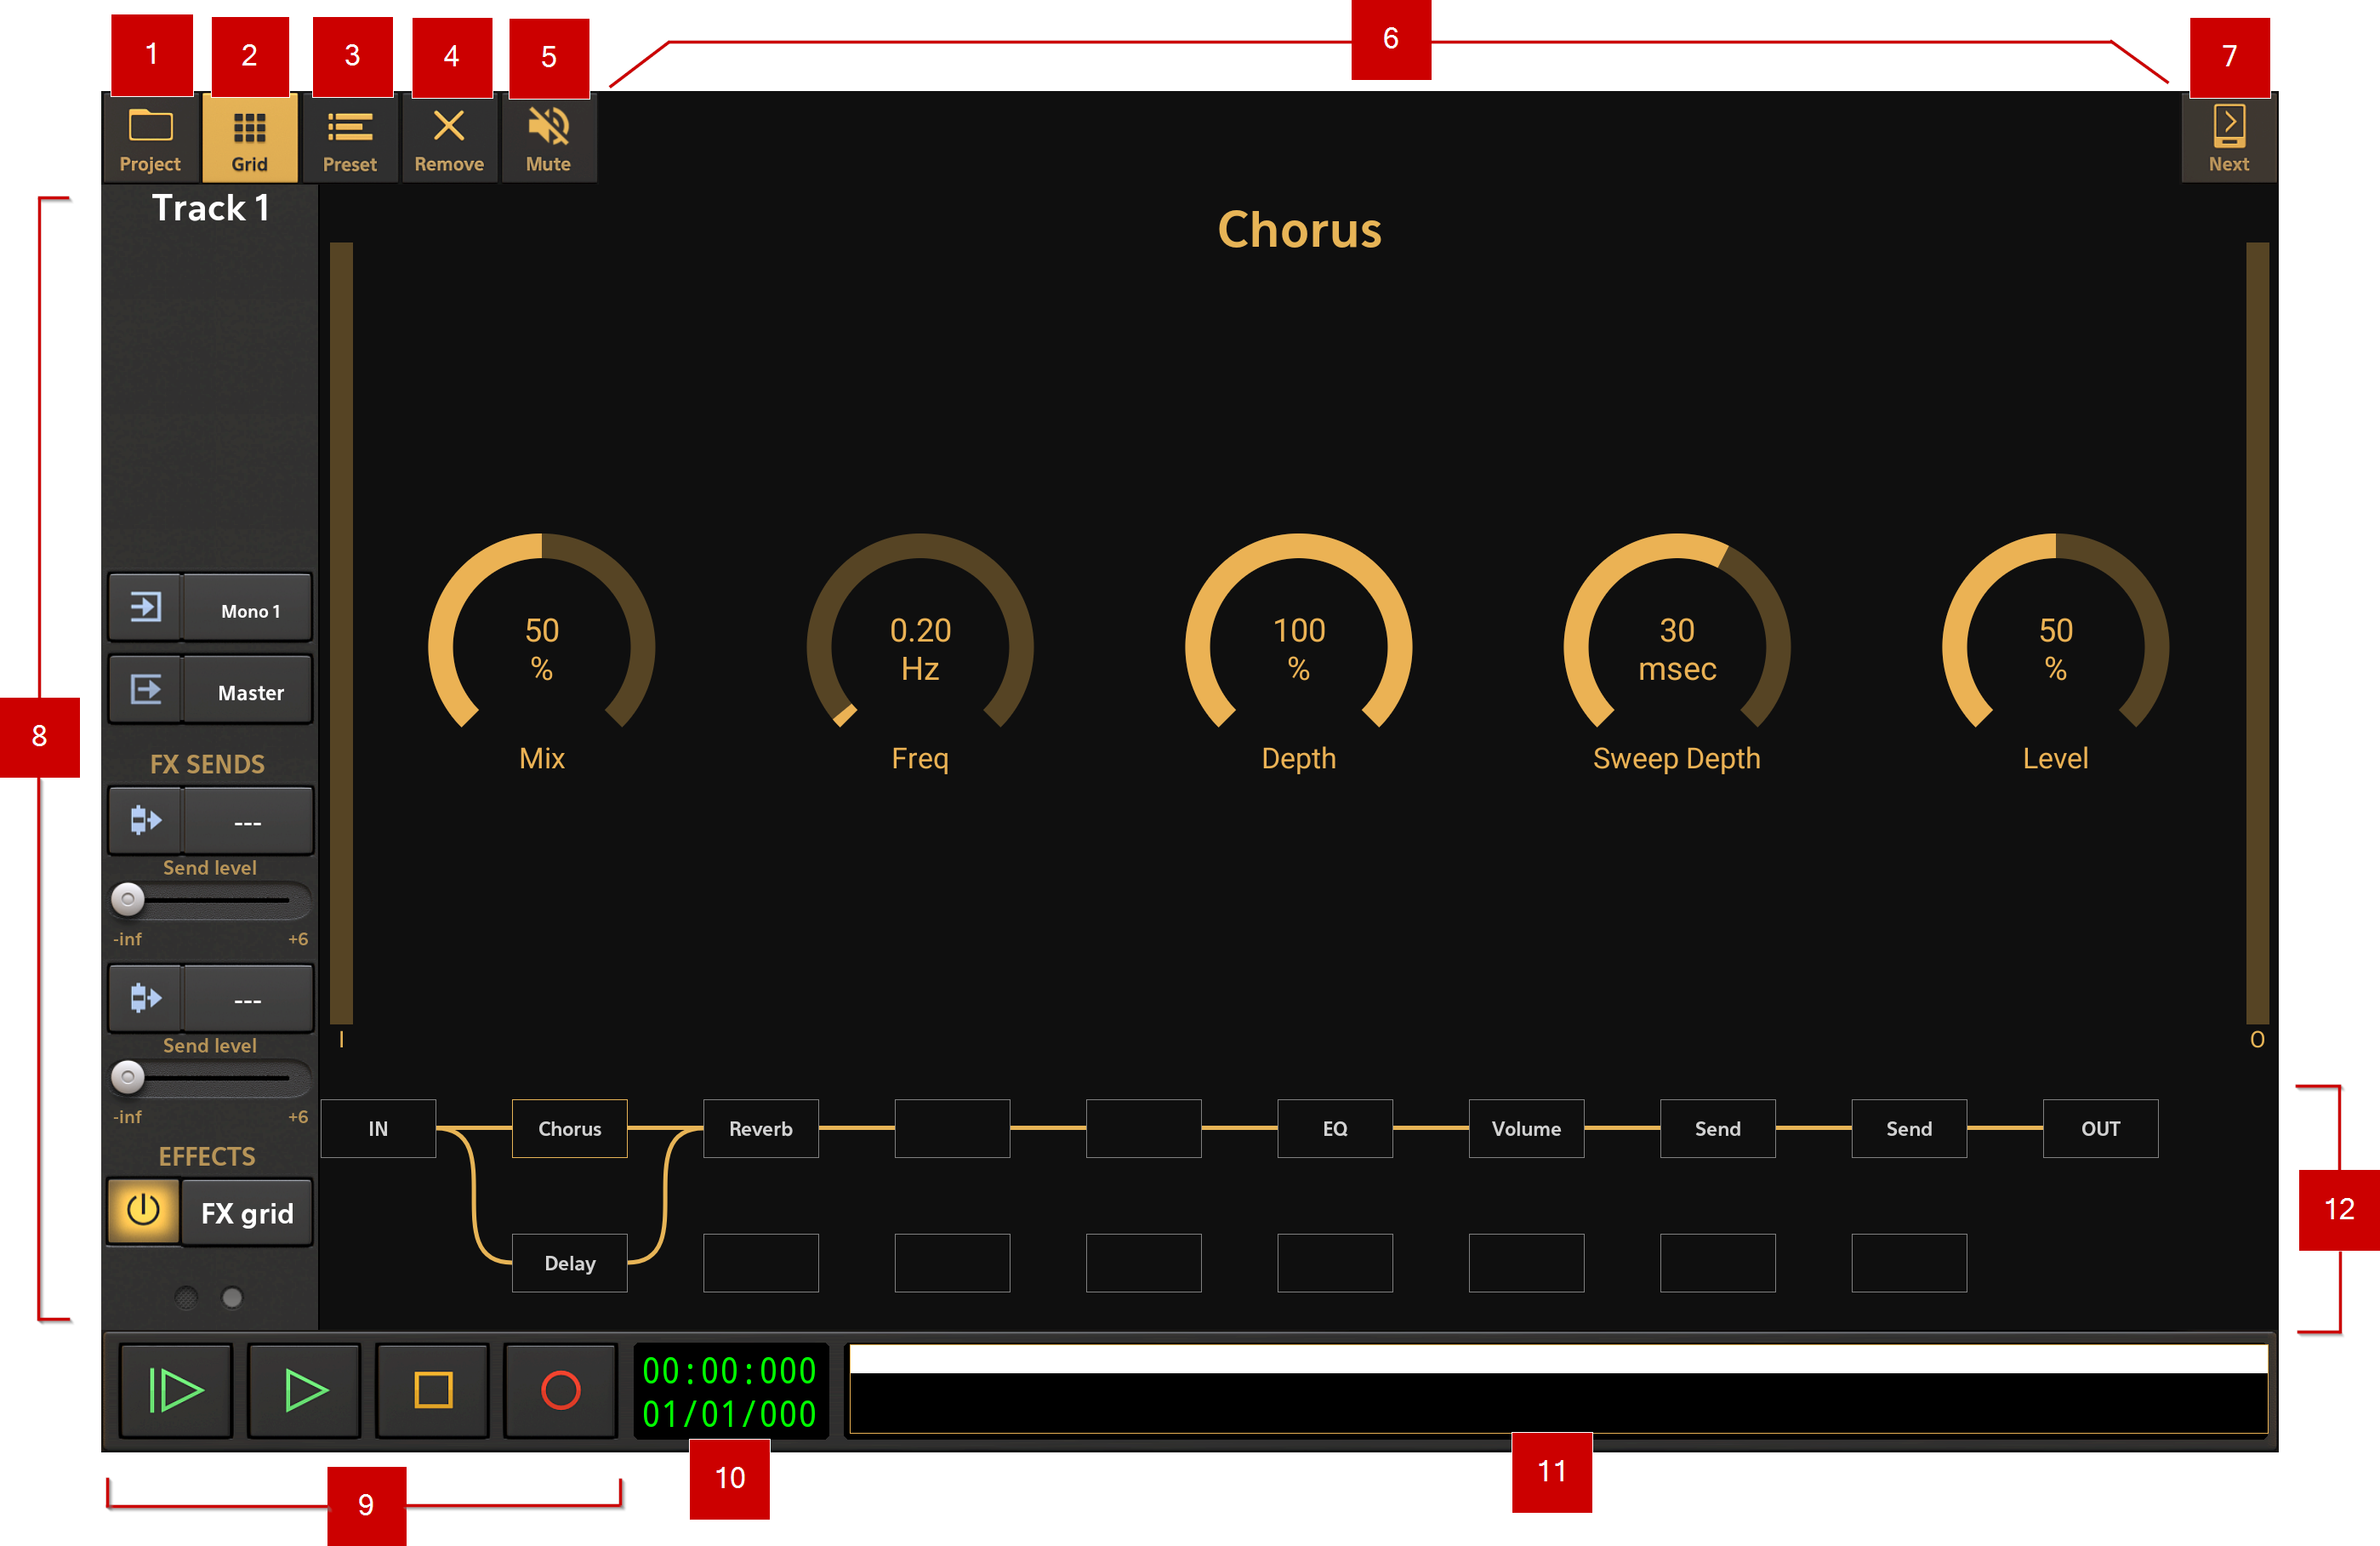
1 Project options button ![]() . Pressing this button opens the Project Options panel. This is where you can set up, load and save your projects, import audio and MIDI, export your tracks and final mixdown and access the cloud sync backup feature. For more information see here.
. Pressing this button opens the Project Options panel. This is where you can set up, load and save your projects, import audio and MIDI, export your tracks and final mixdown and access the cloud sync backup feature. For more information see here.
2 Show/Hide Grid ![]() button. This button allows you to show or hide the FX Grid. This can be especially useful on devices with smaller screens when you want the display of the effect interface to be as large as possible as you alter its parameters.
button. This button allows you to show or hide the FX Grid. This can be especially useful on devices with smaller screens when you want the display of the effect interface to be as large as possible as you alter its parameters.
3 Preset ![]() button. Pressing this allows you to save presets for the selected effect (highlighted in yellow on the grid when selected), load your saved presets, as well as delete presets. Most of the Toneboosters effects come with factory presets as well, though please be aware that the factory presets for the Version 4 (V4) effects can be accessed from within the effect interface itself which is why they don't have a Preset button.
button. Pressing this allows you to save presets for the selected effect (highlighted in yellow on the grid when selected), load your saved presets, as well as delete presets. Most of the Toneboosters effects come with factory presets as well, though please be aware that the factory presets for the Version 4 (V4) effects can be accessed from within the effect interface itself which is why they don't have a Preset button.
4 Remove ![]() button. Pressing this removes the selected effect from the grid completely. There is no confirmation dialog so please use with caution.
button. Pressing this removes the selected effect from the grid completely. There is no confirmation dialog so please use with caution.
5 Mute ![]() button. When activated, this temporarily mutes/disables the selected effect as if it weren't present in the effects chain. The effect's block on the grid will have a dotted line boundary to indicate it has been muted.
button. When activated, this temporarily mutes/disables the selected effect as if it weren't present in the effects chain. The effect's block on the grid will have a dotted line boundary to indicate it has been muted.
NOTE. You can also turn all user added effects (i.e. not including those which are present on the grid by default) on and off using the User added FX On/Off ![]() button on the track's Channel Strip.
button on the track's Channel Strip.
6 Effect Interface Display. The main area on this screen is used to display the selected effect's parameters/controls. These are the controls you use to fine tune the effect and achieve the sound your after.
7 Next ![]() button. Pressing the Next button returns you to the Arranger Screen. Please be aware though, that pressing the Next button again after that will not return you to the FX Grid Screen: to enter this screen again, please press the FX Grid button
button. Pressing the Next button returns you to the Arranger Screen. Please be aware though, that pressing the Next button again after that will not return you to the FX Grid Screen: to enter this screen again, please press the FX Grid button ![]() on the track's Channel Strip as before.
on the track's Channel Strip as before.
8 The track's Channel Strip. This is the track's Channel Strip, discussed here. Channel strips have their functions displayed over several pages; the smaller the device screen, the more pages required. Use the small gray circular buttons at the bottom of the channel strip to select different pages.
Initially, the FX Grid will be empty except for the default EQ, Volume and two Send blocks. These are the functions which are also represented on the track's channel strip as described here (EQ), here (Volume) and here (Send). They can be moved but cannot be deleted.
The last thing, particularly relevant to the FX Grid, to mention again here is the User added FX On/Off ![]() button. This can be used to turn all user added effects (i.e. not including those which are present on the grid by default, as just mentioned) on and off.
button. This can be used to turn all user added effects (i.e. not including those which are present on the grid by default, as just mentioned) on and off.
9 Playback Transport Controls ![]() . These are the controls for starting and stopping playback and recording.
. These are the controls for starting and stopping playback and recording.
![]() Start Playback from the beginning of the project.
Start Playback from the beginning of the project.
![]() Playback from the position of the Time Marker (The green marker
Playback from the position of the Time Marker (The green marker ![]() in the Timeline/Marker Display).
in the Timeline/Marker Display).
![]() Stop Playback or Recording.
Stop Playback or Recording.
![]() Record.
Record.
10 Playback Timer Display ![]() . This display shows the current time during playback and recording. When playback and recording are stopped it displays the current position of the Time Marker (the green marker
. This display shows the current time during playback and recording. When playback and recording are stopped it displays the current position of the Time Marker (the green marker ![]() shown in the Timeline/Marker Display). Tapping the Playback Time Display once will open the Tempo options for the current project. The top counter shows the time in minutes, seconds and milliseconds. The bottom counter shows the time in bars (or measures), beats and ticks (the resolution is 192 ticks per beat) according to the project Tempo settings.
shown in the Timeline/Marker Display). Tapping the Playback Time Display once will open the Tempo options for the current project. The top counter shows the time in minutes, seconds and milliseconds. The bottom counter shows the time in bars (or measures), beats and ticks (the resolution is 192 ticks per beat) according to the project Tempo settings.
11 Project Overview / Scrollpad ![]() . The Project Overview/Scrollpad is a very useful feature which displays a miniature view of the entire project and allows you to quickly move within the timeline. Since you can't see the Timeline on the FX Grid Screen, this can be particularly useful as sliding your finger across the Scrollpad allows you to move through the project and position the Time Marker
. The Project Overview/Scrollpad is a very useful feature which displays a miniature view of the entire project and allows you to quickly move within the timeline. Since you can't see the Timeline on the FX Grid Screen, this can be particularly useful as sliding your finger across the Scrollpad allows you to move through the project and position the Time Marker ![]() , ready for playback from that point. True, you won't be able to see the Time Marker, but you will be able to see its position indicated on the Playback Timer Display.
, ready for playback from that point. True, you won't be able to see the Time Marker, but you will be able to see its position indicated on the Playback Timer Display.
12 The FX Grid. This is grid with its blocks, each of which can contain an effect (and extra columns can be added, horizontally, should you need even more blocks). This is where you create your effects chain for the track. As already mentioned in the previous section, you can create either serial or parallel effect chains. The following section will explain how to use the FX Grid.