Importing Audio and MIDI
There are several ways to import audio and MIDI into Audio Evolution Mobile: by using Audio Evolution Mobile's built in browser, the Files app, using a 'Open with' command from another app, the Media server and AudioShare.
NOTE. You can also directly import audio Sample Loops, with time stretching and pitch shifting to match the current project if they have been correctly named. This is covered in its own section next.
Importing from within Audio Evolution Mobile
Every app has its own private space on your device. You can copy files to this space using the Files app for example. Once they are in the app's private space, you can import audio and MIDI files into Audio Evolution Mobile using the app's own file browser (which is limited to browse in this private space). Another use is if you want to import an audio file from a different project. To access the file browser, you need to press the Project ![]() button on the Arranger Screen. From the menu which opens, please select the 'File browser' option at the top. This will open Audio Evolution Mobile's file browser which will allow you to navigate to the place where your audio and MIDI files are being stored on your device. From there it is simply a case of tapping on the file name in the browser to import.
button on the Arranger Screen. From the menu which opens, please select the 'File browser' option at the top. This will open Audio Evolution Mobile's file browser which will allow you to navigate to the place where your audio and MIDI files are being stored on your device. From there it is simply a case of tapping on the file name in the browser to import.
You will notice that the browser has two buttons at the top and a text which identifies the currently displayed location.
The first ![]() button is a simple 'Move directory/folder up' button, common to all browsers, to allow you to navigate through the app's private directory space.
button is a simple 'Move directory/folder up' button, common to all browsers, to allow you to navigate through the app's private directory space.
The home ![]() button is a shortcut button which will take you immediately to the Samples folder of your current project.
button is a shortcut button which will take you immediately to the Samples folder of your current project.
You will also see that the browser has an option to Insert at Time Marker. This option only applies when importing a single audio file and will be ignored when importing a MIDI file. Selecting this will import your audio file onto the currently selected track at the current position of the green Time Marker ![]() . When doing this, it is important to note that when importing audio onto a track which already contains audio clips, it must have the same number of audio channels as the rest of the clips on the track: stereo audio tracks can only contain stereo (2 audio channels) clips and mono audio tracks can only contain mono (1 audio channel) clips. It is also worth noting that, if importing your audio at the Time Marker onto an existing track would cause the imported clip to overlap a clip already present on the track, the clip already present will be trimmed to avoid the two audio clips overlapping. All of the audio of the clip already present is still there though: just use the 'Clip Trimming Handles' to pull out and reveal the audio which was hidden by the resizing process if necessary.
. When doing this, it is important to note that when importing audio onto a track which already contains audio clips, it must have the same number of audio channels as the rest of the clips on the track: stereo audio tracks can only contain stereo (2 audio channels) clips and mono audio tracks can only contain mono (1 audio channel) clips. It is also worth noting that, if importing your audio at the Time Marker onto an existing track would cause the imported clip to overlap a clip already present on the track, the clip already present will be trimmed to avoid the two audio clips overlapping. All of the audio of the clip already present is still there though: just use the 'Clip Trimming Handles' to pull out and reveal the audio which was hidden by the resizing process if necessary.
By default, if the 'Insert at Time Marker' option is not selected, single audio clips - like MIDI clips and multiple audio clips - are imported onto new tracks at the beginning of the timeline.
NOTE. If you want your imported clip to be on an existing track rather than its own track, but don't want to use the 'Import at Time Marker' function, once it's imported onto its own new track, simply drag the clip to the desired track.
Tapping on the ![]() button in front of each file will open a menu with the following options:
button in front of each file will open a menu with the following options:
- Open with will open a file sharing dialog where you can select another app to send the file to, including system apps like AirDrop. As an example, if you have Dropbox installed, an option 'Save to Dropbox' would appear here as well.
- AudioShare will send the file to the AudioShare app (when installed)
- Delete will erase the selected file (warning: this cannot be undone!)
The ![]() button lets you preview (pre-listen) to the audio file before importing onto a track.
button lets you preview (pre-listen) to the audio file before importing onto a track.
Importing using the Files app
If you have audio or MIDI files in another app on your device or on one of the Locations that the Files app supports (like iCloud Drive, Dropbox, etc.) you can browse to the file you wish to copy, long-tap it, select Copy from the pop-up menu, browse to the Audio Evolution folder (press the top-left button and browse all the way up to 'On My iPad'), select Projects, then the project folder of the project where you wish to copy to, then select Samples, long-tap on an empty space and select 'Paste'.
A quicker way would be to select 'Share' from the pop-up menu and select the Audio Evolution icon from the top row of buttons in the dialog that appears. Then the app will open and insert the audio file on a new track in the currently opened project.
Importing directly from other apps
In many apps, you will find a 'Share' or 'Send to' button that uses the standard iOS mechanisms to send files between apps. After pressing such button, a standard iOS dialog will open where you can select the Audio Evolution icon from the top row of buttons. After that, the app will open and insert the audio file on a new track in the currently opened project.
Importing and exporting using Media Server
For this option, you need to have a WiFi connection. If the files you wish to import are located on another device, like a PC or Mac, you can either use a cloud service like Dropbox or connect directly to a file server that is run from inside the app. To use this function, press the Project ![]() button on the Arranger screen and select Media server. A dialog will open asking you whether you want to use WebDAV or a web browser to access the file server. Normally, you would keep WebDAV selected and just press Ok:
button on the Arranger screen and select Media server. A dialog will open asking you whether you want to use WebDAV or a web browser to access the file server. Normally, you would keep WebDAV selected and just press Ok:
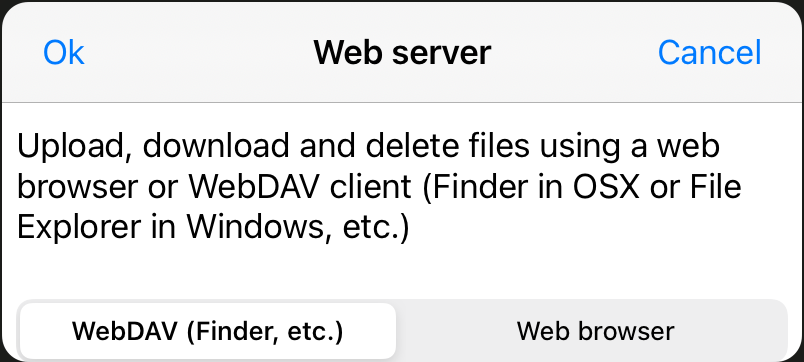
WebDAV is a protocol that is directly supported by Finder on MacOSX and the File Explorer Windows. This means that the IP address that the app will give can be directly entered into Finder or the File Explorer, and it will show the app's private file system space. In this way, you can simply perform any regular file manager operation like browse, copy and delete. You could for instance copy one or all projects to your desktop computer. If you select Web browser, then you can browse to the app's private file system space using a web browser, but the options are more limited.
After pressing Ok, the app will display the file server's IP address:
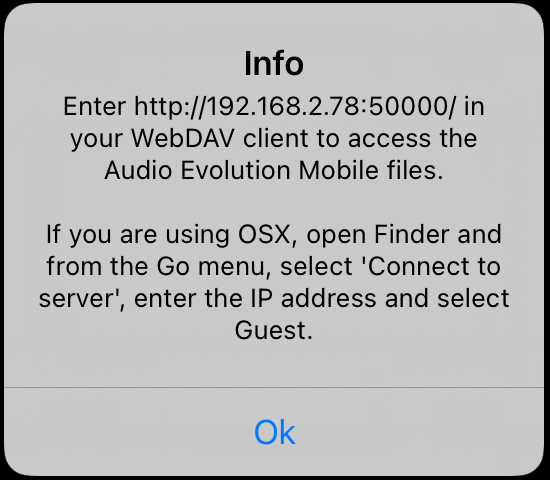
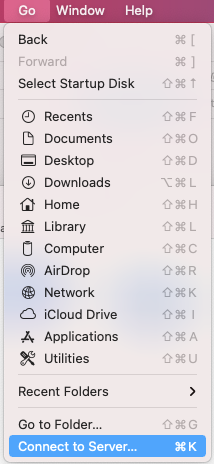
Before pressing Ok, go to the device (PC / Mac / etc) where you wish to copy files from/to (or write down the http address since you will need this a few steps later). As an example, we open Finder on the Mac, select Go in the Finder menu and select Connect to server:
In the next dialog, you would enter the IP address as displayed earlier in the app:
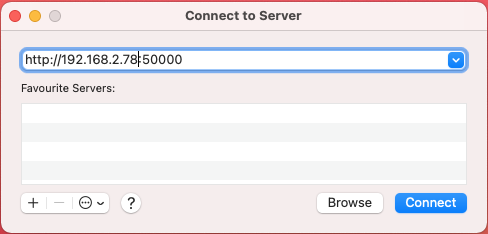
On Windows, you would type this address directly in the File Explorer's address bar. After pressing Connect (Finder) or pressing enter (Windows File Explorer), the contents of the app's private file system space will be displayed like any other directory on your device. On OSX, you may be asked for a password which you can leave empty and just press Ok. You can now copy files to the app (import) or copy files or complete project directores to your PC or Mac (for instance as back-up or processing further on desktop applications).
Importing using AudioShare
If you have AudioShare installed you can importing audio and MIDI files by pressing the Project ![]() button on the Arranger screen and selecting Import from AudioShare. After AudioShare has started, you can select files from the Library on the left side and after pressing the button Import into app, the selected file will be imported onto a new track in Audio Evolution Mobile.
button on the Arranger screen and selecting Import from AudioShare. After AudioShare has started, you can select files from the Library on the left side and after pressing the button Import into app, the selected file will be imported onto a new track in Audio Evolution Mobile.
Notes on importing Audio
If you import an audio track into a project which doesn't already contain any audio clips, and the audio clip you want to import has a different sample rate than the project sample rate, you will be asked whether you want to resample the clip being imported to the project sample rate or import the clip at its original sample rate and change the project's sample rate to match it. Once an audio clip exists in the project, the project's sample rate is fixed and cannot be changed. As such, all audio imported after that point will be resampled to match that sample rate.
Regarding audio formats, WAV files, AIFF files and FLAC files will be imported without being converted and can co-exist in a project. All other supported audio formats, such as MP3 files, will be converted to WAV format upon import to ensure maximum performance.
As already mentioned earlier, if importing audio onto a track which already contains audio clips, it must have the same number of audio channels as the rest of the clips on the track: stereo audio tracks can only contain stereo (2 audio channels) clips and mono audio tracks can only contain mono (1 audio channel) clips.
Notes on importing MIDI
MIDI files can contain more than one MIDI channel/track. What's more, there are two different ways this multi-channel information is stored depending on whether the MIDI file is a MIDI Type 1 file or a MIDI Type 0 file. MIDI Type 1 files contain separate information for each channel. MIDI Type 0 files merge all of the channels into one track, though the MIDI channel information is still retained. Thus, if you import a MIDI Type 1 file into Audio Evolution Mobile, each channel within the file will be automatically imported onto its own track on the timeline. The content of each track will be correctly placed in relation to each other to maintain the correct timing and arrangement of the original MIDI file. If, however, you import a MIDI Type 0 file, all of the channels are combined and will be imported as a single clip on a single track on the timeline. Since the MIDI channel information is retained in the MIDI Type 0 file though, you can now use the Split MIDI channels function to have each MIDI channel contained in the original clip onto its own track on the timeline if that's what you want.
MIDI files can also contain information identifying which instrument is to be used for playback based on the General MIDI Sound Set (https://www.midi.org/specifications-old/item/gm-level-1-sound-set). This information is stored as a Program Change number and may, or may not, be included in the MIDI file you import depending on the application which originally exported the file. This is the reason why you might find that all of your imported MIDI tracks initially have the Stereo Grand instrument, from the Default Sound Set, applied.
In order to allocate the instrument of your choice to imported MIDI tracks, simply press the instrument name ![]() in the Channel Strip to open the Instrument Selection screen. From here you can easily select the virtual instrument you want to use for that track.
in the Channel Strip to open the Instrument Selection screen. From here you can easily select the virtual instrument you want to use for that track.
NOTE. You can also manually place Program Change numbers within the Piano Roll editor, which will automatically change the instrument used for playback at that point, as long as the soundfont you are using has its instruments mapped according to the General MIDI Sound Set. If it doesn't use that mapping, you will need to experiment to find what Program Change numbers are applied to which instrument patches.