MIDI Channel Strips
The MIDI Channel Strip is different from the other types in that it does not produce audio. The MIDI events from the MIDI clips are meant to be sent to outboard MIDI equipment. They do not produce any audio inside the app.
NOTE. The MIDI channel strip functions are, like the audio channel strip's, shown over several 'pages'. The number of pages needed to cover the functions will vary depending on the size of the device screen. As such, you may not see all of the functions spread over two pages as shown here, but they will all be present nonetheless. Simply use the Page Selector at the bottom to access the different pages or, when on the Mixer Screen, move through the pages of all channel strips displayed simultaneously using the Next  button at the top left of those screens.
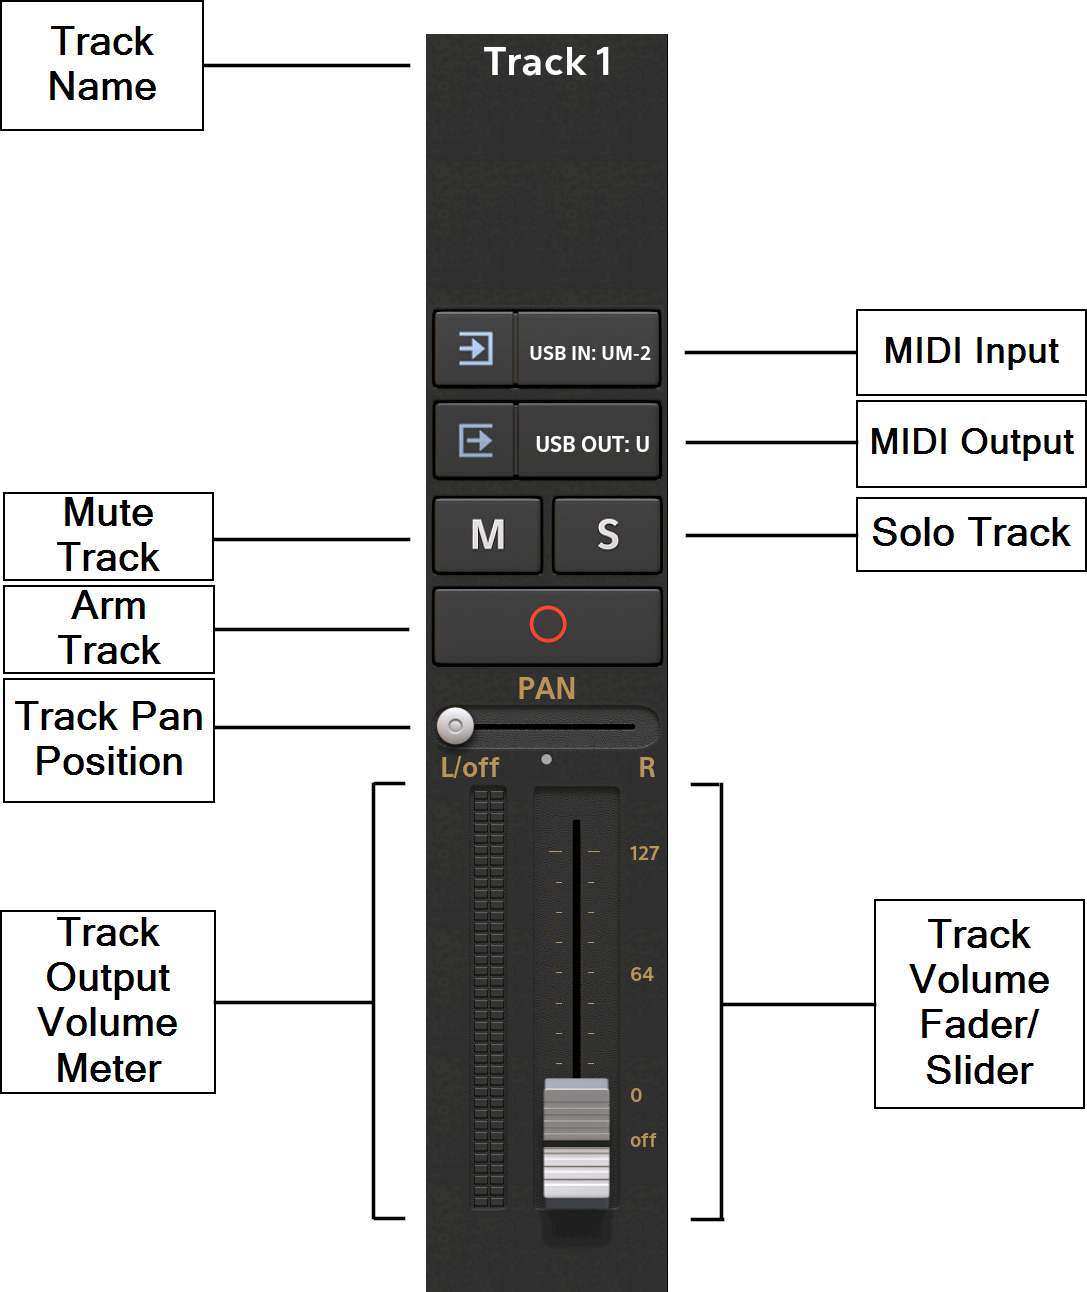
At the top of each channel strip is the Track Name ![]() . You can long-press on this display of the track name on the channel strip to open a dialog which will allow you to change the name. You can also rename your tracks using the Track Options which are accessed by long pressing in an empty area, containing no clips, of the desired track in the Timeline. Then select Rename Track and enter your chosen track name which will then be displayed at the top of tracks channel strip.
. You can long-press on this display of the track name on the channel strip to open a dialog which will allow you to change the name. You can also rename your tracks using the Track Options which are accessed by long pressing in an empty area, containing no clips, of the desired track in the Timeline. Then select Rename Track and enter your chosen track name which will then be displayed at the top of tracks channel strip.
The Mute ![]() button allows you to mute (silence) the selected track so that it is not sent to the selected MIDI output. Muting a track manually by pressing this button will light the button yellow as seen here
button allows you to mute (silence) the selected track so that it is not sent to the selected MIDI output. Muting a track manually by pressing this button will light the button yellow as seen here ![]() . Tracks will be automatically muted when another track, or tracks, have been soloed (see below). Tracks which have been automatically muted due to the soloing of other tracks, are indicated by a yellow rectangle around their Mute button like this
. Tracks will be automatically muted when another track, or tracks, have been soloed (see below). Tracks which have been automatically muted due to the soloing of other tracks, are indicated by a yellow rectangle around their Mute button like this ![]() . Long pressing a Mute button will open an Options dialog allowing you to Deactivate all mute buttons at once.
. Long pressing a Mute button will open an Options dialog allowing you to Deactivate all mute buttons at once.
The Solo ![]() button allows you to isolate the selected track (and temporarily mute all other tracks) so that it is the only one heard. You can, though, simultaneously solo as many tracks, or Groups, as you want, allowing you to hear the selection you require whilst muting the other tracks. Pressing the Solo button solos the track and lights the button green as seen here
button allows you to isolate the selected track (and temporarily mute all other tracks) so that it is the only one heard. You can, though, simultaneously solo as many tracks, or Groups, as you want, allowing you to hear the selection you require whilst muting the other tracks. Pressing the Solo button solos the track and lights the button green as seen here ![]() . Long pressing a Solo button will open an Options dialog allowing you to Deactivate all solo buttons at once.
. Long pressing a Solo button will open an Options dialog allowing you to Deactivate all solo buttons at once.
The Arm ![]() button, when active, arms the selected track to be recorded to when the Record
button, when active, arms the selected track to be recorded to when the Record ![]() button is pressed. For more information on this, see here. When 'Virtual keyboard' is selected as MIDI input, the virtual keyboard will be displayed, allowing to play and send MIDI note events to external MIDI equipment.
button is pressed. For more information on this, see here. When 'Virtual keyboard' is selected as MIDI input, the virtual keyboard will be displayed, allowing to play and send MIDI note events to external MIDI equipment.
The Track Pan Position ![]() slider will send a MIDI panning event to the selected MIDI output. Double tap the Track Pan Position control to open the Options to reset to center or to enter a value for greater precision. The slider values (for all sliders/fader controls within the channel strip) are displayed in the Playback Timer Display
slider will send a MIDI panning event to the selected MIDI output. Double tap the Track Pan Position control to open the Options to reset to center or to enter a value for greater precision. The slider values (for all sliders/fader controls within the channel strip) are displayed in the Playback Timer Display ![]() as they are changed. When the slider is positioned all the way to the left, it is in the 'Off' position (which it is set to by default). That means that no MIDI panning event is sent when starting playback or when moving the slider.
as they are changed. When the slider is positioned all the way to the left, it is in the 'Off' position (which it is set to by default). That means that no MIDI panning event is sent when starting playback or when moving the slider.
The Track Volume Output Meter ![]() displays the velocity of MIDI events in real time. You can choose between having vertical volume display/controls (shown above) or horizontal display/controls (see below in the Track Volume Fader/Slider section), to save space, in the User Interface section of the Settings. Devices with smaller screens will default to using the horizontal display/controls.
displays the velocity of MIDI events in real time. You can choose between having vertical volume display/controls (shown above) or horizontal display/controls (see below in the Track Volume Fader/Slider section), to save space, in the User Interface section of the Settings. Devices with smaller screens will default to using the horizontal display/controls.
The Track Volume Fader/Slider ![]() allows you to adjust the volume level of the track within the overall mix. When the fader is positioned all the way down, it is in the 'Off' position (which it is set to by default). That means that no MIDI volume event is sent when starting playback or when moving the slider. In any other position, the app will send a MIDI volume event between 0 and 127 to the MIDI output on the MIDI channel of the track.
allows you to adjust the volume level of the track within the overall mix. When the fader is positioned all the way down, it is in the 'Off' position (which it is set to by default). That means that no MIDI volume event is sent when starting playback or when moving the slider. In any other position, the app will send a MIDI volume event between 0 and 127 to the MIDI output on the MIDI channel of the track.
The Page Selector ![]() allows you to move between the different pages of the channel strip. Depending on your device's screen size, more, or fewer, pages will be required to show all of the channel strip functions. Tap on the circles representing the pages to move through them. Alternatively, when on the Mixer Screen or Master and Groups Screen, you can move through the pages of all channel strips displayed simultaneously using the Next
allows you to move between the different pages of the channel strip. Depending on your device's screen size, more, or fewer, pages will be required to show all of the channel strip functions. Tap on the circles representing the pages to move through them. Alternatively, when on the Mixer Screen or Master and Groups Screen, you can move through the pages of all channel strips displayed simultaneously using the Next ![]() button at the top left of those screens.
button at the top left of those screens.
The MIDI Input ![]() button opens the following dialog to allow you to specify the MIDI input options for the selected track. This is where you can select a MIDI input from a connected device (like a USB MIDI keyboard) or the Virtual keyboard.
button opens the following dialog to allow you to specify the MIDI input options for the selected track. This is where you can select a MIDI input from a connected device (like a USB MIDI keyboard) or the Virtual keyboard.

The Octave offset gives you the option to transpose incoming MIDI events by 1 or 2 octaves up or down. This can be useful when you have a small MIDI keyboard without octave buttons.
The Channel filter can be used to record only from a specific MIDI channel. If you for instance have a split area on your MIDI keyboard or have multiple MIDI keyboards attached, you could for example create two tracks, with one having a channel filter for MIDI channel 1 and the other for MIDI channel 2. With both tracks armed, you could record onto separate tracks where MIDI events with channel 1 would be recorded onto one track and MIDI events with channel 2 being recorded on the other track.
The MIDI Output ![]() button opens the MIDI output options seen here.
button opens the MIDI output options seen here.
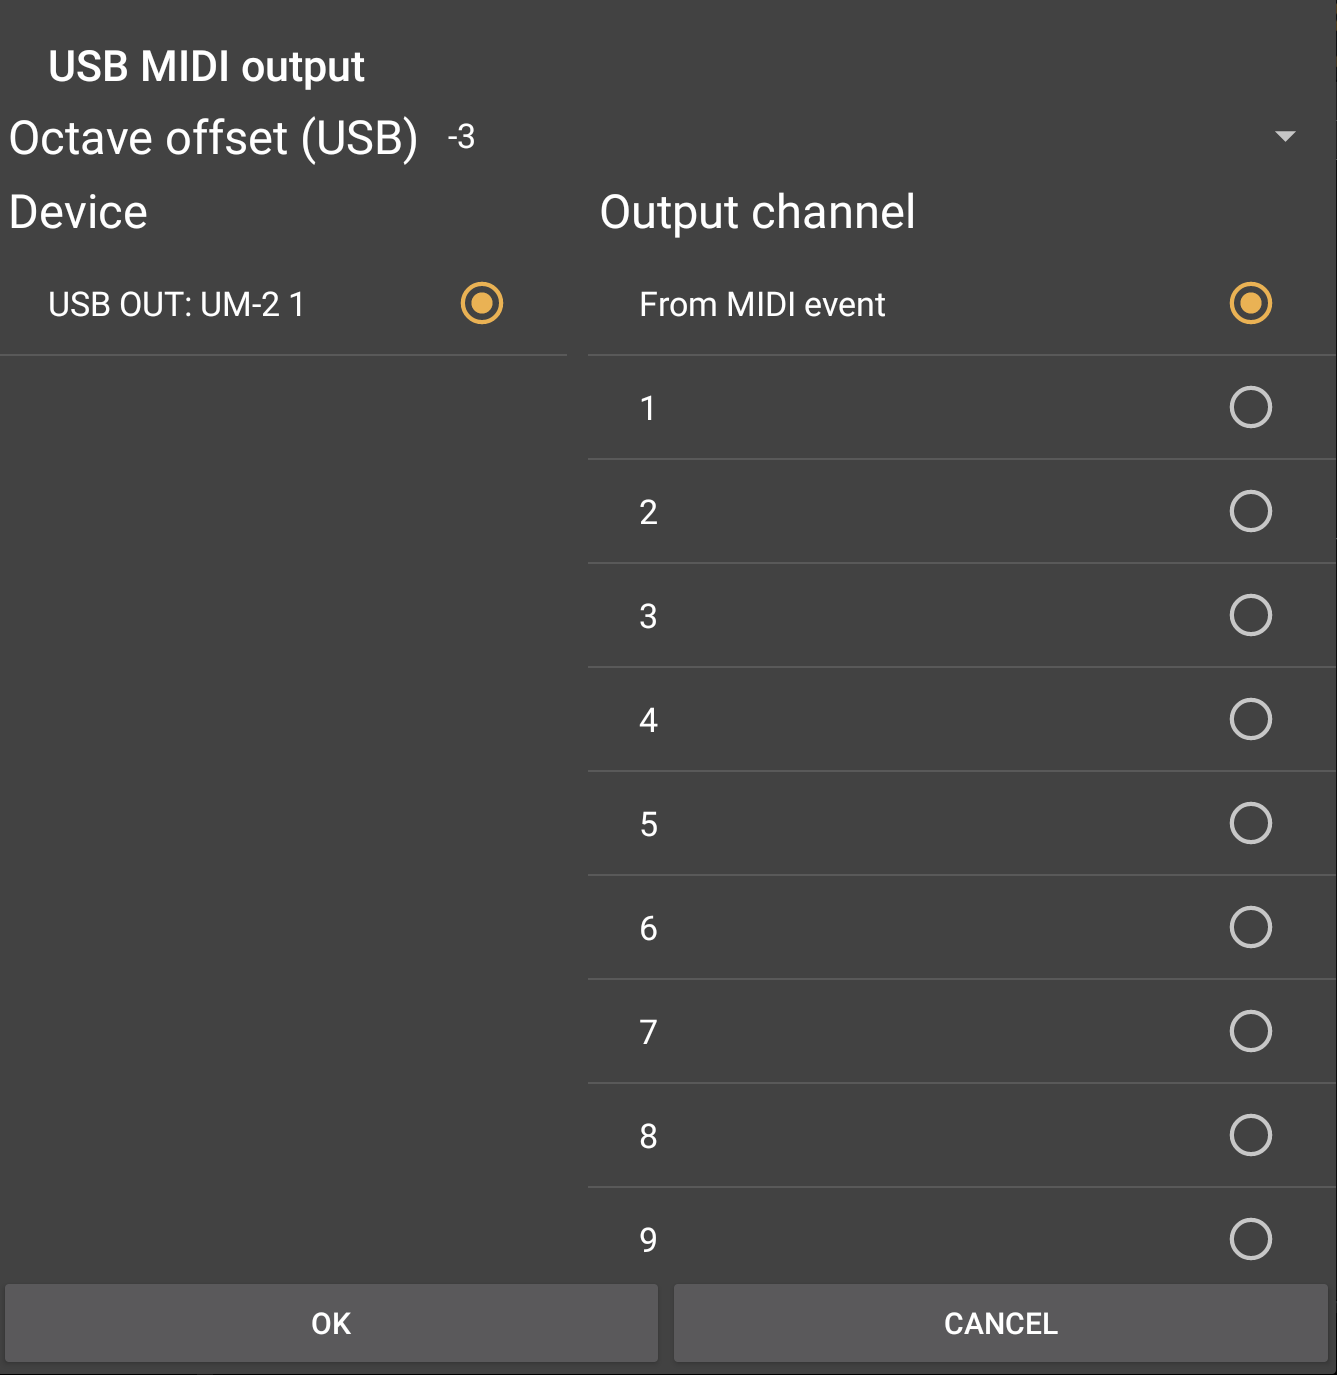
This allows you to select the MIDI output where the MIDI events of this track are sent to. In this example, events are sent to the MIDI output of a USB MIDI interface.
The Output channel can be either be set to 'From MIDI event' where the MIDI events are just sent as they are including their MIDI channel information, or you can choose a MIDI channel to change the MIDI channel of the outgoing events.